
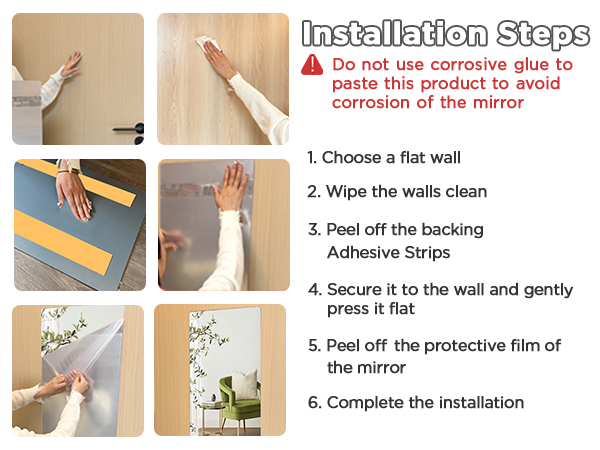
Are you wondering how to glue a mirror to a wall without any hassle or damage? Whether you want to add a stylish touch to your room or save space, hanging a mirror the right way is key.
You might be worried about the mirror falling or leaving marks on your wall. Don’t worry—this guide will walk you through simple, effective steps to securely attach your mirror. Keep reading, and you’ll learn exactly what you need to know to get it done safely and beautifully.
Credit: www.diychatroom.com
Choosing The Right Adhesive
Choosing the right adhesive is key to securely mounting a mirror on a wall. The adhesive must hold the mirror’s weight without damaging the surface. Not all glues work well for glass or wall materials. Selecting the correct glue ensures safety and lasting results.
Types Of Glue Suitable For Mirrors
- Silicone Adhesive:Flexible and water-resistant. Sticks well to glass and walls.
- Construction Adhesive:Strong bond for heavy mirrors. Works on various surfaces.
- Epoxy Glue:Two-part glue with very strong hold. Good for permanent fixing.
- Mirror Mastic:Special adhesive made for mirrors. Prevents damage and holds firmly.
Factors To Consider When Selecting Adhesive
- Weight of the Mirror:Choose glue that supports the mirror’s weight safely.
- Wall Surface:Different adhesives work better on tile, drywall, or wood.
- Drying Time:Some glues set quickly, others take longer. Plan accordingly.
- Moisture Resistance:Bathrooms need water-resistant adhesive to avoid failure.
- Ease of Use:Consider how easy the glue is to apply and clean up.

Credit: crystelmontenegrohome.com
Preparing The Wall And Mirror
Clean the wall and mirror surface to remove dust and grease. Ensure the wall is dry and smooth for better glue adhesion. Use a level to mark where the mirror will hang.
Preparing your wall and mirror is a crucial first step in ensuring a secure and seamless mirror installation. This process not only enhances the adhesive bond but also prevents potential mishaps. A little preparation goes a long way in achieving professional-looking results.Cleaning The Surface
A clean surface is vital for strong adhesion. Dust and grime can weaken the bond, leading to future problems. Use a damp cloth with a mild detergent to wipe down the wall where you’ll mount the mirror. For the mirror’s back, a mix of vinegar and water works wonders. After cleaning, allow both surfaces to dry completely. Moisture can interfere with the glue, compromising its effectiveness.Measuring And Marking Placement
Accurate measurement is your best friend here. It’s easy to assume you’ll get it right by eye, but precision saves you from future frustration. Use a tape measure to determine the exact spot where your mirror will hang. Mark the top and bottom corners lightly with a pencil. Consider the room’s lighting and height for optimal placement. You want the mirror to be functional and aesthetic, reflecting light to brighten the space. Ask yourself, will this mirror complement the room’s design? Will it reflect a desirable view? Careful planning ensures that the mirror not only stays put but also enhances the room’s overall look.Applying The Glue
Applying glue to a mirror requires precision and care. The glue must spread evenly for a strong hold. Uneven glue can cause bubbles or weak spots. Taking time during this step ensures your mirror stays secure on the wall.
Best Techniques For Even Application
Use a high-quality adhesive suitable for mirrors. A clear silicone glue works well. Apply the glue in small dots or thin lines on the mirror’s back. Keep the spacing consistent for uniform coverage.
- Place dots about 3 to 4 inches apart.
- Avoid thick globs that can squeeze out.
- Use a caulking gun for controlled application.
- Work quickly but carefully to prevent drying.
After applying, press the mirror gently against the wall. Hold it steady to spread the glue evenly.
Avoiding Common Mistakes
Never apply too much glue. Excess glue can drip and damage the wall or mirror. Avoid applying glue on the edges only; it reduces strength.
- Do not skip cleaning the mirror’s back before gluing.
- Don’t rush; let the glue set as instructed.
- Avoid touching the glue with your fingers.
- Never use glue not meant for mirrors or glass.
Follow these tips to ensure a clean and strong bond. Proper glue application is key to a lasting mirror installation.
Mounting The Mirror
Mounting a mirror on your wall is more than just sticking it up. It requires careful handling to ensure it stays secure and looks perfect. The way you position and press the mirror, along with the supports you use, can make all the difference between a strong hold and a disaster waiting to happen.
Positioning And Pressing The Mirror
Start by deciding exactly where you want your mirror. Use a level to make sure it will hang straight—no one wants a crooked reflection. Mark the spot lightly with a pencil so you can align the mirror precisely.
When you apply the glue, press the mirror firmly against the wall. Hold it steady for a few minutes to let the adhesive begin bonding. Don’t rush this step; even slight movement can weaken the hold and cause problems later.
Using Supports Or Tape For Stability
While the glue sets, support the mirror to prevent it from slipping. You can use painter’s tape to hold the edges in place without damaging your wall paint. Alternatively, small wooden blocks or brackets can provide extra stability, especially for heavier mirrors.
Think about how long the glue needs to cure—usually 24 hours. Leaving the supports in place during this time ensures your mirror won’t fall off. Have you ever tried to glue a mirror without supports? It’s a gamble you don’t want to take.
Curing And Finishing
The curing and finishing stages are crucial for making sure your mirror stays safely and securely glued to the wall. This phase requires patience and attention to detail, as rushing it can weaken the bond and cause the mirror to fall. Let’s focus on how drying time and conditions affect curing, and how you can check the adhesion strength to feel confident about your work.
Drying Time And Conditions
Adhesives don’t set instantly—most need several hours or even days to fully cure. Check the product label for specific drying times, but keep in mind that temperature and humidity play a big role in how quickly the glue dries.
Higher humidity slows down drying, while a warm, dry environment speeds it up. If you live in a damp area, consider using a dehumidifier or fan near the mirror to help the glue cure properly.
Also, avoid touching or putting any stress on the mirror during this period. You might be tempted to check if it’s secure, but premature handling can weaken the bond.
Checking Adhesion Strength
After the recommended drying time, gently test the mirror’s hold without applying too much force. You can try a light push or tap on the edges to see if it feels firmly attached.
If the mirror moves or wobbles, the glue hasn’t cured enough or wasn’t applied properly. In this case, it’s best to remove the mirror carefully and reapply adhesive, ensuring the wall and mirror surfaces are clean and dry.
Have you noticed any peeling or gaps between the mirror and wall? These are signs of weak adhesion and need to be addressed before adding any weight or decoration on the mirror.

Credit: www.youtube.com
Safety Tips And Precautions
Gluing a mirror to a wall requires careful attention to safety. Glass can break easily and cause injury. Protecting your walls and surroundings is also important to avoid damage. Follow these safety tips and precautions to ensure a smooth and safe installation process.
Handling Glass Safely
- Wear thick gloves to protect your hands from sharp edges.
- Use safety goggles to shield your eyes from glass shards.
- Lift the mirror with both hands to keep it steady and balanced.
- Never rush. Move slowly and carefully to avoid dropping the mirror.
- Place the mirror on a soft surface when not holding it to prevent scratches.
Protecting Walls And Surroundings
- Cover the floor and nearby furniture with a drop cloth or old sheets.
- Clean the wall surface to remove dust and dirt before gluing.
- Use painter’s tape to mark the exact spot for the mirror.
- Apply glue carefully to avoid drips that can damage paint or wallpaper.
- Keep pets and children away from the work area for safety.
Frequently Asked Questions
What Type Of Glue Works Best For Mirrors On Walls?
Silicone-based adhesives or mirror mastic are ideal for gluing mirrors. They provide strong, flexible bonds and prevent damage. Avoid regular glue, as it may not hold the mirror’s weight securely.
How Do You Prepare A Wall For Mirror Gluing?
Clean the wall surface thoroughly to remove dust and grease. Ensure the wall is dry and smooth for better adhesion. Use a level to mark where the mirror will be placed.
Can I Glue A Heavy Mirror Without Support?
For heavy mirrors, use both adhesive and mechanical support like brackets. Glue alone may not safely hold large mirrors. Support prevents accidents and ensures long-term stability.
How Long Does Mirror Glue Take To Dry?
Mirror adhesive usually sets within 24 hours but may fully cure in 48 hours. Avoid moving the mirror during this period for secure bonding.
Conclusion
Gluing a mirror to a wall is simple with the right steps. Use strong adhesive made for mirrors. Clean the wall and mirror surface well before applying glue. Press the mirror firmly and hold it in place. Wait for the glue to dry completely.
This method saves space and adds style to any room. Take your time and be careful for the best results. Enjoy your new mirror safely attached to the wall.


