
Are you ready to make your Christmas tree sparkle like never before? Putting fairy lights on your tree might seem simple, but doing it the right way can transform your whole holiday vibe.
Imagine your tree glowing with perfect, even light that fills your room with warmth and magic. In this guide, you’ll discover easy steps and insider tips to help you wrap those twinkling lights flawlessly around your tree. Keep reading, and you’ll have a dazzling centerpiece that everyone will admire this holiday season.

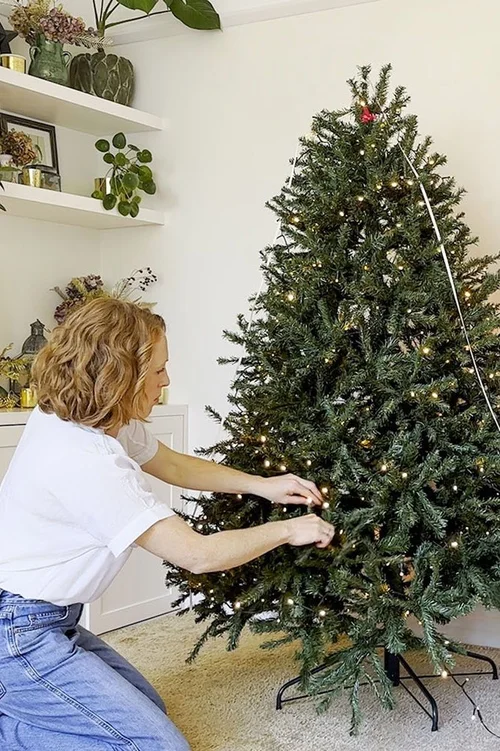
Credit: www.christmastreeworld.co.uk
Choosing The Right Fairy Lights
Choosing the right fairy lights can transform your Christmas tree from ordinary to stunning. The perfect lights highlight the tree’s shape and add a magical glow to your holiday decor. Before you start wrapping lights around your tree, consider the type, color, style, power source, and length of the fairy lights to make sure you get the best effect.
Types Of Fairy Lights
There are several types of fairy lights available, each with its own charm and function. LED lights are energy-efficient and last longer, making them a smart choice for holiday decorating. Incandescent lights offer a warm, classic glow but use more electricity and can get hot.
Battery-operated fairy lights give you the freedom to place them anywhere without worrying about outlets. On the other hand, plug-in lights provide consistent power but limit your placement options. Think about where you want to place your tree and how accessible power sources are.
Selecting Light Color And Style
Choosing the right color can set the mood for your entire room. Warm white lights create a cozy, traditional feel, while cool white or blue lights give a modern, crisp look. Multicolored lights can make your tree playful and vibrant, but can also clash if your ornaments are already colorful.
Consider the size of the bulbs too. Tiny micro lights offer a delicate sparkle, while larger bulbs make a bold statement. Reflect on your existing decor and the vibe you want to create. What feeling do you want your tree to evoke when guests walk in?
Considering Power Source And Length
Measure your tree’s height and width before choosing the length of your fairy lights. Too short, and you’ll have patchy coverage; too long, and you’ll end up with excess wires that look messy. As a rule of thumb, use about 100 lights for every 1.5 feet of tree.
Power sources matter a lot for convenience. If you’re using plug-in lights, check how far the cord can reach the nearest outlet. For battery-operated options, consider how often you’ll need to replace or recharge batteries. Have you checked your tree’s location for easy access to power?
Preparing Your Christmas Tree
Preparing your Christmas tree sets the stage for a magical holiday display. Taking time to arrange it properly helps your fairy lights shine bright. A well-prepared tree looks fuller and stays safe throughout the season.
Positioning The Tree
Place the tree near a power outlet for easy access to lights. Choose a spot away from heaters or open flames. Allow space for people to walk around it comfortably. A visible location enhances the festive atmosphere in your room.
Fluffing Branches For Volume
Start from the bottom and work upward, gently pulling each branch apart. Spread needles evenly to cover gaps and create a full look. Fluffing helps lights wrap around branches better. It also makes ornaments hang naturally without crowding.
Checking Tree Stability
Ensure the tree stand holds the tree upright without wobbling. Tighten screws or fasteners for a secure fit. Place the tree on a flat surface to prevent tipping. Stability keeps your tree and decorations safe during celebrations.
Testing The Lights Before Installation
Test each string of fairy lights to ensure all bulbs work before decorating the tree. This helps avoid dark spots and saves time during setup.
Testing the lights before installation is a crucial step. It ensures your Christmas tree shines bright without any hiccups. Skipping this step might lead to half-lit or non-lit sections. This can disrupt the magical ambiance you aim for during the holiday season. Proper testing saves time and enhances tree lighting.Plugging In And Inspecting
Start by plugging in the string of lights. Look for any dark or flickering bulbs. Ensure the entire length illuminates evenly. Inspect the wire for damage or exposed wires. This step helps identify issues early on. Catching problems now can save frustration later.Replacing Faulty Bulbs
Identify non-working bulbs by their lack of glow. Replace them promptly to maintain the light flow. Keep spare bulbs on hand for quick fixes. Most string lights come with extra bulbs. This ensures uninterrupted beauty once installed.Untangling The Wire
Gently untangle the wire to avoid damage. Start from one end and work towards the other. Use your fingers to separate knots. Avoid pulling forcefully to prevent breaking. A smooth wire makes installation easier and quicker. Keep the wire organized to simplify the process.Starting The Lighting Process
Starting the lighting process on your Christmas tree sets the tone for the entire decoration experience. It’s more than just plugging in strings of lights; it requires planning to ensure even coverage and safety. Taking a moment to prepare will save you frustration and create a beautiful glow that lasts all season.
Plug Placement And Safety
Before you unwrap a single light, consider where your power source will be. Position your tree close to an outlet to avoid long extension cords that could become tripping hazards.
Check the cord and plug for damage. Damaged lights can cause shorts or even fire risks. Use a surge protector to protect your lights and other decorations.
Think about how you will hide the plug without stressing the cord. You want easy access in case you need to turn the lights off quickly. Safety should always come first—never overload your outlets.
Beginning From The Base Or Top
Deciding where to start lighting can change how your tree looks. Starting at the base lets you wrap lights around the bottom branches first, creating a solid foundation of brightness.
Alternatively, beginning at the top offers better control over spacing as you move downward. It can help you avoid bunching lights in one area and leave others dark.
Think about your tree shape and how you want the lights to flow. Are you aiming for a classic spiral effect or a more random twinkle? Your choice affects the ease and final look.
Have you ever struggled with uneven light distribution? Starting at the right point can prevent that common issue and give your tree a balanced shine every time.
Wrapping Fairy Lights Around The Tree
Wrapping fairy lights around your Christmas tree is more than just a task—it’s a chance to make your tree truly shine. How you place those tiny bulbs affects the overall glow and festive mood in your room. Getting it right means balancing brightness with beauty, and the way you wrap can change everything.
Techniques For Even Distribution
Start by testing your fairy lights to ensure they work before hanging. Begin at the base of the trunk, weaving the lights upward in a spiral. Keep the spacing consistent—try to leave about 4 to 6 inches between each wrap.
Don’t just wrap around the outside; tuck some strands deeper into the branches. This adds an inner glow rather than just surface sparkle. Have you noticed how a tree looks more magical when lights peek through the branches instead of just sitting on top?
Layering Lights For Depth
Layer your lights by first wrapping the inner branches close to the trunk, then gradually moving outward. Use multiple strands if needed, placing some higher and some lower on the tree. This layering creates a sense of depth and fullness that flat lighting can’t achieve.
Think about how light plays with shadows in a room—your tree should have that same effect. Adding layers lets you control the brightness and adds dimension. Try stepping back occasionally to see how the layers work from different angles.
Avoiding Overcrowding
It’s tempting to add as many lights as possible, but overcrowding can make your tree look chaotic and reduce the sparkle. Leave some space for ornaments to shine and for the tree’s natural beauty to show through.
If your tree looks too busy or the lights are clumped, pull some strands back and spread them out. Ask yourself, does each branch have room to breathe? Less can definitely be more when it comes to fairy lights on a Christmas tree.

Credit: www.wayfair.com
Securing And Concealing The Lights
Securing and concealing fairy lights enhances the tree’s beauty and ensures safety. Proper attachment prevents lights from slipping or tangling. Well-hidden wires create a seamless, magical glow without distractions.
Using Clips Or Hooks
Clips and hooks hold lights firmly on branches. They prevent the lights from falling off or shifting. Small, clear clips work best as they blend with the tree. Hooks can be gently attached to thicker branches for support. Use clips designed for holiday decorations to avoid damage. Secure each light strand at regular intervals for even spacing.
Hiding Wires Within Branches
Conceal wires by tucking them deep inside the branches. Place wires close to the trunk for better camouflage. Wrap wires around sturdy branches to keep them hidden. Avoid letting wires hang loosely or dangle outside. Tucking wires carefully keeps the tree looking natural and tidy. This technique also reduces tripping hazards and protects wires from pets or children.
Final Touches And Troubleshooting
After wrapping fairy lights around your Christmas tree, small adjustments can make a big difference. This stage focuses on perfecting the look and ensuring everything works safely. Troubleshooting common issues helps avoid frustration and keeps your tree glowing beautifully.
Adjusting Light Placement
Step back and look at your tree from different angles. Move lights closer to the trunk for a warm glow inside the branches. Spread lights evenly on the outer tips for a bright sparkle. Avoid bunching lights in one spot to prevent dark areas. Tuck in loose wires for a neat appearance.
Checking For Safety Hazards
Inspect all light strands for damaged wires or broken bulbs. Replace any faulty parts before turning the lights on. Keep plugs and sockets dry and away from water sources. Use lights rated for indoor use to reduce fire risk. Never leave the lights on unattended for long periods.
Enhancing With Additional Decorations
Add ornaments, ribbons, or garlands after fixing the lights. Place decorations in spots where lights highlight them best. Use reflective decorations to bounce the light and add sparkle. Choose lightweight decorations to avoid pulling on the lights. Balance colors and sizes for an attractive finish.

Credit: food52.com
Frequently Asked Questions
How Do You Start Putting Fairy Lights On A Christmas Tree?
Begin by testing the lights for any issues. Then, plug them in and start wrapping from the tree trunk outward, ensuring even coverage.
Should Fairy Lights Be Wrapped Inside Or Outside The Tree Branches?
Wrap lights both inside and outside the branches for depth. This creates a balanced glow and enhances the tree’s overall sparkle.
How Many Fairy Light Strands Do I Need For My Tree?
Calculate about 100 lights per foot of tree height. Adjust based on light brightness and desired intensity for optimal decoration.
Can I Use Fairy Lights On Real And Artificial Christmas Trees?
Yes, fairy lights are suitable for both real and artificial trees. Ensure the lights are rated safe for indoor use.
Conclusion
Fairy lights bring magic to any Christmas tree. Start from the bottom and wrap lights evenly around branches. Check for any dark spots and adjust as needed. Keep the plug near the tree base for easy access. Simple steps make decorating fun and stress-free.
Your tree will shine bright and cozy all season. Enjoy the warm, festive glow with family and friends.


