
Are you ready to transform your space quickly and easily? Applying vinyl stickers to a wall can give your room a fresh, personalized look without any hassle.
But if you’ve never done it before, it might feel tricky. Don’t worry—this guide will walk you through every step, so your stickers stick perfectly and look amazing. Keep reading, and you’ll learn simple tips that save you time, avoid bubbles, and make your walls stand out just the way you want.
Choosing The Right Vinyl Sticker
Choosing the right vinyl sticker is important for a smooth and lasting wall decoration. The right sticker complements the room’s style and fits the wall space perfectly. It also sticks well and stays vibrant over time. This section helps you pick the best vinyl sticker for your wall.
Types Of Vinyl Stickers
Vinyl stickers come in different types. Each type suits different walls and uses. Here are common types:
- Glossy stickers:Shiny finish, bright colors, easy to clean.
- Matte stickers:No shine, soft look, hides fingerprints well.
- Clear stickers:Transparent background, blends with wall color.
- Textured stickers:Add depth, feel rough or smooth.
- Removable stickers:Easy to peel off without damage.
- Permanent stickers:Strong adhesive, made for long-term use.
Selecting The Perfect Design
Choose a design that matches your room’s theme. Simple designs work well in small spaces. Bold patterns fit larger walls. Think about colors that match your furniture. Avoid designs that clash or look too busy. Nature, quotes, and geometric shapes are popular choices. Pick one that makes you feel happy and calm.
Sizing Your Sticker
Measure the wall space before buying a sticker. Too big can overwhelm the room. Too small might look lost on the wall. Use a tape measure or ruler for accuracy. Consider the sticker’s shape and how it fits with other decor. Place the sticker where it will be seen clearly. Proper size makes the sticker stand out nicely.

Credit: www.walldecorplusmore.com
Preparing Your Wall Surface
Preparing your wall surface is a crucial step before applying vinyl stickers. A well-prepared wall ensures the sticker sticks properly and lasts longer without peeling or bubbling. Taking time to get the surface right can save you from frustration and the need for reapplication.
Cleaning The Wall
Start by removing dust, dirt, and grease from your wall. Use a mild soap solution and a soft cloth to wipe the area where you plan to place the sticker. Avoid harsh chemicals as they might leave residues that affect adhesion.
After cleaning, rinse the wall with plain water and dry it thoroughly. Have you noticed how a tiny speck of dust can cause bubbles under your sticker? That’s why this step matters more than you might think.
Smoothing Out Imperfections
Check your wall for any bumps, cracks, or peeling paint. These imperfections can create air pockets under the vinyl sticker. Use fine-grit sandpaper to gently smooth rough spots and fill cracks with spackling paste if needed.
Once patched, let the filler dry completely and sand again for a smooth finish. A flat, even surface helps your sticker lay down perfectly without wrinkles or gaps.
Ensuring A Dry Surface
Moisture on the wall can ruin your vinyl sticker’s adhesive power. Make sure the surface is completely dry before application. If you just cleaned or patched the wall, wait several hours or even overnight for it to dry fully.
Humidity in the air can also affect drying time, so consider the weather and room conditions. Have you ever applied a sticker that started peeling within days? Moisture might have been the hidden culprit.
Gathering Tools And Materials
Gather all necessary items like vinyl stickers, a squeegee or credit card, a measuring tape, and a clean cloth. Having these ready helps the process go smoothly and ensures the stickers stick well to the wall.
Gathering the right tools and materials is crucial before applying vinyl stickers. Proper preparation ensures a smooth and efficient application process. A well-prepared workspace makes the task easy and enjoyable. Below, we break down the essential tools and optional accessories you may need.Essential Tools
To apply vinyl stickers, gather these essential tools:- Cleaning Cloth:Use a lint-free cloth to clean the wall.
- Rubbing Alcohol:Helps remove dirt and grease.
- Measuring Tape:Ensures correct placement.
- Level:Keeps the sticker straight.
- Squeegee or Credit Card:Smooths out air bubbles.
Optional Accessories
Consider these optional accessories for a smoother experience:- Painter’s Tape:Temporarily holds the sticker in place.
- Scissors or Craft Knife:Trims excess material.
- Hair Dryer:Loosens stubborn bubbles.
Positioning The Sticker
Positioning the vinyl sticker on your wall is a key step. It ensures the design looks perfect and fits the space well. Careful placement helps avoid mistakes that can waste time and materials. Take your time to align the sticker just right before sticking it down.
Planning The Layout
Start by measuring the wall area where the sticker will go. Use a pencil to mark light guidelines on the wall. These marks will help center the sticker and keep it straight. Visualize how the sticker fits with other wall elements like furniture or frames. Adjust the placement to balance the overall look.
Consider the height and width of the sticker. Make sure it is not too high or low for easy viewing. Check that the sticker does not cover important wall features like switches or outlets.
Using Tape For Placement
Use painter’s tape or masking tape to hold the sticker temporarily on the wall. Tape the top edge first, then step back and check the alignment. Adjust the sticker’s position by moving the taped edge until it looks right.
Once happy with the position, tape the other edges to keep the sticker flat. This method keeps the sticker secure and prevents it from falling during application. It also allows you to peel off the backing slowly and stick the design smoothly.
Applying The Vinyl Sticker
Applying a vinyl sticker to a wall needs patience and precision. This process ensures the sticker looks smooth and lasts long. Taking small careful steps avoids mistakes and wrinkles.
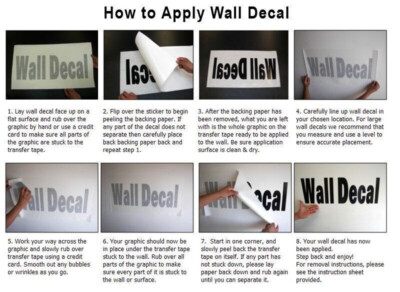
Peeling The Backing
Start by lifting one corner of the vinyl sticker. Peel the backing paper slowly and steadily. Avoid touching the adhesive side with your fingers. Keep the sticker close to the wall as you peel. This prevents it from folding or sticking to itself.
Applying With Care
Place the exposed edge of the sticker on the wall gently. Hold the sticker taut but do not stretch it. Gradually press the sticker onto the surface. Work from one side to the other to avoid misalignment. Use light pressure at first to adjust placement if needed.
Smoothing Out Air Bubbles
Use a soft cloth or a squeegee to smooth the sticker. Start from the center and push air bubbles outward. Apply steady pressure to remove trapped air. Check edges for any lifted parts and press them down firmly. This step ensures a clean, flat finish.

Credit: www.flipkart.com
Finishing Touches
After placing your vinyl sticker on the wall, the final steps ensure it looks perfect and stays put. These finishing touches make a big difference in how your sticker appears and lasts over time. Take your time here for the best results.
Removing Transfer Tape
Gently peel off the transfer tape at a sharp angle. Pull slowly to avoid lifting the sticker from the wall. If any part of the sticker lifts, press it back down and smooth it again. Use a soft cloth or squeegee to help keep the sticker flat while removing the tape.
Checking For Edges
Look closely at the edges of the sticker. Press down any corners or edges that may have curled up. Use your fingers or a soft tool to smooth the edges firmly against the wall. This prevents peeling and ensures the sticker stays secure.
Cleaning Up
Remove any leftover residue or dust around the sticker. Use a damp cloth to gently wipe the wall near the sticker. Avoid using strong cleaners that can damage the vinyl. A soft touch keeps your sticker and wall looking clean and fresh.
Tips For Long-lasting Adhesion
To ensure your vinyl stickers stay put and look fresh on your walls, focusing on long-lasting adhesion is key. Small habits and thoughtful care can make a big difference in how well your stickers stick over time. Let’s dive into some tips that will help you maintain that perfect look without the frustration of peeling edges or fading colors.
Avoiding Moisture
Moisture is one of the biggest enemies of vinyl sticker adhesion. If your wall is damp or prone to humidity, the sticker may lift or bubble quickly.
Always make sure the wall is completely dry before applying the sticker. This means no recent cleaning or exposure to steam in the area.
If you’re decorating a bathroom or kitchen, consider using a moisture-resistant sealant on the wall first. This extra step keeps water from sneaking behind your sticker and ruining the bond.
Handling Temperature Changes
Temperature fluctuations can cause vinyl stickers to expand and contract, weakening their grip. Have you noticed stickers peeling in rooms with big temperature swings?
Try to apply stickers in a room with stable, moderate temperatures. Avoid placing them near heating vents, fireplaces, or drafty windows.
If your room gets cold at night but warm during the day, give your sticker some time to settle and bond before exposing it to drastic changes.
Regular Maintenance
Keeping your vinyl stickers clean helps maintain their stickiness and appearance. Dust and dirt can build up on the edges and make peeling more likely.
Use a soft, dry cloth or a slightly damp microfiber cloth to gently wipe your stickers. Avoid harsh chemicals or abrasive materials that could damage the vinyl.
Check your stickers regularly for signs of lifting or damage. Catching small problems early lets you press the edges back down or replace the sticker before it gets worse.

Credit: www.stickeryou.com
Frequently Asked Questions
How Do I Prepare The Wall For Vinyl Stickers?
Clean the wall with mild soap and water. Ensure the surface is smooth, dry, and free of dust or grease. Avoid textured or rough walls for best results.
Can Vinyl Stickers Damage My Wall Paint?
Vinyl stickers typically do not damage paint if applied correctly. Remove slowly and gently to prevent paint peeling or residue. Test on a small area first.
What Tools Do I Need To Apply Vinyl Stickers?
You need a clean cloth, a squeegee or credit card, masking tape, and a level. These tools help apply stickers smoothly and accurately.
How Long Should I Wait Before Touching Applied Stickers?
Wait at least 24 hours after application. This allows the adhesive to bond firmly with the wall surface for long-lasting results.
Conclusion
Applying vinyl stickers to a wall is simple with the right steps. Clean the surface well and measure carefully. Peel the backing slowly and press the sticker firmly. Smooth out any air bubbles as you go. Take your time and work gently for best results.
Vinyl stickers add style and personality to any room. Try different designs and have fun decorating your space. Small efforts bring big changes to your walls. Enjoy your new look and the easy process.


