
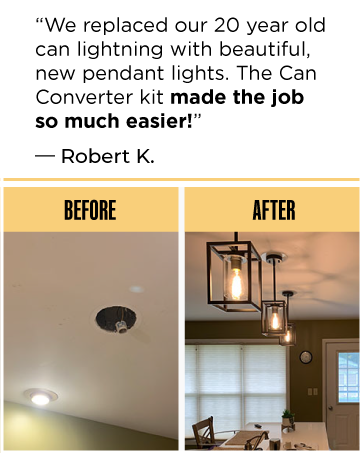
Are you tired of plain recessed lighting and ready to add a stylish touch to your space? Changing recessed lighting to pendant lights can completely transform the look and feel of your room.
Imagine warm, inviting light hanging just where you want it, creating a cozy atmosphere that draws people in. If you’ve ever wondered how to make this switch yourself, you’re in the right place. In this guide, you’ll discover simple steps to upgrade your lighting without the hassle.
Keep reading, and you’ll soon have the skills to brighten your home with beautiful pendant lights that match your style perfectly.
Tools And Materials Needed
Changing recessed lighting to pendant lights can transform the look and feel of your space instantly. Before you start, gather all the right tools and materials. This preparation saves time and prevents frustration during the project.
Essential Tools For The Job
You’ll need a few basic tools to make the switch safely and efficiently. A voltage tester is critical to ensure the power is off before you touch any wires.
- Voltage tester:To check for live wires and avoid shocks.
- Screwdrivers:Both flathead and Phillips for removing fixtures and securing new ones.
- Wire strippers:To strip insulation cleanly without damaging wires.
- Pliers:Needle-nose pliers help twist wires together neatly.
- Drill:For making new holes if needed to mount the pendant.
Materials Needed For Pendant Installation
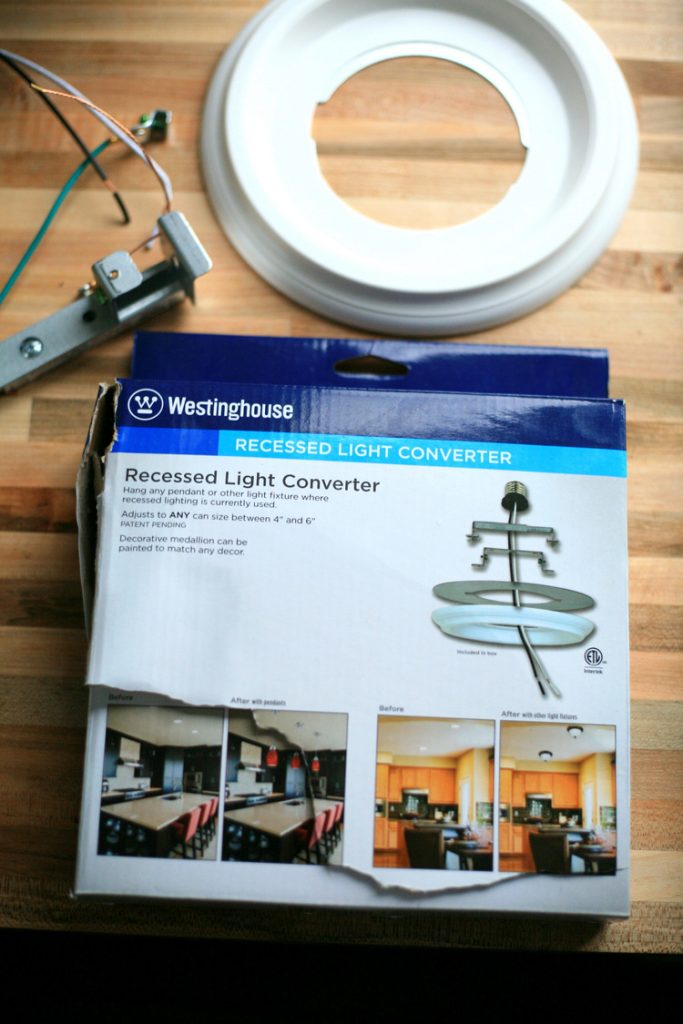
Besides tools, you’ll require specific materials tailored to pendant lighting. The mounting bracket and canopy usually come with the pendant kit, but check to be sure.
- Pendant light kit:Includes the fixture, canopy, and mounting hardware.
- Wire nuts:For connecting wires securely and safely.
- Electrical tape:To wrap wire nuts for extra safety.
- Mounting bracket:Needed if your recessed housing doesn’t support pendant fixtures.
- Extension cord or wire:Sometimes the existing wiring is too short; having extra wire helps.
Safety Gear And Extra Supplies
Don’t forget safety gear—it protects you and keeps the project on track. Wearing gloves can prevent cuts and handling wires more comfortably.
- Insulated gloves:Protect your hands from sharp edges and electrical hazards.
- Safety goggles:Keep debris and dust out of your eyes, especially when drilling.
- Ladder or step stool:To reach your ceiling comfortably and safely.
Have you ever started a home project only to realize you were missing a crucial tool? Avoid that by double-checking your kit before you begin. What tools do you already have on hand that might surprise you in this project?
Safety Precautions
Changing recessed lighting to pendant fixtures can transform your space dramatically, but safety must come first. Electrical work involves risks that you cannot overlook. Taking the right precautions protects both you and your home.
Turn Off The Power At The Breaker
Never start any electrical project without cutting the power supply. Simply switching off the light won’t do. Go to your breaker box and turn off the specific circuit that controls the lighting you’re working on.
Use a voltage tester to double-check that no electricity is flowing. This small extra step saved me from a nasty shock once—it’s worth the effort.
Use The Right Tools And Equipment
Using proper tools makes your job safer and easier. Insulated screwdrivers, wire strippers, and voltage testers are essential. Avoid makeshift tools that could slip or damage wiring.
Keep a sturdy ladder nearby to reach the ceiling comfortably. Your balance matters just as much as your electrical knowledge.
Follow Local Electrical Codes
Electrical codes exist for a reason—they ensure installations are safe and reliable. Check your local regulations before making any changes. You might need a permit or inspection, depending on your area.
Ignoring codes can lead to dangerous wiring or fines. Does your local authority have clear guidelines online? This simple check can save you headaches later.
Secure Connections Properly
Loose or improper wiring connections cause shorts and fires. Twist wires tightly together and use wire nuts designed for your wire size. Never skip this step, even if it seems tedious.
When I first tried changing a light fixture, I underestimated how critical tight connections are. A quick double-check prevented a potential hazard in my home.
Know When To Call A Professional
If you feel unsure at any point, don’t hesitate to hire an electrician. Complex wiring, unusual setups, or older homes often require expert attention.
Remember, the cost of a professional can be less than the damage from a mistake. Have you considered your comfort level with electrical work honestly?
Turn Off Power
Cut off the power at the main switch to ensure safety before starting any electrical work. This prevents shocks while changing recessed lighting to pendant fixtures. Always double-check that the power is off using a tester before proceeding.
Before changing recessed lighting to pendant, safety is crucial. The first step is turning off the power. This ensures your safety and prevents electrical accidents. It’s essential to be cautious during the entire process.Locate The Circuit Breaker
Find your home’s circuit breaker panel. It’s usually in the basement, garage, or utility room. Look for the switch that controls the electricity in the room where you’re working.Switch Off The Correct Breaker
Turn off the correct circuit breaker. The breaker should be labeled with the room name or number. This stops electricity from flowing to the light fixture.Verify The Power Is Off
Test the light switch to ensure the power is off. Flip the switch and see if the light turns on. If it stays off, the power is off. You can also use a voltage tester for confirmation.Double-check For Safety
Before proceeding, double-check everything. Make sure no power is reaching the light fixture. This step guarantees your safety while changing the fixture.Remove Recessed Lighting Fixture
Removing a recessed lighting fixture is the first step to updating your lighting setup to stylish pendant lights. It’s a straightforward task, but it requires care to avoid damaging your ceiling or electrical system. Understanding how to safely and effectively take out the old fixture sets you up for a smooth installation of your new pendants.
Turn Off Power At The Circuit Breaker
Before touching anything, ensure the power is completely off. Switch off the circuit breaker that controls the recessed light to prevent any electrical accidents. Double-check by flipping the light switch to confirm the light no longer turns on.
Remove The Trim And Bulb
Start by gently pulling out the trim—the decorative part that sits flush with the ceiling. Some trims twist off, while others simply pull down with a bit of pressure. Then, carefully unscrew the bulb to clear the way for the fixture removal.
Disconnect The Fixture From The Ceiling
Look inside the housing for clips or screws holding the recessed fixture in place. These usually need to be pressed or unscrewed to release the fixture. Be ready to support the fixture as you detach it so it doesn’t fall suddenly.
Unwire The Fixture Safely
Once the fixture is loose, pull it down enough to access the wiring. You’ll find wire nuts connecting the fixture wires to your home’s electrical wiring. Unscrew these nuts carefully, keeping track of how the wires are connected for future reference.
Remove The Housing If Necessary
Some recessed lights have an outer housing that fits into the ceiling. If your new pendant requires a different setup, this housing might need to be taken out. Check if it’s nailed or screwed in place and remove it carefully without damaging the drywall.
Prepare Electrical Box For Pendant
Preparing the electrical box is key before installing a pendant light. This step ensures safety and a secure fit. The existing recessed lighting box often needs changes to support the weight and style of a pendant fixture.
First, confirm the electrical box is rated to hold a pendant light. Pendant fixtures can be heavier than recessed lights, so a strong box is crucial. A metal box or a fan-rated box usually works well.
Next, turn off the power at the circuit breaker. Never work on live wires. Use a voltage tester to double-check the power is off before touching wires.
Remove The Recessed Light Fixture
Unscrew the trim and remove the bulb from the recessed light. Carefully detach the fixture from the ceiling. Pull the fixture down gently to expose the wiring and box.
Check And Upgrade The Electrical Box
Look inside the box to assess its condition. If it is plastic or not strong enough, replace it with a metal box. The new box must fit the ceiling hole and support the pendant’s weight.
Secure The New Electrical Box
Attach the new box to a ceiling joist or use a brace bar designed for ceiling fixtures. Ensure the box is tight and stable. This prevents any movement after the pendant is installed.
Prepare The Wiring For The Pendant
Strip the ends of the wires to the proper length, usually about ¾ inch. Organize the wires: black (hot), white (neutral), and green or bare (ground). Make sure wires are straight and ready for connection.
Install A Support Hook Or Mounting Bracket
Install the hook or bracket that comes with the pendant. This supports the fixture’s weight and keeps it secure. Attach the bracket firmly to the electrical box.

Credit: www.xhlux.com
Install Pendant Mounting Bracket
Installing the pendant mounting bracket is a key step to change recessed lighting to pendant lighting. This bracket supports the weight of your new fixture. It also ensures the pendant hangs straight and securely. Proper installation keeps your lighting safe and stable.
First, turn off the power at the circuit breaker. Safety is very important when working with electrical fixtures. Remove the recessed light trim and bulb carefully. Then, take out the recessed light housing if possible, to make room for the new bracket.
Choose The Right Mounting Bracket
Select a mounting bracket that fits your electrical box and pendant light. Most pendant fixtures come with a compatible bracket. Check the size and shape to match your setup. Using the correct bracket prevents installation problems later.
Attach The Bracket To The Electrical Box
Align the bracket holes with the electrical box screw holes. Use screws to secure the bracket firmly in place. Tighten the screws enough to hold the bracket steady. Avoid over-tightening, which can damage the box or bracket.
Check The Bracket Level And Stability
Use a level tool to check if the bracket is even. Adjust the bracket if it tilts or hangs unevenly. Press gently to confirm it feels stable and strong. A solid bracket prevents your pendant from wobbling or falling.
Prepare Wiring For Pendant Installation
- Pull the electrical wires through the bracket’s center hole.
- Strip about half an inch of insulation from each wire end.
- Keep wires straight and untangled for easier connection.
- Make sure the wires are long enough to reach the pendant fixture.
Following these steps carefully sets a strong foundation for your new pendant light. The mounting bracket holds everything safely and neatly. This step helps make the rest of the installation smooth and secure.
Connect Wiring
Connecting wiring is a vital step when changing recessed lighting to pendant lighting. Proper connections ensure safety and functionality. Handle all electrical wiring with care to avoid risks.
Turn off the power at the circuit breaker before touching any wires. Use a voltage tester to confirm no electricity flows through the wires. This prevents shocks and accidents.
Identify Existing Wires
Locate the black (hot), white (neutral), and green or bare copper (ground) wires. These wires supply power to your light fixture. Label each wire with tape to avoid confusion later.
Prepare Pendant Wiring
Check the pendant light’s wiring colors. Match them with the existing house wires. Usually, black connects to black, white to white, and green or copper to ground.
Make Secure Wire Connections
- Strip about ¾ inch of insulation from each wire end.
- Twist matching wires tightly together.
- Use wire nuts to cover and secure the twisted wires.
- Give each connection a gentle tug to confirm tightness.
Connect The Ground Wire
Attach the pendant’s ground wire to the house ground wire. If the junction box has a grounding screw, wrap the wire around it tightly. Grounding ensures electrical safety.
Double-check Connections
- Verify each wire is connected to its counterpart.
- Ensure no bare wire is exposed outside wire nuts.
- Confirm that all wire nuts are tight and secure.
After wiring is complete, carefully tuck wires into the junction box. Attach the pendant fixture base to the box. Restore power and test the new pendant light for proper operation.
Credit: www.amazon.com
Attach Pendant Light
Attaching a pendant light is a key step in transforming your recessed lighting into a stylish feature. It’s where the project starts to feel real and your space begins to reflect your personal style. Getting this right ensures safety and a polished look that lasts.
Prepare The Electrical Box
First, check the electrical box where your recessed light was. It needs to be sturdy enough to hold the weight of the pendant light. If it’s loose or damaged, replace it with a ceiling box designed for fixtures.
Make sure the power is turned off at the breaker to avoid any shocks. Testing with a voltage tester is a smart move to confirm the wires are dead.
Connect The Wires Correctly
Matching the wires from your pendant to the wires in the ceiling is crucial. Usually, black wires connect to black (hot), white to white (neutral), and green or copper wires to ground.
Use wire nuts to secure the connections tightly. Loose connections can cause flickering or even a fire hazard.
Attach The Mounting Bracket
Your pendant light will come with a mounting bracket. Attach this bracket firmly to the electrical box using screws. This bracket is what holds the fixture in place, so don’t rush this step.
If the pendant has adjustable height, set it roughly now, knowing you can fine-tune it later.
Secure The Pendant Light
After wiring and mounting, attach the pendant fixture to the bracket. This often involves aligning screws or hooks with the fixture’s base.
Make sure it’s level and secure before moving on. A wobbly pendant not only looks bad but can be dangerous.
Test The Light And Adjust Height
Turn the power back on and test your new pendant light. Does it illuminate properly? If not, re-check your connections.
Now is the time to adjust the pendant’s height for the best look and function. You want enough clearance for heads but also a cozy, inviting glow.
Adjust Pendant Height
Adjusting the pendant height is a key step in transforming your recessed lighting into a stylish pendant fixture. The right height can enhance the room’s ambiance and functionality, while a poorly set height might ruin the look and feel of your space.
Think about how you use the area where the pendant will hang. Is it above a dining table, kitchen island, or an open space? The ideal height changes depending on the function and size of the area.
Measure The Ceiling Height And Pendant Length
Start by measuring your ceiling height to understand the maximum length your pendant can hang. Then, measure the pendant itself, including its cord or chain length.
This information helps you decide how much to shorten or lengthen the pendant to fit your space perfectly.
Determine The Ideal Hanging Height
For dining areas or kitchen islands, keep the bottom of the pendant about 28 to 34 inches above the surface. In open rooms, aim for at least 7 feet from the floor to the bottom of the pendant to avoid head bumps.
Adjust based on personal preference and room layout. Are you taller or shorter than average? Would you prefer the light closer or more diffused?
Adjust The Cord Or Chain Length
Most pendants allow you to shorten or lengthen the cord or chain. To shorten, remove the excess cord and secure the wires properly. For longer cords, check if the manufacturer offers extension kits.
Make sure the fixture hangs straight and the cord is not twisted or pinched. A stable pendant height improves both safety and aesthetics.
Test The Lighting Effect At Different Heights
Turn on your pendant light at the chosen height and observe the effect. Does it provide enough illumination? Is it casting shadows where you don’t want them?
Try adjusting the height slightly up or down until you find the most flattering and functional position.
Secure The Pendant Fixture Properly
Once the height is set, firmly tighten all screws and clamps to keep the pendant stable. A wobbly fixture can be distracting and unsafe.
Check the weight rating of your ceiling box to ensure it supports the new pendant light securely.
Restore Power And Test
Turn the power back on carefully after installing your pendant light. Test the fixture to ensure it works properly and safely. Check for any flickering or issues before finishing.
Restoring power and testing your new pendant lights is a crucial step in ensuring your lighting project is a success. It’s the moment of truth where your efforts either shine brightly or flicker out. But don’t worry—testing is straightforward and can be a fun part of the process. Here’s how to do it effectively.Restore Power Safely
First, head back to your circuit breaker or fuse box. Flip the switch that corresponds to your lighting circuit back to the ‘on’ position. It’s important to proceed cautiously and ensure that everything is secure before restoring power.Test The Pendant Lights
Once the power is restored, turn on the light switch for your newly installed pendant lights. Check if the lights illuminate as expected. If they do, you’ve successfully completed the installation.Troubleshoot If Necessary
If the lights don’t turn on, don’t panic. Double-check the connections to ensure they are secure. Also, verify if the bulbs are properly screwed in and functioning.Seek Professional Help If Needed
Sometimes, despite best efforts, things might not work as planned. If you can’t identify the issue, it may be time to call in a professional. An electrician can quickly diagnose and fix the problem, bringing peace of mind. Remember, seeing your pendant lights glow for the first time can be incredibly satisfying. Have you ever had a project where everything just clicked into place? That sense of achievement is within reach!Troubleshooting Tips
Changing recessed lighting to pendant lights can bring a fresh look. Sometimes, problems appear during or after installation. Troubleshooting helps fix these issues quickly. Keep these tips handy to solve common challenges.
Check The Electrical Connections
Loose or wrong wiring can stop pendant lights from working. Turn off power before inspecting wires. Make sure all connections are tight and secure. Use wire nuts to cover exposed wires. Match wire colors correctly: black to black, white to white, and green or copper to ground.
Ensure The Junction Box Supports Pendant Lights
Recessed fixtures often use small junction boxes. Pendant lights need strong support to hold their weight. Verify the box is rated for pendant fixtures. Replace it with a heavy-duty box if needed. This prevents sagging or falling.
Confirm The Dimmer Switch Compatibility
Not all dimmer switches work with pendant bulbs. Check if the dimmer matches the bulb type. LED-compatible dimmers are common for energy-saving bulbs. Incompatible dimmers cause flickering or buzzing. Change the dimmer if these issues occur.
Adjust Pendant Height Properly
Wrong pendant height can cause glare or poor lighting. Measure the distance from the ceiling to the pendant. A good rule: 28 to 34 inches above a table or counter. Adjust the cord or chain length for the right fit.
Test The Bulbs
Sometimes, new bulbs are faulty. Test bulbs in another fixture to confirm. Use the right wattage and type for your pendant. Avoid bulbs that exceed the fixture’s limit. This keeps the light safe and bright.

Credit: www.amazon.com
Frequently Asked Questions
How Do I Replace Recessed Lighting With Pendant Lights?
Turn off power, remove recessed fixtures, and install pendant mounting brackets. Connect wiring to the pendant light and secure it in place. Ensure proper height and support for the pendant.
What Tools Are Needed To Change Recessed To Pendant Lighting?
You’ll need a voltage tester, screwdriver, wire stripper, pliers, electrical tape, and a ladder. These tools help safely remove old fixtures and install new pendant lights.
Can I Convert Recessed Lighting To Pendant Without Rewiring?
Often yes, if existing wiring supports pendant fixtures. Check the electrical box and wiring length. If incompatible, you may need to extend wiring or hire an electrician.
How High Should Pendant Lights Hang From The Ceiling?
Pendant lights typically hang 28-34 inches above countertops or tables. Adjust height based on room size and lighting needs for optimal illumination and aesthetics.
Conclusion
Changing recessed lighting to pendant lights can brighten your room’s style. It adds charm and focus to your space. Make sure to turn off power before starting work. Choose pendant lights that match your decor and needs. Take your time with wiring and installation for safety.
This simple update can refresh any room easily. Enjoy the new look and cozy atmosphere created. Small changes often bring big improvements in lighting.


