
Are you looking to make your home smarter and more energy-efficient? Connecting a motion sensor to your light is a simple way to do just that.
Imagine never having to fumble for a switch in the dark again—your light turns on automatically when you enter a room and off when you leave. It saves energy, adds convenience, and even boosts your home’s security. In this guide, you’ll learn exactly how to connect a motion sensor to your light step-by-step.
By the end, you’ll have the confidence to upgrade your lighting setup quickly and safely. Keep reading to discover how easy it can be!

Credit: www.youtube.com
Choosing The Right Motion Sensor
Choosing the right motion sensor is key to a smooth setup and reliable performance. The sensor must fit the specific needs of your lighting system and your space. Picking the wrong one can cause false triggers or no response at all.
Understanding the different types of sensors, their compatibility with your lights, and power needs helps you make the best choice. This section breaks down these important factors.
Types Of Motion Sensors
Motion sensors detect movement using various technologies. The most common types are:
- Passive Infrared (PIR):Detects heat changes from moving objects. Ideal for indoor use.
- Ultrasonic:Uses sound waves to sense motion. Works well in complex areas.
- Microwave:Emits microwaves and measures reflection changes. Covers larger areas but may be sensitive to outside movement.
- Dual-technology:Combines PIR and microwave for better accuracy. Reduces false alarms.
Sensor Compatibility With Lights
Not all motion sensors work with every type of light. Check if the sensor supports your lighting system. Common light types include LED, incandescent, and fluorescent.
Look for sensors designed for your light’s voltage and wattage. Some sensors only work with low-voltage lights. Others handle high power loads.
Also, consider if the sensor can control multiple lights or just one. This affects how you set up the system.
Power Requirements
Motion sensors need power to operate. Some sensors plug directly into an outlet. Others connect through the light’s wiring.
Battery-powered sensors offer easy installation but need regular battery changes. Hardwired sensors require professional installation but provide constant power.
Check the sensor’s voltage and current ratings. Match them with your electrical system for safety and efficiency.

Credit: www.amazon.com
Tools And Materials Needed
To connect a motion sensor to a light, gather all necessary tools and materials first. Having the right items on hand makes the process smoother and safer. Below is a detailed list of what you will need to complete this task effectively.
Essential Tools
- Screwdriver (flathead and Phillips)
- Wire stripper
- Voltage tester
- Electric drill (optional for mounting)
- Pliers
- Measuring tape
- Wire nuts or connectors
Required Materials
- Motion sensor light fixture
- Electrical wire (appropriate gauge)
- Electrical tape
- Mounting brackets or screws (usually included with the sensor)
- Power source or existing light fixture wiring
Safety Gear
- Insulated gloves to prevent electric shocks
- Safety goggles to protect eyes from debris
- Non-slip shoes for stable footing
- Flashlight for working in dark areas
Preparing For Installation
Gather all necessary tools and turn off the power supply before starting the installation. Clear the workspace to ensure safety and easy access to wiring connections.
Preparing for installation is a crucial step when connecting a motion sensor to a light. It ensures safety and effectiveness. Proper preparation helps avoid mistakes and ensures a smooth installation process. Let’s walk through the key steps to get ready.Turning Off The Power
Safety is paramount. Turn off power at the circuit breaker. This prevents electrical shocks. Make sure the light switch is off too. Use a voltage tester to confirm power is off. Double-check to ensure no electricity flows.Locating Wiring And Fixture
Find the existing wiring and light fixture. Remove the light cover to access the wires. Identify the wires: live, neutral, and ground. Ensure all components are easily reachable. This step is vital for correct installation.Testing Existing Light Setup
Test the current light setup. Turn on the power briefly to check functionality. Ensure the light works before adding the sensor. This verifies existing wiring is intact. If issues arise, address them before proceeding.Wiring The Motion Sensor
Wiring the motion sensor properly is key to ensuring your light reacts exactly how you want it to. You’ll need to understand the wires involved and how to connect them securely. Let’s break down the wiring process so you can get your motion sensor and light working together without any guesswork.
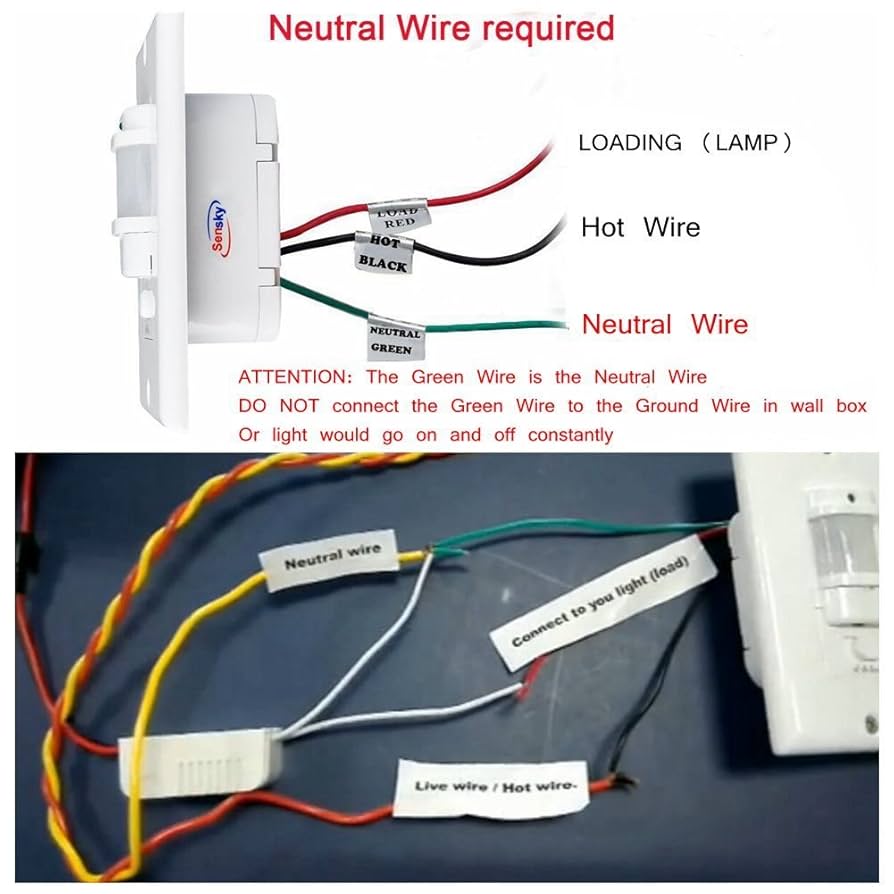
Identifying Wires
Before touching any wires, turn off the power at the breaker to stay safe. Most motion sensors come with three wires: black(live), white(neutral), and red(load). The light fixture typically has a black (live) and white (neutral) wire as well.
Check your sensor’s manual to confirm wire colors because some models might differ. If you see a green or bare copper wire, that’s your ground wire, which you should also connect for safety. Have you ever grabbed the wrong wire and caused a short? Identifying wires correctly prevents that hassle.
Connecting Sensor To Power
Connect the sensor’s black wire to the power source’s black (live) wire. This connection provides electricity to the sensor itself. Use a wire nut to secure the connection and wrap it tightly to avoid any loose contacts.
Next, link the sensor’s white wire to the power source’s white (neutral) wire. This completes the circuit, allowing current to flow safely. If your setup includes a ground wire, twist the green or bare copper wire from the sensor to the ground wire in the electrical box.
Linking Sensor To Light Fixture
Now, connect the sensor’s red wire to the black wire of your light fixture. This wire controls the light, turning it on when motion is detected. Secure the connection with a wire nut, and make sure no bare wire is exposed.
Finally, double-check all connections and gently push the wires back into the electrical box. Restore power and test your sensor by walking in front of it. Does your light turn on promptly? If not, revisit your connections—you might have missed a wire or mixed up colors.
Mounting The Motion Sensor
Mounting the motion sensor correctly ensures it works well with your light. Proper placement and secure fixing help the sensor detect movement accurately. Adjusting the angle lets you control the sensor’s coverage area. Follow these tips to mount your motion sensor right.
Choosing Sensor Placement
Pick a spot where the sensor can see the area clearly. Avoid placing it near heat sources or direct sunlight. Corners of rooms or hallways often work best. Keep the sensor at about 6 to 10 feet high for good range.
Securing The Sensor
Use screws or strong adhesive to fix the sensor firmly. Make sure it does not wobble or move after mounting. Check that wires are safe and not pinched. A stable mount helps the sensor stay reliable over time.
Adjusting Sensor Angle
Point the sensor where most movement happens. Tilt it slightly down to cover the floor area. Avoid aiming it at busy roads or trees that move in the wind. Test the angle by walking through the detection zone.
Configuring Sensor Settings
Configuring sensor settings helps the motion sensor work well with your light. Adjusting these settings makes sure the sensor reacts properly to movement. Proper setup avoids false alarms and saves energy. Take time to adjust sensitivity, time delay, and detection range for the best results.
Adjusting Sensitivity
Sensitivity controls how much movement triggers the sensor. Higher sensitivity detects small motions but may cause false triggers. Lower sensitivity ignores minor movements but catches larger ones. Find a balance by testing the sensor in your environment. Use the adjustment dial or buttons on the sensor to change sensitivity.
Setting Time Delay
Time delay sets how long the light stays on after motion stops. A short delay saves energy but may turn off too soon. A longer delay keeps the light on for comfort and safety. Adjust the time delay using the sensor’s control panel or switches. Choose a delay that fits your needs.
Testing Detection Range
Detection range is the area the sensor can monitor for motion. Test this by walking around the sensor’s location. Check if the sensor activates the light at the right distance. Adjust the sensor’s angle or position to cover the desired area. Some sensors allow range adjustment through controls or physical changes.
Troubleshooting Common Issues
Connecting a motion sensor to a light can seem straightforward, but issues often arise that can leave you scratching your head. Troubleshooting these common problems helps ensure your setup works smoothly and saves you time and frustration. Let’s look at some typical challenges and how you can fix them quickly.
Sensor Not Triggering
If your motion sensor doesn’t activate the light, start by checking the sensor’s power supply. A loose wire or dead battery could be the culprit. Sometimes, the sensor’s detection range might be too narrow or obstructed by objects like furniture or walls.
Try adjusting the sensor angle or moving it to a more open area. Also, verify the settings on the sensor—some models have sensitivity controls that might be set too low. Have you tested the sensor in different lighting conditions? Bright sunlight or reflective surfaces can affect detection.
Light Staying On Constantly
If your light stays on all the time, this usually points to a wiring issue or a faulty sensor. Double-check your connections to ensure the sensor and light are wired correctly according to the manufacturer’s instructions. Sometimes, the sensor’s timer setting is too long, causing the light to remain on.
Reducing the timer duration can help. Another cause might be electrical interference or a damaged sensor that fails to detect motion properly. Have you noticed if this happens only during certain times or weather conditions? This insight can guide your troubleshooting.
Interference And False Alarms
False triggers can be frustrating and waste energy. These often happen because the sensor picks up unwanted movements, like tree branches swaying or pets moving nearby. You can reduce false alarms by adjusting the sensor’s sensitivity or repositioning it away from sources of interference.
Another tip is to select a sensor with adjustable detection zones, allowing you to block off areas where you don’t want the sensor to activate. Ever wondered how your neighbors handle this? Sometimes, simply trimming back foliage or repositioning the sensor a few inches makes a big difference.

Credit: www.youtube.com
Maintenance Tips
Keeping your motion sensor light working efficiently means giving it regular attention. Maintenance helps catch small issues before they turn into big problems. It also ensures your light responds quickly and reliably whenever you need it.
Regular Cleaning
Dirt and dust can block the sensor’s view and reduce its sensitivity. Clean the sensor lens gently using a soft, dry cloth every few weeks. Avoid harsh chemicals that could damage the surface or affect its performance.
Have you noticed your light not turning on as quickly as before? Cleaning might be all it needs to work like new again.
Checking Connections
Loose or corroded wiring can cause your motion sensor to malfunction. Inspect the wiring connections regularly to make sure they are tight and free from rust or damage. If you spot any frayed wires, replace them immediately to avoid electrical hazards.
Think about the last time your light flickered or failed unexpectedly. Could a quick check of the connections have prevented that?
Replacing Batteries Or Components
Some motion sensors use batteries to operate. Keep an eye on battery life and replace them promptly to avoid downtime. For hardwired sensors, components like sensors or control units may wear out and need replacement over time.
Don’t wait until your sensor stops working completely. Regularly swapping out batteries or worn parts keeps your setup running smoothly and saves you from emergency repairs.
Frequently Asked Questions
How Do I Connect A Motion Sensor To A Light?
To connect a motion sensor to a light, first turn off the power. Then, wire the sensor’s live, neutral, and load wires to the corresponding light wires. Secure connections and mount the sensor before restoring power to test functionality.
What Tools Are Needed To Install A Motion Sensor Light?
You need a screwdriver, wire stripper, electrical tape, voltage tester, and possibly a drill. These tools help safely connect and mount the motion sensor to your light fixture.
Can I Install A Motion Sensor Light Outdoors?
Yes, ensure the motion sensor is rated for outdoor use and weatherproof. Install it under a protective cover and connect it to an outdoor-rated light fixture for safety.
How Do I Adjust The Sensitivity On A Motion Sensor Light?
Most sensors have a small dial or switch to adjust sensitivity. Turn it clockwise to increase detection range or counterclockwise to reduce false triggers.
Conclusion
Connecting a motion sensor to a light is simple and useful. It saves energy and adds convenience to your space. Follow the steps carefully to ensure safety and proper function. Test the sensor after installation to check it works well.
Enjoy automatic lighting that turns on only when needed. This small upgrade makes your home smarter and more efficient. Try it yourself and see the difference it brings.


