
Is your desk lamp not turning on or off properly? The problem might be a faulty rotary switch, a small part that controls your lamp’s power.
Fixing it yourself can save you money and get your light working again fast. In this guide, you’ll learn simple steps to diagnose and repair your rotary switch, even if you’re not an expert. Keep reading, and you’ll have your lamp shining bright in no time.

Credit: www.amazon.com
Tools Needed
Fixing a rotary switch on a desk lamp requires a few basic tools. These tools help you open the lamp, check the switch, and replace parts if needed. Having the right tools makes the repair process easier and safer.
Gather these items before starting the repair to avoid interruptions. Each tool has a specific role in the process. Using the correct tool ensures you do not damage the lamp or the switch.
Screwdrivers
A set of screwdrivers is essential. Most desk lamps use small screws to hold parts together. Both flathead and Phillips screwdrivers may be needed.
Multimeter
A multimeter checks if the switch works correctly. It measures electrical continuity and voltage. This tool helps identify if the switch is faulty.
Pliers
Pliers assist in gripping and pulling small parts. Needle-nose pliers are useful for tight spaces. They help remove wires or connectors carefully.
Replacement Rotary Switch
Having a new rotary switch ready is important. Match it with the lamp’s model and specifications. This ensures proper fit and function.
Electrical Tape
Electrical tape insulates exposed wires after repair. It prevents short circuits and protects from electric shock. Use good-quality tape for safety.

Credit: www.weekand.com
Safety Precautions
Safety is the top priority when fixing a rotary switch on a desk lamp. Working with electrical parts can be risky. Taking the right precautions helps avoid shocks and accidents. Always prepare your workspace and tools before starting the repair.
Follow clear safety steps to protect yourself and your lamp. This section explains the key safety tips you must know.
Disconnect The Lamp From Power
Unplug the desk lamp from the power outlet before any repair. This stops electricity from flowing. Never touch wires or parts while the lamp is plugged in. Even a small current can cause harm.
Use Insulated Tools
Choose tools with insulated handles. These protect against electric shocks. Avoid using metal tools without insulation near live wires. Insulated screwdrivers and pliers are best for electrical repairs.
Work In A Dry Area
Keep your workspace dry and clean. Moisture increases the risk of electric shock. Avoid working near water or damp surfaces. Dry hands and tools reduce danger during the repair.
Wear Protective Gear
Wear safety glasses to protect your eyes from debris. Gloves with electrical insulation add another layer of safety. Protect your skin from sharp edges inside the lamp and from accidental shocks.
Check The Lamp’s Condition
Inspect the lamp for damage before starting. Look for frayed wires, broken parts, or loose connections. Fix or replace damaged components before handling the rotary switch. This prevents further damage or hazards.
Identifying The Problem
Identifying the problem with a rotary switch on your desk lamp can be challenging. A malfunctioning switch may cause the lamp to flicker or not turn on at all. Understanding the issue helps streamline the repair process and ensures efficient troubleshooting.
Common Rotary Switch Issues
Several issues can affect rotary switches on desk lamps. A worn-out contact inside the switch can cause inconsistent power flow. Dirt and debris can also accumulate, hindering the switch’s functionality. Sometimes, the internal mechanism may become loose, leading to a non-responsive switch.
Testing The Switch Functionality
Testing the rotary switch is vital for diagnosing problems. Begin by unplugging the lamp for safety. Turn the switch and listen for clicking sounds, indicating proper mechanical function. Use a multimeter to test electrical continuity. This confirms if electricity flows through the switch. If there is no continuity, the switch may need replacement or repair.
Removing The Rotary Switch
Removing the rotary switch from your desk lamp is a crucial step if you want to fix or replace it. This process requires careful handling to avoid damaging the lamp’s wiring or other parts. Let’s break down how you can access and detach the switch efficiently.
Accessing The Lamp Interior
Start by unplugging your lamp to ensure safety. Locate the screws or clips that hold the lamp’s base or housing together. These are often found underneath or behind the lamp’s body.
Use a screwdriver that fits the screws properly to avoid stripping them. Once removed, gently separate the lamp’s outer shell to reveal the internal wiring and the rotary switch. Be cautious not to pull or tug on any wires at this stage.
Detaching The Switch
Observe how the rotary switch is connected. Usually, you’ll see two or more wires attached via terminals or solder joints. Take a close look and note which wire connects where — snapping a picture can help you remember the setup.
Use a small flathead screwdriver or your fingers to loosen the terminal screws if present. If the wires are soldered, you may need a soldering iron to carefully melt the solder and free the wires. Avoid yanking the wires to prevent damage.
Once the wires are detached, check if the switch is held in place by a nut or clip on the lamp’s exterior. Unscrew or unclip it to fully release the rotary switch. Now, you have successfully removed the old switch and can proceed with repair or replacement.
Cleaning The Switch
Cleaning the rotary switch of a desk lamp can solve many common problems. Dirt and dust often cause poor connections and flickering lights. A clean switch improves performance and extends the lamp’s life.
Using Contact Cleaner
Contact cleaner removes grime and oxidation inside the switch. Choose a spray designed for electrical parts. Spray a small amount directly onto the switch contacts. Let it sit for a few minutes to break down buildup. Then, rotate the switch several times to spread the cleaner. Wipe off excess liquid with a dry cloth. Avoid using water or household cleaners, which can damage the switch.
Removing Dirt And Debris
Turn off and unplug the lamp before cleaning. Use a small brush or compressed air to remove loose dirt. Gently clean around the switch housing to avoid damage. If needed, use a cotton swab dipped in rubbing alcohol to clean tight spots. Rotate the switch while cleaning to reach all areas. Make sure the switch is dry before reassembling and testing the lamp.
Repairing Or Replacing Components
Repairing or replacing components of a rotary switch on a desk lamp can restore its function quickly. A faulty switch often causes the lamp to flicker or not turn on at all. Simple checks and fixes can solve the problem without buying a new lamp. This section covers fixing loose connections and replacing the switch itself.
Fixing Loose Connections
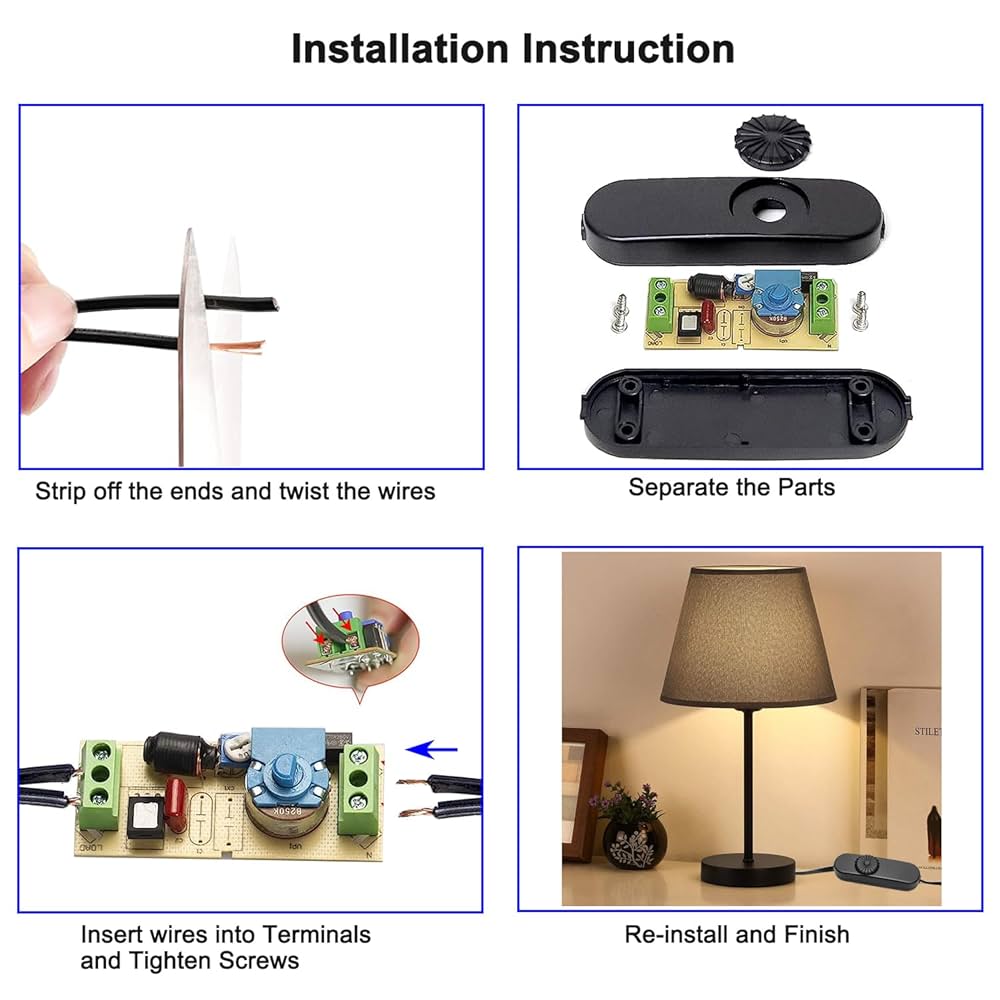
Loose connections are a common cause of switch failure. Open the lamp base carefully to access the switch wiring. Look for wires that are disconnected or loosely attached to terminals. Use a screwdriver to tighten any loose screws holding the wires. If wires are frayed, strip a small section of insulation to expose fresh wire. Reattach the wires firmly to the correct terminals.
Check the wiring for corrosion or damage. Clean corroded terminals with a small brush or sandpaper. Ensure all connections are secure before reassembling the lamp. Test the switch by turning it on and off several times. A steady connection should restore normal function.
Replacing The Switch
If fixing connections does not work, the switch may need replacement. Purchase a rotary switch that matches the lamp’s specifications. Note the voltage and current ratings printed on the old switch. Turn off and unplug the lamp before starting replacement.
Remove the old switch by disconnecting its wires and unscrewing it from the lamp. Connect the new switch using the same wiring pattern. Secure the switch firmly in place. Double-check all wire connections for safety. After reassembly, plug in the lamp and test the new switch. It should turn the lamp on and off smoothly without flickering.
Reassembling The Lamp
Reassembling the lamp is a crucial part of fixing the rotary switch. Proper assembly ensures the lamp works safely and correctly. Take your time to align parts carefully. Avoid forcing pieces together to prevent damage.
Reinstalling The Switch
Place the rotary switch back into its slot on the lamp base. Make sure the switch fits snugly without gaps. Connect the wires securely to the switch terminals. Use a small screwdriver to tighten screws, holding wires firmly. Test the switch by turning it gently to check movement. Loose connections can cause the lamp to flicker or not work.
Securing The Lamp Cover
Align the lamp cover over the base carefully. Check that no wires are pinched or exposed. Attach screws or clips to hold the cover firmly in place. Tighten screws evenly to avoid warping the cover. Wipe the lamp surface to remove fingerprints or dust. A well-secured cover protects the switch and wiring inside.

Credit: www.amazon.com
Testing The Repair
Testing the repair ensures your rotary switch works properly. It confirms the lamp powers on and the switch controls the light as expected. This step is crucial to avoid repeated issues and save time.
Powering On The Lamp
Plug the lamp into a power outlet. Check that the bulb lights up without flickering. If the lamp does not turn on, disconnect power immediately. Recheck your wiring and connections before trying again.
Checking Switch Operation
Rotate the switch through all its positions slowly. Notice if the light changes with each click. The light should turn on and off smoothly. If the switch feels stiff or unresponsive, it may need further adjustment or replacement.
Tips For Maintenance
Keeping your rotary switch in good shape means fewer headaches and longer lamp life. Simple maintenance habits can prevent many common problems before they start. Let’s look at easy ways to care for your switch so it keeps working smoothly.
Regular Cleaning
Dust and dirt can sneak into the rotary switch, causing it to stick or fail. Use a soft brush or compressed air to clear out any debris around the switch regularly.
If you notice the switch feels gritty, a small drop of electrical contact cleaner can help. Just be careful not to flood the switch—less is more here.
Have you ever ignored a tiny bit of dust only to find your lamp won’t turn on? That’s why regular cleaning matters more than you think.
Avoiding Future Issues
Think about how you use your lamp. Are you twisting the switch too hard or too fast? Gentle, deliberate movements reduce wear on the internal parts.
Keep liquids away from the switch to avoid corrosion. Even a small spill can cause long-term damage.
Also, avoid over-tightening the switch during repairs—it can strip the threads or break components inside. Would you rather fix the switch again or save time now by being gentle?
Frequently Asked Questions
How Do I Identify A Faulty Rotary Switch On A Desk Lamp?
Check if the lamp doesn’t respond when you turn the rotary switch. Look for loose connections or unusual resistance when rotating the switch. These signs indicate the switch might be faulty and needs repair or replacement.
What Tools Are Needed To Fix A Rotary Switch On A Desk Lamp?
You’ll need a screwdriver, multimeter, soldering iron, and replacement switch if necessary. A multimeter helps check electrical continuity, while a soldering iron is for reconnecting wires securely.
Can I Repair A Rotary Switch Without Replacing It?
Yes, sometimes cleaning contacts or tightening connections fixes the switch. Use contact cleaner to remove dirt or corrosion. However, if damage is severe, replacement is recommended for safety and functionality.
How Do I Safely Disassemble The Rotary Switch From A Desk Lamp?
Unplug the lamp before starting. Use a screwdriver to remove screws holding the switch cover. Gently disconnect wires, noting their positions for reassembly to avoid wiring errors.
Conclusion
Fixing a rotary switch on your desk lamp saves time and money. You can do it yourself with basic tools and care. Follow the steps carefully to avoid damage. Test the switch after repair to ensure it works well. This simple fix keeps your lamp bright and useful.
Taking action helps you learn and feel confident. Don’t hesitate to try fixing small problems at home. A working lamp makes your space comfortable and safe. Keep your tools ready for quick repairs anytime.


