

You’ve got a mirror stuck to your wall, glued tight, and now you’re wondering how to get it down without causing damage. It can feel frustrating and tricky, especially if you’re worried about leaving marks or breaking the glass.
But don’t worry—you’re not alone, and there are smart, safe ways to remove that mirror. Keep reading, and you’ll discover simple, effective steps to free your mirror with ease. By the end, you’ll have the confidence and know-how to handle this task like a pro.
Let’s get started!
Tools You’ll Need
Removing a glued mirror from the wall needs the right tools. Using proper tools helps avoid damage to the mirror and wall. Prepare these tools before starting for a smooth process.
Common Household Items
- Hairdryer or heat gun to soften the glue
- Plastic putty knife or old credit card to gently pry
- Rubbing alcohol or adhesive remover for cleaning residue
- Soft cloths or rags for wiping surfaces
- Gloves to protect your hands
- Protective eyewear for safety
Specialized Tools
- Oscillating multi-tool with a cutting blade for stubborn glue
- Wire or fishing line to slide behind the mirror and cut adhesive
- Caulk softener to loosen strong adhesive bonds
- Putty scraper designed for delicate surfaces
- Vacuum with a brush attachment to clean dust and debris

Credit: www.reddit.com
Preparing The Area
Preparing the area before removing a glued mirror is crucial for a smooth and safe process. Taking time to organize and protect your space not only prevents damage but also helps you work with confidence. Let’s look at how to get your area ready.
Clearing The Space
Start by removing any furniture or objects near the mirror. This gives you enough room to move freely and reduces the risk of knocking things over. If the mirror is in a tight spot, think about temporarily relocating smaller items like lamps, vases, or picture frames.
Clear the floor beneath the mirror as well. You’ll need a clean, open space to lay down tools or catch any falling debris. It might feel like extra work, but this step saves you from scrambling around mid-task.
Protecting Surfaces
Cover nearby surfaces with drop cloths or old sheets to guard against scratches or glue residue. Walls, floors, and furniture close to the mirror should be shielded. Sticky glue or shattered glass can cause unexpected damage, so don’t skip this step.
Use painter’s tape to secure protective coverings in place. This ensures they won’t shift while you work. Have you ever underestimated the mess from removing a glued mirror? Protecting your space is the best way to avoid costly cleanups later.
Softening The Adhesive
Removing a glued mirror from the wall can be tricky, especially when the adhesive is strong and stubborn. Softening the glue first makes the process much easier and reduces the risk of damaging your wall or the mirror. Let’s look at two effective ways to loosen that stubborn adhesive so you can safely free your mirror.
Using Heat
Heat can work wonders in softening glue. A hairdryer or heat gun applied carefully can warm up the adhesive, making it more flexible and easier to peel away. Hold the heat source a few inches from the mirror’s edge and move it slowly to avoid overheating one spot.
Be cautious not to apply too much heat, as mirrors can crack or the wall paint can peel. Have a soft cloth or plastic putty knife ready to gently pry the mirror once the glue feels softer under your touch. Have you tried this before and noticed how the glue almost melts away?
Applying Solvents
Certain solvents break down adhesives effectively. Products like rubbing alcohol, acetone, or specialized adhesive removers can be applied to the glue’s edge to weaken its hold. Use a cotton ball or cloth to dab the solvent carefully along the glued area.
Test the solvent on a small, hidden part of the wall first to ensure it won’t damage the paint or wallpaper. Give the solvent some time—usually 10 to 15 minutes—to soak in and soften the glue before attempting to remove the mirror. What solvents have you found work best for your home projects?
Credit: bfymirror.com
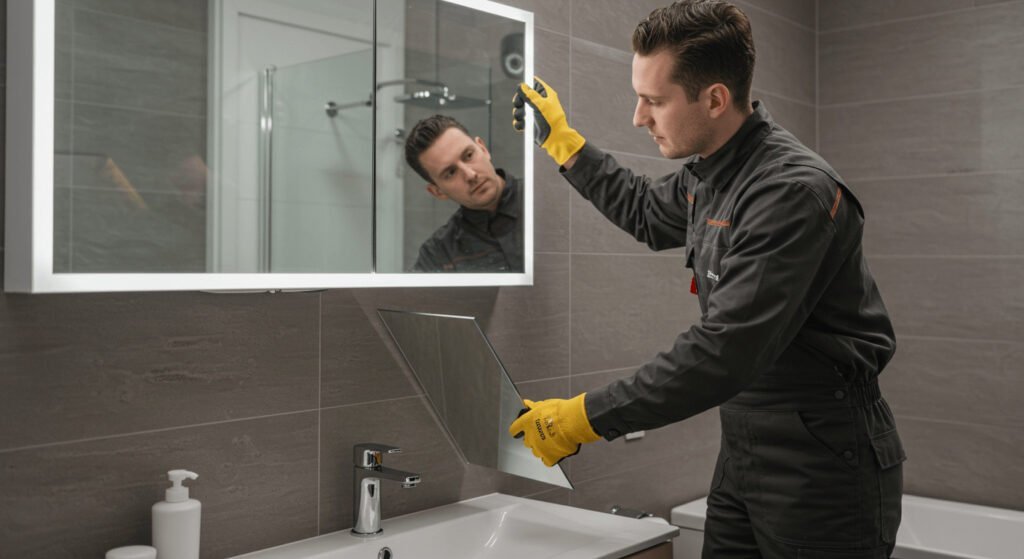
Removing The Mirror Safely
Gently loosen the edges of the mirror using a thin tool or wire. Apply heat or a solvent to soften the glue. Carefully pull the mirror away from the wall to avoid cracks or damage.
Removing a glued mirror from the wall might seem daunting, but it’s entirely possible to do it safely with the right approach. Safety is crucial, not just for you but also for the integrity of your wall and mirror. By carefully loosening and prying, you can successfully remove the mirror without causing damage.Loosening The Edges
Begin by examining the edges of the mirror. Use a utility knife to gently score along the perimeter. This can help break the adhesive bond. A hairdryer can be your best friend here. Apply heat evenly across the edges to soften the glue. Be patient; this might take a few minutes, but it’s a critical step in ensuring the mirror comes off smoothly.Prying Techniques
Once the edges are loosened, you can start prying the mirror. A putty knife is ideal for this task. Carefully insert it between the mirror and the wall, and gently wiggle to create space. Work your way around the mirror, slowly and steadily. It helps to have a friend support the mirror to prevent it from falling. If you feel resistance, don’t rush. Applying a bit more heat or using a longer tool can help. The goal is to remove the mirror in one piece without damaging the wall. Have you ever considered how much easier it is when you take things slow? By approaching the task with patience, you not only protect the wall but also reduce the risk of injury.Handling Mirror Breakage
Handling mirror breakage is a delicate task that requires caution and the right approach. Mirrors can shatter unexpectedly while removing them from the wall, creating sharp shards that pose risks to your safety. Knowing how to manage breakage effectively will help you protect yourself and clean up efficiently.
Preventing Shards
Start by wearing thick gloves and safety goggles to shield your hands and eyes. If the mirror cracks but doesn’t fall, press a piece of strong tape like duct tape over the surface to hold shards in place. This simple step can prevent small pieces from scattering if the glass breaks further.
Cover the floor with a drop cloth or old blanket before attempting removal. This softens any fall and catches fragments, making them easier to gather. Have a sturdy box or container ready to place broken pieces directly into it.
Clean-up Tips
After breakage, avoid using your hands to pick up shards. Instead, use a broom and dustpan to sweep up larger pieces carefully. For tiny slivers, press a damp paper towel or piece of bread onto the floor to pick them up without risking cuts.
Vacuum the area thoroughly, including corners and crevices, to catch any missed fragments. Dispose of broken glass in a thick, sealed container or wrap it securely in cardboard before placing it in the trash. Your safety depends on thoroughness here—don’t rush this step.
Dealing With Residual Glue
After successfully removing a glued mirror from the wall, you’re often left with stubborn glue residue that can be just as frustrating to tackle. Removing this residue is essential to prepare the surface for repainting or rehanging. Let’s look at practical ways to clear off that sticky mess without damaging your wall.
Scraping Methods
One of the simplest ways to deal with residual glue is to scrape it off carefully. Use a plastic scraper or putty knife to avoid scratching the wall surface. Metal tools might seem stronger, but they can leave marks that require extra work to fix.
If the glue is particularly hard, soften it by applying warm water with a sponge. Let it sit for a few minutes to loosen the adhesive. Then gently scrape again, being patient to avoid gouging the wall.
Have you tried using a razor blade scraper? It can be effective but requires a steady hand. If your wall is drywall or plaster, plastic tools are safer to prevent damage.
Chemical Removers
When scraping isn’t enough, chemical adhesive removers can help break down the glue. Look for products specifically labeled for use on walls to avoid harmful effects. Always test a small hidden area first to check for discoloration or damage.
Apply the remover with a cloth or brush and let it sit according to the product instructions—usually a few minutes. Then wipe away the softened glue with a clean rag or scraper.
Remember to work in a well-ventilated area and wear gloves to protect your skin. Some removers have strong fumes, so safety is key. Have you ever tried household alternatives like rubbing alcohol or vinegar? They can work for light residues but might need more elbow grease.
Preventing Wall Damage
Removing a glued mirror can leave marks or damage on the wall. Protecting the wall during removal helps keep it clean and intact. Taking simple steps reduces repair work later.
Using Protective Layers
Place a soft cloth or cardboard behind the mirror before removal. This layer acts as a cushion and stops scratches. Use painter’s tape to secure the protective layer in place.
Cover the floor under the wall with a drop cloth. This prevents glue or debris from sticking to the floor. Protective layers absorb shock and protect paint and drywall.
Repairing Minor Marks
Small scratches or holes can be fixed quickly. Use a putty knife to apply spackling paste on damaged spots. Let it dry and then sand it smooth.
Paint over repaired areas with matching wall paint. This restores the wall’s original look. Keep a small repair kit handy for touch-ups after mirror removal.
Alternative Removal Methods
Sometimes, removing a glued mirror from the wall requires more than just standard tools and solvents. Alternative removal methods can offer clever solutions that save your wall and reduce the risk of breaking the mirror. These techniques may take a bit of patience but often deliver surprising results with minimal damage.
Using Dental Floss Or Wire
Dental floss or thin wire can work like a saw to cut through the glue holding the mirror to the wall. Slide the floss gently behind the mirror’s edge and use a sawing motion to separate the adhesive.
This method is effective because it doesn’t apply direct pressure on the glass, reducing the chance of cracks. Make sure to wear gloves to protect your hands, and take your time to avoid sudden movements that could break the mirror.
Have you ever thought a simple floss could double as a removal tool? It’s a handy trick that many overlook but can be a lifesaver when you don’t want to damage the wall surface.
Cold Application
Applying cold can sometimes weaken certain adhesives, making it easier to remove the mirror. Wrap ice packs or frozen gel packs in a thin cloth and press them against the glued areas for 10 to 15 minutes.
The cold temperature causes the adhesive to become brittle or less sticky, allowing you to gently pry the mirror off with less resistance. Be careful not to get moisture on the wall, as this might cause damage or staining.
If you’re dealing with stubborn glue and worried about scraping or tearing your wall, could cold therapy be the gentler approach? It’s worth trying before reaching for harsher chemicals or tools.

Credit: www.youtube.com
Frequently Asked Questions
How Can I Safely Remove A Glued Mirror?
Use a hairdryer or heat gun to soften the adhesive. Gently pry the mirror using a thin, flexible tool. Work slowly to avoid damage or injury.
What Tools Do I Need To Take Off A Glued Mirror?
You’ll need a hairdryer or heat gun, a thin putty knife, gloves, and safety goggles. These tools help soften glue and protect you during removal.
How Do I Protect My Wall While Removing A Glued Mirror?
Place painter’s tape around the mirror edges. Use gentle prying tools to avoid wall damage. Move slowly and carefully to preserve the surface.
Can I Reuse A Mirror After Removing It From The Wall?
Yes, if the mirror remains intact and glue residues are cleaned. Carefully remove adhesive with a solvent. Handle the mirror gently to prevent cracks.
Conclusion
Removing a glued mirror from a wall takes care and patience. Use gentle tools and take your time. Avoid rushing to prevent damage to the wall or mirror. Stay safe by wearing gloves and protecting your eyes. Small steps can make a big difference.
Now, you know how to handle this task with ease. Try these tips and see the results yourself. Simple actions lead to great success.


