
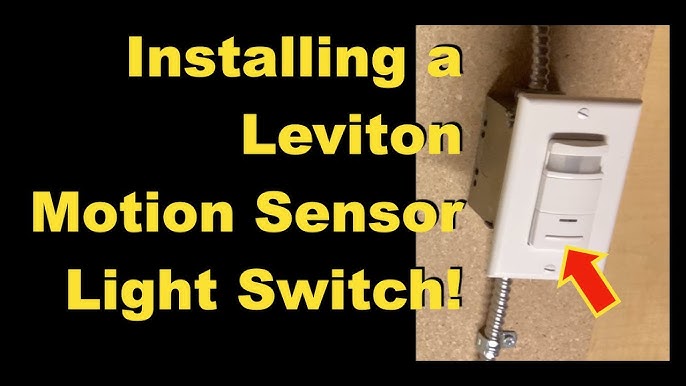
Are you tired of fumbling for the light switch in the dark? Installing a motion sensor light switch can change that instantly.
Imagine your lights turning on automatically the moment you enter a room—no more searching or wasted energy. In this guide, you’ll learn exactly how to install a motion sensor light switch quickly and safely, even if you’re not an expert.
Keep reading, and you’ll discover simple steps that make your home smarter and your life easier.
Tools And Materials Needed
Before you start installing a motion sensor light switch, gathering the right tools and materials is crucial. Having everything ready saves time and prevents frustrating trips to the hardware store. It also ensures the installation goes smoothly, even if you’re a beginner.
Essential Tools For The Job
- Screwdrivers:Both flathead and Phillips screwdrivers are necessary for removing the old switch and securing the new one.
- Voltage Tester:Safety first—check that the power is off before touching any wires.
- Wire Strippers:These help you strip insulation from wires cleanly without damaging the copper inside.
- Needle-Nose Pliers:Handy for bending wires and making tight connections inside the electrical box.
- Electrical Tape:Use it to insulate wire nuts and secure loose wires.
Materials You’ll Need
- Motion Sensor Light Switch:Choose one that matches your home’s wiring and desired features, like adjustable sensitivity.
- Wire Nuts:These connect wires safely and securely.
- Wall Plate:Sometimes included with the switch, but having a spare can be useful for a neat finish.
- Electrical Box:Usually already in place, but check if yours is compatible or needs replacement.
Extra Items That Can Help
- Flashlight or Headlamp:Working in dark spaces or during power-off periods is easier with good lighting.
- Multimeter:For more detailed electrical testing if you want to double-check connections.
- Instruction Manual:Always keep the manual handy—it often has wiring diagrams specific to your switch model.
Have you ever started a project only to realize you’re missing a small but critical tool? Preparing your workspace with all these items can turn a tricky task into a straightforward one. What’s the one tool you can’t live without when working on home electrical projects?
Choosing The Right Motion Sensor Switch
Choosing the right motion sensor switch helps ensure efficient lighting control. It also improves home security and saves energy. Different switches offer various features and designs. Picking one that fits your needs makes installation easier. Consider your room size, lighting type, and wiring system. These factors guide you to the best choice.
Understanding Different Types Of Motion Sensor Switches
Motion sensor switches come in two main types: passive infrared (PIR) and ultrasonic. PIR sensors detect body heat and movement. They work well in rooms with clear line of sight. Ultrasonic sensors use sound waves to sense motion. They cover corners and hidden spots better. Some switches combine both sensors for accuracy. Choose the type that suits your room layout.
Checking Compatibility With Your Lighting System
Not all motion sensor switches fit every light fixture. Confirm the switch matches your bulb type—LED, CFL, or incandescent. Some switches support dimmable lights, others do not. Check your home wiring to ensure compatibility. Most switches work with standard 120V circuits. Look for switches labeled for your voltage and load requirements.
Considering Sensor Range And Sensitivity
Sensor range determines how far the switch detects movement. Smaller rooms need shorter range settings. Larger areas require switches with wider coverage. Sensitivity controls how easily the sensor triggers lights. High sensitivity works well in low-traffic areas. Lower sensitivity prevents false triggers in busy rooms. Adjustable settings offer flexibility for different spaces.
Evaluating Additional Features And Settings
Extra features improve the switch’s convenience and function. Look for adjustable timer settings to control light duration. Some switches include daylight sensors to avoid turning on in bright rooms. Manual override options let you turn lights on or off anytime. Choose switches with clear instructions and easy controls. These features add comfort and energy savings.
Turning Off Power Safely
Always switch off the power at the circuit breaker before starting any electrical work. Confirm the power is off by testing the existing switch with a voltage tester. This ensures safety and prevents electrical shock during installation.
Turning off the power safely is a crucial step when installing a motion sensor light switch. You might think it’s a simple flick of the switch, but there’s more to it than meets the eye. Taking the right precautions can prevent electrical mishaps and ensure a smooth installation process.Locate Your Circuit Breaker
Before you start, find your home’s circuit breaker panel. It’s usually located in the basement, garage, or utility room. Knowing its location can save valuable time and effort.Identify The Correct Circuit
Open the panel and look for the labels indicating which switch controls what area. If labels are missing, you might have to test each switch to find the right one. This can be a bit tedious but ensures you’re working safely.Turn Off The Power
Once you’ve identified the right circuit, flip the switch to the “off” position. Double-check by trying to turn on the light connected to that circuit. If the light doesn’t turn on, you’re good to go.Use A Voltage Tester
To be extra safe, use a voltage tester to confirm there’s no power. Place the tester on the wires connected to the switch. If it doesn’t light up, you’re ready to proceed with the installation.Communicate With Household Members
Inform others at home that you’re working on the electrical system. This prevents anyone from accidentally turning the power back on while you’re working. A simple note on the breaker panel can also serve as a helpful reminder. Turning off the power safely is not just about flipping a switch. It’s about ensuring that your home and everyone in it remains safe while you tackle your DIY project. Have you ever wondered what could go wrong if you skip this step? Trust me, you don’t want to find out.Removing The Existing Switch
Removing the existing switch is the first step to install a motion sensor light switch. It requires care and attention to safety. Turn off the power at the circuit breaker to avoid electric shock. Verify the power is off by testing the switch with a voltage tester. Gather tools like a screwdriver, voltage tester, and needle-nose pliers before starting.
Turn Off Power At The Circuit Breaker
Locate the circuit breaker panel in your home. Switch off the breaker that controls the light switch. This prevents any electrical current from flowing. Double-check by flipping the light switch to ensure no power is running.
Remove The Switch Cover Plate
Use a screwdriver to unscrew the cover plate. Keep the screws in a safe place for later use. Gently pull the cover plate away from the wall. This exposes the switch and wiring inside.
Test For Electrical Current
Use a voltage tester to check the wires. Touch the tester to each wire terminal. Confirm there is no electrical current before touching wires. Safety must always come first in electrical work.
Unscrew And Pull Out The Existing Switch
Remove screws holding the switch to the electrical box. Carefully pull the switch out without damaging wires. Note how wires are connected for the new switch. Take a photo if needed for reference.
Disconnect The Wires
Loosen the terminal screws on the switch. Gently pull the wires free from the switch terminals. Keep wires straight and separated to avoid confusion. Your switch is now ready for replacement.
Identifying Wires And Connections
Identifying wires and connections is the first key step to install a motion sensor light switch safely. Understanding the wiring ensures the switch works correctly without electrical issues. Each wire has a specific role. Knowing these roles helps connect the new device properly.
Wires usually come in different colors and sizes. Their colors show their purpose. Learning these colors avoids confusion and mistakes. Use a voltage tester to check wires before touching them. Safety always comes first when working with electricity.
Common Wire Colors And Their Functions
- Black wire:This is the hot or live wire. It carries electricity from the power source.
- White wire:This is the neutral wire. It completes the electrical circuit back to the panel.
- Green or bare copper wire:This is the ground wire. It protects against electrical faults.
- Red wire (if present):Often used as a traveler wire in three-way switches.
How To Locate Each Wire In Your Switch Box
Turn off the power at the circuit breaker. Remove the old switch cover and switch. Carefully pull the switch from the box to see the wires. Look for the wire colors listed above. Use a voltage tester to confirm which wire is live.
Tools To Identify And Test Wires
- Voltage tester:Detects if a wire has current.
- Multimeter:Measures voltage and continuity between wires.
- Wire stripper:Removes insulation to expose wire ends.
- Screwdriver:Removes switch cover and terminals.
Wiring The Motion Sensor Switch
Wiring the motion sensor switch is a key part of the installation process. It allows the switch to detect movement and control the light automatically. Correct wiring ensures safety and proper function. Follow the instructions carefully and turn off the power before starting.
Identify The Wires In Your Electrical Box
First, look inside the electrical box. You will see several wires. Usually, these include:
- Line wire (usually black) – brings power from the electrical panel
- Load wire (usually black or red) – connects to the light fixture
- Neutral wire (usually white) – completes the circuit
- Ground wire (bare copper or green) – safety grounding
Use a voltage tester to be sure the power is off before handling wires.
Connect The Motion Sensor Switch Wires
The motion sensor switch will have matching wires. Connect them as follows:
- Line wire from the box to the line wire on the switch
- Load wire from the box to the load wire on the switch
- Neutral wire from the box to the neutral wire on the switch
- Ground wire from the box to the ground wire on the switch
Use wire nuts to secure the connections tightly. No loose wires.
Secure And Test The Wiring
Carefully push the wires back into the electrical box. Mount the switch using screws. Turn the power back on at the breaker. Test the motion sensor by moving in front of it. The light should turn on automatically. Adjust settings on the switch if needed for sensitivity and time delay.
Securing The Switch And Testing
Securing your motion sensor light switch correctly is essential for safety and functionality. A loosely installed switch can cause flickering lights or even electrical hazards. Testing after installation ensures the device works exactly as you want it to.
Securing The Switch To The Wall Box
Begin by gently pushing the wires back into the wall box, making sure they don’t get pinched. Hold the switch firmly against the box and align the screw holes.
Use the screws provided with your switch to fasten it tightly. Avoid over-tightening, as this can crack the switch plate or damage the box. A solid fit keeps the switch stable and prevents accidental movement.
Attaching The Switch Plate
Place the switch plate over the installed switch, aligning the screw holes. Secure it with the screws, tightening until it’s flush against the wall.
A properly attached plate not only looks neat but also protects wiring from dust and moisture. If your switch plate doesn’t sit evenly, double-check the switch’s alignment and screw tightness.
Testing The Motion Sensor Functionality
Turn the power back on at the breaker. Most switches will have a small LED or indicator light to show they are powered.
- Wave your hand in front of the sensor to see if the light turns on.
- Adjust the sensor’s sensitivity or time delay settings if needed.
- Walk around the area to ensure the light activates consistently.
Did the light respond smoothly? If not, check for loose connections or misplaced wires before re-securing the switch.
Fine-tuning And Final Checks
Try different lighting conditions to see how the sensor reacts. Some sensors work better in dim light, while others may activate with any movement.
Think about your daily routine—does the sensor trigger at the right times? Adjust the settings accordingly to avoid false activations or missed triggers.
Remember, a well-tuned sensor switch can save energy and add convenience. Take a few minutes now to get it just right.

Credit: howlandhammer.com
Adjusting Sensitivity And Settings
Adjusting the sensitivity and settings of a motion sensor light switch is essential for optimal performance. Proper adjustment ensures the light activates only when needed. It also helps save energy and extends the switch’s lifespan.
Each motion sensor model offers different controls. Some have dials, buttons, or switches to customize sensitivity, time delay, and detection range. Understanding these controls helps tailor the sensor to your space.
Adjusting The Sensitivity Level
Sensitivity controls how far the sensor detects movement. Turn the sensitivity dial to increase or decrease the detection range. Higher sensitivity picks up small movements at a distance.
Lower sensitivity limits detection to larger movements nearby. Test different levels by walking in front of the sensor. Find a balance to avoid false triggers from pets or passing cars.
Setting The Time Delay
The time delay determines how long the light stays on after detecting motion. Adjust the timer to fit your needs. Shorter times save electricity but may turn off too quickly.
Longer times keep the light on for comfort or safety. Use the timer dial or button to set delays from a few seconds to several minutes. Test the setting to ensure the light turns off when no movement occurs.
Configuring The Light Sensitivity (day/night Sensor)
Many motion sensors have a light sensitivity setting to work only in low light. This prevents the light from turning on during the day.
Adjust the light sensor dial to set the brightness level that activates the sensor. Set it low for use only at night. Increase it to allow operation in dim environments like hallways.
Testing And Fine-tuning Settings
After adjusting, test the sensor in your usual conditions. Walk through the detection area to check activation and timing. Observe any false activations or missed detections.
Fine-tune the sensitivity and time delay until the sensor works reliably. Repeat testing during different times of day for best results. Proper tuning saves energy and enhances convenience.
Troubleshooting Common Issues
Installing a motion sensor light switch can be straightforward, but sometimes things don’t work as expected. Troubleshooting common issues helps you avoid frustration and get your switch functioning smoothly. Let’s look at practical ways to fix problems you might encounter during or after installation.
Checking Power Supply And Wiring Connections
If your motion sensor light switch isn’t turning on, the first thing to check is the power supply. Make sure the circuit breaker is on and the wiring connections are secure. Loose wires or incorrect connections often cause the switch to malfunction.
Turn off the power before inspecting wires to stay safe. Look for any disconnected or frayed wires, and tighten any loose screws. Have you ever overlooked a small wire connection that delayed your project for hours? Double-checking wiring saves you time and prevents electrical issues.
Adjusting Sensor Sensitivity And Range
Sometimes the sensor detects movement too far away or not at all. Most motion sensor switches allow you to adjust sensitivity and detection range. If your light turns on unexpectedly or never turns on, tweaking these settings can fix the problem.
Try lowering the sensitivity if your light activates from passing cars or pets. Increase it if the sensor doesn’t respond when you enter the room. Ask yourself: Is the sensor covering the right area without false triggers?
Dealing With Compatibility Issues
Your new motion sensor switch might not work well with certain types of bulbs or existing dimmer switches. Check the product specifications for compatible bulb types like LED, CFL, or incandescent. Using incompatible bulbs can cause flickering or prevent the light from turning on.
Also, some motion sensors don’t function properly if installed with dimmer switches. If you notice flickering or erratic behavior, test the switch with a standard bulb and no dimmer. Have you checked if your existing setup matches the sensor’s requirements?
Resetting The Motion Sensor Switch
If the motion sensor light switch behaves unpredictably, a reset might help. Most switches have a reset button or require you to turn the breaker off and on to reboot the system. Resetting clears any glitches and restores default settings.
After resetting, you’ll need to readjust the sensitivity and timer settings. Don’t skip this step if your switch acts strangely—it’s a simple fix that often resolves issues quickly.

Credit: www.youtube.com
Safety Tips And Best Practices
Turn off the power before starting to avoid electric shock. Use a voltage tester to confirm no current flows. Follow the wiring diagram carefully to ensure safe installation.
Installing a motion sensor light switch is a fantastic way to enhance convenience and energy efficiency in your home. However, safety should always be your top priority during installation. Before diving into the process, it’s crucial to understand the best practices that ensure not only a successful installation but also a safe one.Turn Off The Power
Before you touch any electrical components, make sure to switch off the power at the circuit breaker. Use a voltage tester to double-check that no power is flowing to the switch. This simple step can prevent dangerous electrical shocks.Read The Manufacturer’s Instructions
Every motion sensor light switch comes with its own set of instructions. Take a moment to thoroughly read and understand them. Manufacturers often include specific tips that can make your installation smoother and safer.Wear Protective Gear
Even if you’re just swapping out a switch, it’s wise to wear safety goggles and gloves. These can protect you from any unforeseen sparks or sharp edges. It’s a small investment in your personal safety.Use The Right Tools
Having the correct tools at hand can make all the difference. A screwdriver, voltage tester, and wire stripper are usually necessary. Using the wrong tool can damage your switch or create safety hazards.Secure Connections Properly
Ensure that all wire connections are tight and secure. Loose wires can lead to faulty connections and potential fire hazards. Double-check each connection before finishing up.Test The Switch
Once installed, test the motion sensor light switch to ensure it’s functioning correctly. Adjust the sensitivity settings if needed to suit your preferences. This step ensures that your efforts lead to a fully operational switch.Consult A Professional If Unsure
If at any point you feel unsure or encounter a problem, don’t hesitate to call a professional electrician. Your safety and the integrity of your home’s electrical system are worth the extra cost. By following these safety tips and best practices, you’re not just installing a motion sensor light switch—you’re doing it with confidence and peace of mind. Have you ever had an unexpected issue during a DIY project? How did you handle it?
Credit: www.youtube.com
Frequently Asked Questions
What Tools Are Needed To Install A Motion Sensor Switch?
You need a screwdriver, voltage tester, wire stripper, and electrical tape. Always turn off power before starting. These tools ensure a safe and efficient installation process.
How Do I Identify Wires For Motion Sensor Switch?
Typically, you’ll find line, load, neutral, and ground wires. Use a voltage tester to confirm. Proper identification prevents wiring errors and ensures switch functionality.
Can I Install A Motion Sensor Switch Myself?
Yes, if you have basic electrical knowledge and follow safety steps. Always turn off power at the breaker before installation. Consult an electrician if unsure to avoid hazards.
How Do I Adjust Sensitivity On A Motion Sensor Switch?
Most switches have a dial or button for sensitivity control. Adjust it to detect motion at desired distances. Proper settings prevent false triggers and save energy.
Conclusion
Installing a motion sensor light switch is simple and useful. It saves energy and adds safety to your home. Follow the steps carefully for a smooth installation. Test the switch to make sure it works well. Enjoy hands-free lighting that turns on when needed.
This small change can make a big difference every day. Try it yourself and see how easy it is. No special tools or skills are required. Brighten your space with smart, automatic lighting today.


