
Are you ready to transform your kitchen and make your island the star of the room? Installing pendant lights over your island is one of the easiest ways to add style and improve lighting where you need it most.
But if you’re wondering how to do it right without hiring a pro, you’re in the right place. This guide will walk you through every step, making the process simple and stress-free. By the end, you’ll have beautiful, perfectly placed pendant lights that brighten your space and impress your guests.
Let’s get started!
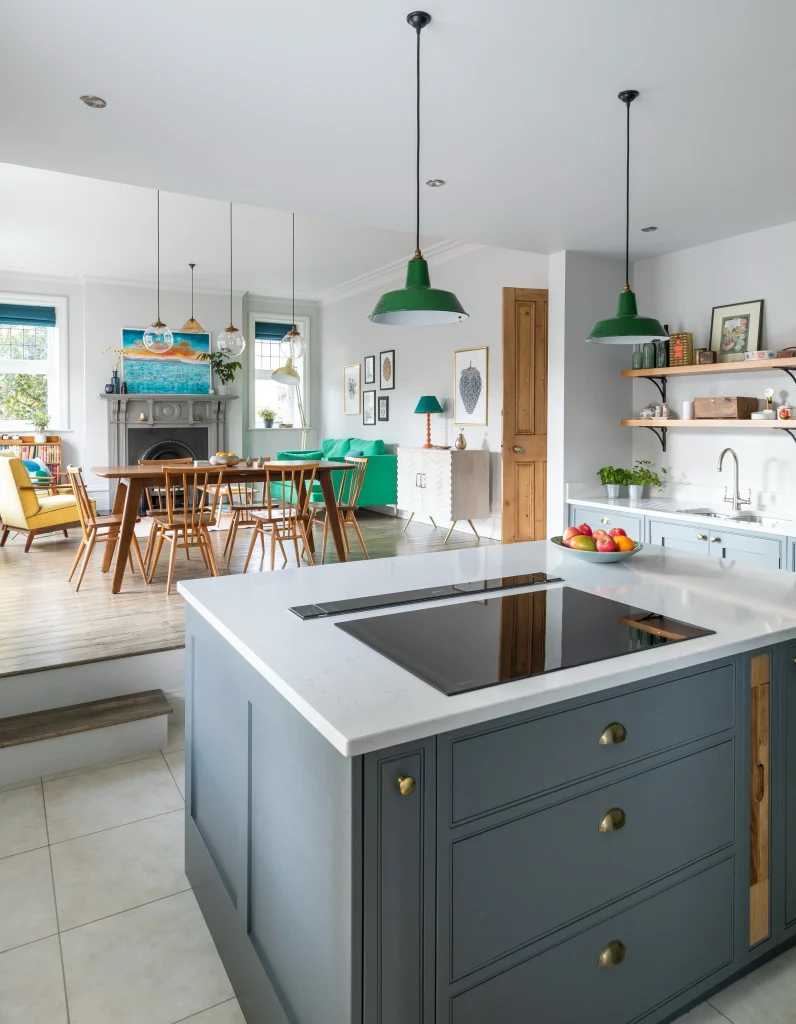
Credit: gatheraus.com
Choosing The Right Pendant Lights
Choosing the right pendant lights for your island is more than just picking something that looks good. The lights need to fit your space, match your kitchen’s vibe, and provide the right amount of illumination. Thoughtful choices here make your island a true focal point and improve your daily kitchen experience.
Consider Size And Scale
Start by measuring your island’s length and width. Pendant lights that are too big can overwhelm the space, while ones that are too small might get lost.
A good rule is to hang pendant lights that are about one-third the width of your island. If your island is 6 feet long, aim for pendants around 8 to 10 inches wide each.
Think about how many pendants you want. Spacing them evenly, about 24 to 30 inches apart, creates balance and ensures even lighting.
Select Style And Finish
Your pendant lights should complement your kitchen’s style. Are you going for modern minimalism, rustic charm, or classic elegance?
Matching the finish of your pendants with other fixtures like faucets or cabinet handles creates a cohesive look. Popular finishes include matte black, brushed nickel, and antique brass.
Don’t be afraid to mix styles if it suits your taste. A sleek metal pendant can add an unexpected edge to a farmhouse kitchen.
Pick The Ideal Light Bulb
The bulb you choose affects both the light quality and energy efficiency. Warm white bulbs (2700K to 3000K) create a cozy atmosphere, while cooler whites (3500K to 4100K) offer brighter, more task-oriented lighting.
Consider LED bulbs for their longevity and low heat output. Dimmable bulbs give you control over the mood and brightness.
Have you tested how different bulbs look in your space? Sometimes changing the bulb transforms the entire feel of the room.
Measuring And Planning Placement
Measuring and planning the placement of pendant lights is crucial for a balanced look. Proper measurements prevent lights from hanging too low or looking crowded. This step ensures the island area is well-lit and visually appealing.
Determine Height Above Island
Measure the height from the countertop to the ceiling. Pendant lights should hang 28 to 34 inches above the island surface. This height allows for enough light without blocking sightlines. Adjust based on ceiling height and pendant size.
Space Between Pendants
Leave enough space between each pendant to avoid clutter. A good rule is 24 to 30 inches apart. This spacing gives each light room to shine and creates a balanced look. Consider the island’s length when deciding the number of pendants.
Marking The Ceiling Spots
Use a tape measure to mark the exact ceiling spots for each pendant. Ensure marks align with the planned spacing and height. Double-check placement before drilling. Use a pencil to make small, visible marks on the ceiling.
Gathering Tools And Materials
Gathering the right tools and materials makes installing pendant lights over your island easier. Preparation saves time and avoids frustration. Having everything ready ensures a smooth installation process. Safety and accuracy depend on the correct equipment and components.
Essential Tools List
- Electric drill with drill bits
- Wire stripper and cutter
- Voltage tester
- Screwdrivers (flathead and Phillips)
- Measuring tape
- Level
- Ladder or step stool
- Pliers
- Wire nuts
- Electrical tape
Safety Equipment
- Insulated gloves
- Safety goggles
- Dust mask
- Non-slip shoes
- Work gloves
Light Fixture Components
- Pendant light shades or globes
- Light bulbs compatible with fixture
- Mounting bracket
- Canopy cover
- Electrical wires
- Chain or rod for hanging
- Wire connectors
Turning Off Power Safely
Ensure safety first by switching off the power at the circuit breaker. This prevents any accidental electric shocks.
Turning off the power safely is crucial before installing pendant lights. This step ensures your safety and prevents electrical accidents. Always prioritize cutting off the electricity supply to avoid any risks. Here’s how to do it effectively.Locate Circuit Breaker
Find the main circuit breaker panel in your home. It’s usually in a garage, basement, or utility room. Open the panel door to access the switches inside. Look for a label indicating the kitchen or island area. This label helps identify the correct breaker to switch off.Verify Power Is Off
Ensure the power is completely off before proceeding. Use a voltage tester to check the wires. Touch the tester to the wires where the pendant lights will be installed. The tester should show no voltage if the power is off. Double-check to be absolutely certain.Installing The Mounting Bracket
Installing the mounting bracket is a crucial step when setting up pendant lights over your island. This bracket will hold the fixture securely and ensure everything aligns properly. Taking your time here can save you from future hassles like loose lights or uneven hanging.
Attach Bracket To Ceiling
Start by locating the ceiling joist above your island. This is where the bracket will get the strongest support. Use a stud finder to pinpoint the exact spot.
Hold the mounting bracket against the ceiling and mark the screw holes with a pencil. Drill pilot holes to make screwing easier and prevent the wood from splitting. Then, secure the bracket firmly with screws rated for ceiling installation.
Have you checked if your ceiling surface needs anchors? Drywall alone won’t hold the weight safely. Make sure your bracket feels stable before moving on.
Secure Wiring Box
The wiring box fits into the bracket and holds the electrical connections safely. Before attaching it, gently pull the electrical wires through the box opening.
Match the wiring box to the bracket’s design and snap or screw it into place. Ensure it sits flush without wobbling to avoid any strain on the wires.
Double-check your wiring connections now or mark the wires for easy identification later. This small step helps avoid confusion when connecting the pendant light itself. Safety always comes first when dealing with electrical components.
Wiring The Pendant Lights
Wiring pendant lights over your island requires care and attention. Proper wiring ensures safety and smooth functioning. Follow these tips for a secure and neat electrical connection.
Connect Wires Correctly
Match the wires by color before connecting them. Typically, black or red wires are hot, white wires are neutral, and green or copper wires are ground. Attach the black wire from the pendant to the black wire in the ceiling. Connect the white wire from the pendant to the white ceiling wire. Finally, connect the ground wires together.
Use Wire Nuts And Tape
Secure wire connections using wire nuts. Twist the wires together tightly, then screw on the wire nut. Wrap electrical tape around the base of the wire nut and wires. This adds extra protection and prevents the wire nut from loosening over time.
Double-check Connections
Inspect all connections before finalizing the installation. Tug gently on each wire to ensure it is secure. Confirm no bare wires are exposed outside the wire nuts. Properly connected wires prevent shorts and electrical hazards.
Securing The Pendant Fixture
Securing the pendant fixture is a crucial part of installing pendant lights over your island. This step ensures your light stays firmly in place and looks great. Proper attachment prevents wobbling and keeps the fixture safe for daily use.
Attach Fixture To Bracket
Start by aligning the pendant fixture with the mounting bracket. The bracket is the metal plate fixed to the ceiling box. Hold the fixture close and connect the wires as instructed. Use wire nuts to secure the electrical connections. Tuck the wires neatly into the ceiling box. Then, position the fixture over the bracket holes.
Fasten the fixture using screws provided with your light. Tighten the screws evenly to keep the fixture steady. Check for any loose parts and adjust as needed. A firm attachment is key to a safe and lasting installation.
Adjust Height And Position
Next, set the pendant light at the right height above your island. The ideal height is usually 30 to 36 inches from the countertop. Adjust the cord or chain length by pulling or releasing it carefully. Make sure the fixture hangs straight and even.
Step back and view the light from different angles. Adjust the position if it looks off-center or uneven. The right placement improves both function and style. Secure any locks or clips to hold the height steady.
Testing And Final Adjustments
After you’ve securely installed your pendant lights, the next crucial phase is testing and making final adjustments. This step ensures your lighting not only functions correctly but also complements your kitchen island perfectly. Taking the time to test and tweak will save you from future headaches and give your space the exact ambiance you want.
Restore Power
Before testing your pendant lights, make sure to restore the power at the circuit breaker. This simple step reactivates the electricity to your new fixtures. If you’re unsure which breaker controls the light, label your breakers for easier future access.
Always double-check that all switches are off before restoring power to avoid any electrical surprises. Safety first—ensure your hands are dry and you’re standing on a dry surface when flipping the breaker back on.
Test Light Functionality
Once the power is back, turn on your pendant lights to check if they illuminate properly. Look for any flickering, dimness, or odd noises that might indicate wiring issues.
If you notice any problems, switch off the power immediately and revisit your wiring connections. It’s better to fix small issues now than risk damage or hazards later.
Do the lights cast the glow you imagined? Sometimes the bulb wattage or type affects how the light fills the room. Don’t hesitate to experiment with different bulbs to find the perfect brightness and color temperature.
Fine-tune Placement
With your lights working, stand back and evaluate their placement over the island. Are they centered? Do they hang at the right height for both style and function?
Adjust the cords or chains if needed to ensure the pendants provide enough task lighting without obstructing views or headspace. Typically, pendant lights should hang about 30 to 36 inches above the island surface.
Consider how the light interacts with the rest of your kitchen. Is there glare or shadow where you don’t want it? Small tweaks now can make a big difference in daily use.
Have you noticed how adjusting the height and position changed the room’s vibe? Sometimes, a few inches up or down can transform the entire atmosphere. Don’t rush this step—test different setups until it feels just right for you.
Tips For Maintenance And Upkeep
Maintaining pendant lights keeps them bright and attractive. Regular care prevents dust buildup and damage. Small steps ensure they last long and work well. This section shares tips for cleaning and bulb replacement. Simple actions help your kitchen island lighting shine.
Cleaning Pendant Lights
Turn off the light and wait for it to cool. Use a soft cloth or microfiber duster to wipe dust gently. Avoid harsh chemicals that might damage the finish. For glass shades, use mild soap and warm water. Dry the parts completely before reassembling. Clean weekly or biweekly to keep lights clear.
Replacing Bulbs Safely
Switch off power at the circuit breaker for safety. Wait until bulbs cool before touching them. Use a ladder or sturdy stool to reach the lights. Match new bulbs with the recommended wattage and type. Insert bulbs firmly but without forcing them. Test the light after replacement to ensure it works.

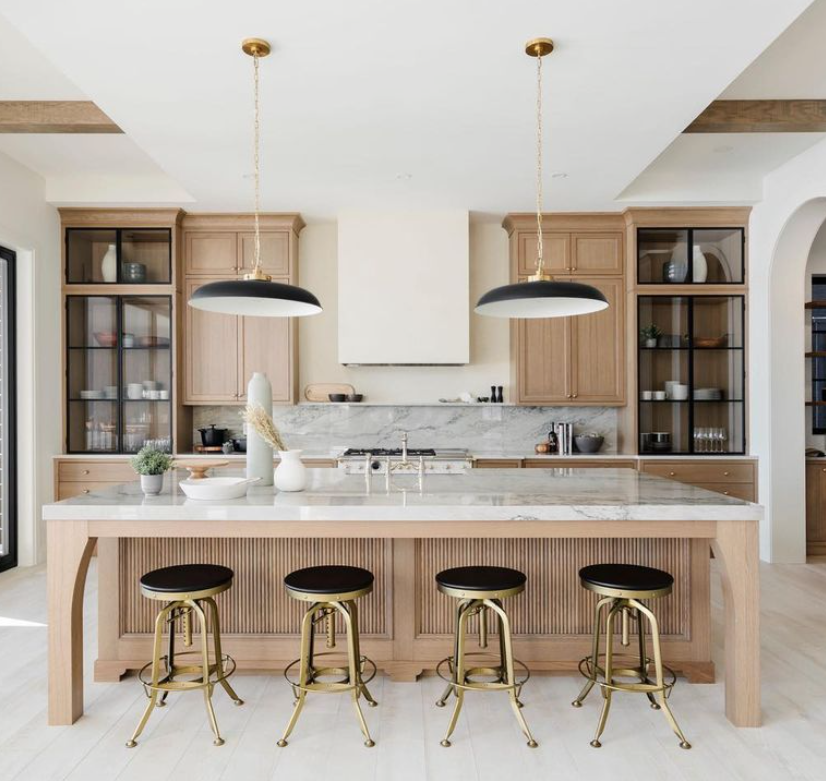
Credit: www.lighting-one.com
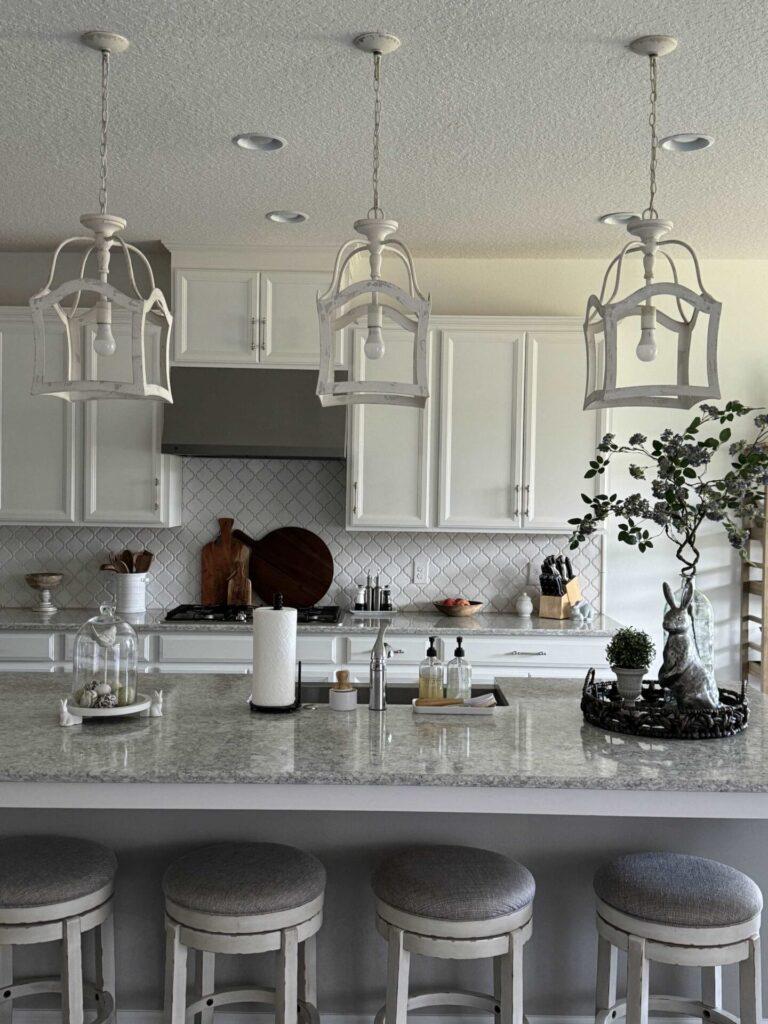
Credit: anorganizedseason.com
Frequently Asked Questions
How High Should Pendant Lights Hang Over An Island?
Pendant lights should hang 30 to 36 inches above the island countertop. This height provides optimal lighting and prevents glare. Adjust based on ceiling height and fixture size for balanced illumination and aesthetics.
What Size Pendant Lights Suit Kitchen Islands?
Choose pendant lights that are 8 to 12 inches wide for each light. For larger islands, space multiple pendants evenly to ensure proper lighting coverage and style balance.
Can I Install Pendant Lights Without An Electrician?
You can install pendant lights if you have basic electrical knowledge. Always turn off power before installation. If unsure, hiring a licensed electrician is safer and ensures code compliance.
How Many Pendant Lights Are Ideal Over An Island?
Typically, two to three pendant lights work well over a kitchen island. The exact number depends on island size and light fixture dimensions for even illumination.
Conclusion
Installing pendant lights over your island can brighten your kitchen and add style. Choose the right height and spacing for the best look. Use safe tools and follow instructions carefully. Take your time to ensure everything fits well. A well-lit island makes cooking and dining more enjoyable.
Try different designs to match your kitchen’s feel. Enjoy the warm, inviting space you create with these lights.


