
Are you tired of dealing with a hot, stuffy attic or worrying about moisture damaging your roof? Proper roof ventilation can solve these problems and extend the life of your home.
But how do you install roof ventilation the right way? This guide will walk you through simple, clear steps to help you improve your roof’s airflow. By the end, you’ll know exactly what to do to keep your home cooler, prevent damage, and save on energy bills.
Keep reading to discover how easy it can be to protect your roof and your comfort.
Credit: www.owenscorning.com
Benefits Of Roof Ventilation
Roof ventilation plays a vital role in maintaining a healthy home environment. It helps air move freely in and out of the attic or roof space. This process brings several benefits that improve comfort and protect your house.
Improved Airflow And Temperature Control
Good roof ventilation allows hot air to escape during warm months. This keeps the attic cooler and reduces heat buildup inside your home. Cooler attic spaces lower indoor temperatures. It makes living areas more comfortable without extra cooling devices.
In colder months, ventilation helps remove warm, moist air. It prevents frost and ice dam formation on the roof. Proper airflow balances the temperature and protects roofing materials.
Prevention Of Moisture Damage
Moisture can build up in poorly ventilated roofs. It causes mold, mildew, and wood rot. These issues weaken the structure and harm indoor air quality.
Roof ventilation reduces moisture by letting damp air escape. It keeps the attic dry and extends the life of roofing materials. This also prevents stains and damage to ceilings and walls.
Energy Efficiency And Cost Savings
Ventilated roofs reduce the load on heating and cooling systems. Less energy is needed to maintain comfortable temperatures. This lowers utility bills and saves money.
Energy-efficient homes have less wear on HVAC equipment. Proper ventilation helps your system run smoothly and last longer.
Types Of Roof Vents
Choosing the right type of roof vent improves air flow and prevents moisture buildup. Each vent serves a specific purpose and fits different roof designs. Understanding these options helps ensure proper ventilation for your home.
Ridge Vents
Ridge vents run along the roof’s peak. They allow hot air to escape from the attic evenly. These vents are hidden under the roof shingles for a clean look. Ridge vents work best on sloped roofs.
Soffit Vents
Soffit vents are installed under the eaves. They bring fresh air into the attic space. These vents help balance airflow by working with ridge vents. Soffit vents are essential for proper intake ventilation.
Gable Vents
Gable vents are placed on the side walls of the attic. They provide ventilation by allowing air to flow in and out. These vents are easy to install and maintain. Gable vents work well for homes with gable roofs.
Turbine Vents
Turbine vents spin with the wind to pull hot air out. They do not need electricity to operate. These vents are visible on the roof and add a unique look. Turbine vents are effective in areas with consistent wind.
Tools And Materials Needed
Installing roof ventilation needs the right tools and materials. Using proper equipment makes the job easier and safer. Preparation saves time and helps avoid mistakes. Below are the essentials to gather before starting.
Basic Tools
- Measuring tape for accurate cuts and placements
- Utility knife for trimming roofing materials
- Power drill with drill bits for securing vents
- Screwdriver set for fastening screws
- Hammer for nails and adjustments
- Chalk line to mark straight lines on the roof
- Caulking gun for sealing around vent edges
- Handsaw or jigsaw for cutting roof openings
Ventilation Components
- Ridge vents to allow hot air to escape
- Soffit vents to bring fresh air into the attic
- Gable vents for additional airflow if needed
- Vent flashing to protect vent openings from water
- Vent covers to keep out debris and pests
- Vent screws or nails specified by the manufacturer
- Foam gaskets or sealants to ensure airtight installation
Safety Gear
- Work gloves to protect your hands
- Safety glasses to guard your eyes
- Non-slip shoes for secure footing on the roof
- Hard hat to protect from falling objects
- Harness and ropes for fall protection on steep roofs
- Dust mask if working with insulation or old materials
Preparing Your Roof
Preparing your roof is a vital first step before installing ventilation. This phase ensures safety and accuracy. It also helps the ventilation system work effectively. Proper preparation prevents future problems like leaks or poor airflow.
Inspecting The Roof Structure
Check the roof for damage or weak spots. Look for broken shingles, cracks, or rotten wood. Clear away debris like leaves and branches. Inspect the rafters and sheathing to confirm they are solid. This inspection helps identify areas needing repair before installation.
Measuring And Marking Vent Locations
Measure the roof area to find the best spots for vents. Mark locations to balance airflow across the roof. Use a tape measure and chalk line for precise marks. Consider both intake and exhaust vents for proper ventilation. Accurate marking guides safe cutting and fitting of vents.
Step-by-step Installation Guide
Installing roof ventilation improves airflow and reduces moisture. Gather tools and materials first. Mark the location carefully on the roof. Cut the opening and secure the vent. Seal edges to prevent leaks. Follow safety precautions throughout the process.
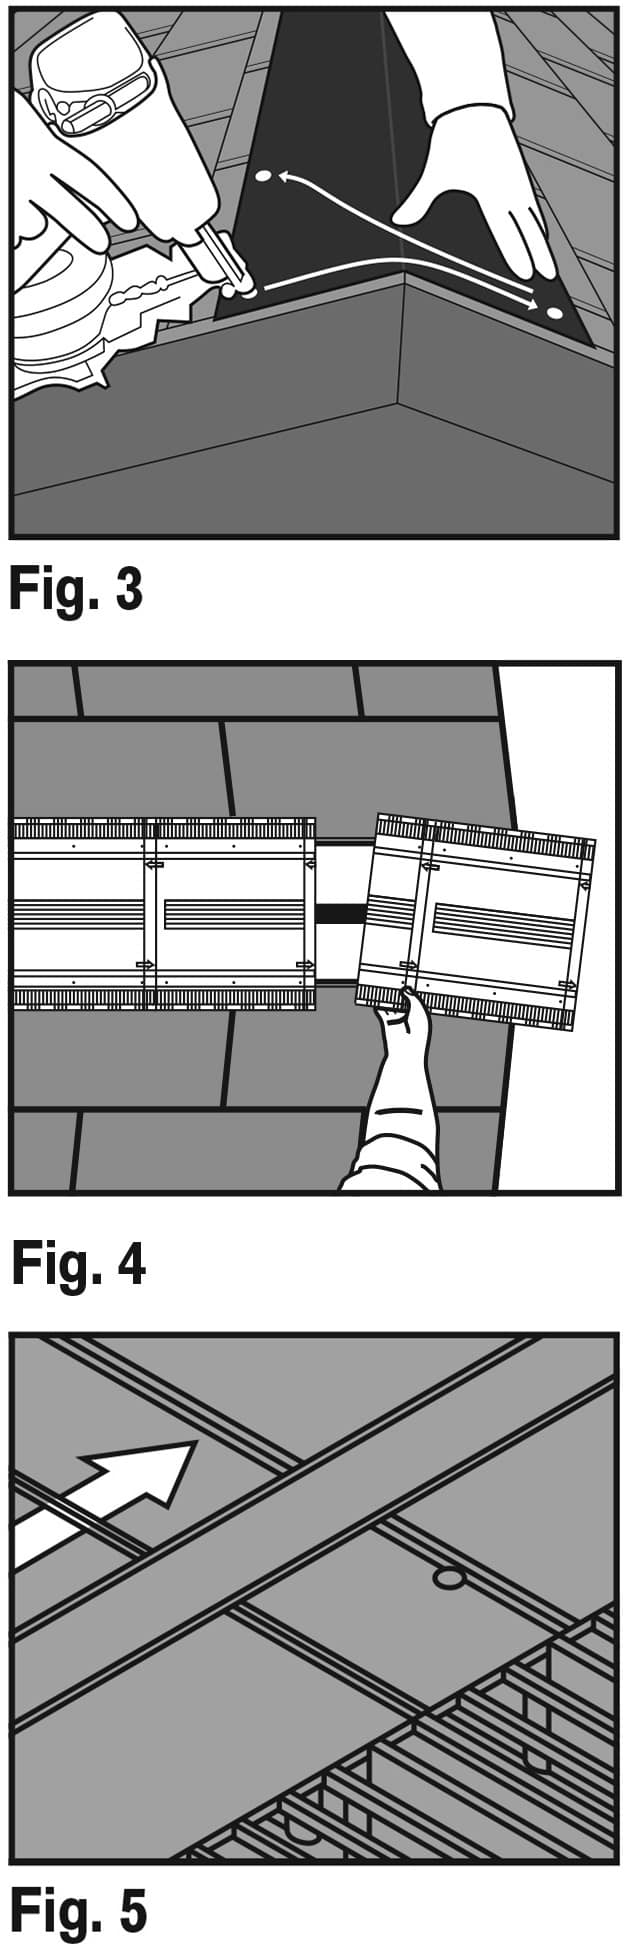
Installing roof ventilation is a crucial process to ensure proper airflow and prevent moisture buildup in your attic. A well-ventilated roof helps to regulate temperature, reduce energy costs, and prolong the lifespan of your roofing system.Installing Ridge Or Gable Vents
Begin by selecting the location for your ridge or gable vents. Typically, these vents are installed at the peak of the roof, where the two slopes meet. Ensure the area is clear of debris and obstructions.
- Measure and mark the location of the vent on the roof.
- Use a drill and jigsaw to cut a rectangular opening for the vent.
- Install the vent according to the manufacturer’s instructions.
- Secure the vent with screws or nails.
Cutting Openings For Vents
To install soffit vents or other types of vents, you’ll need to cut openings in the soffit or fascia board.
- Measure and mark the location of the vent on the soffit or fascia board.
- Use a drill and jigsaw to cut a rectangular or square opening for the vent.
- Ensure the opening is slightly larger than the vent to allow for easy installation.
Adding Soffit Vents
Soffit vents are typically installed along the underside of the roof’s eaves. They help to draw cool air into the attic and push hot air out.
- Measure and mark the location of the soffit vent on the soffit or fascia board.
- Use a drill and jigsaw to cut a rectangular or square opening for the vent.
- Install the soffit vent according to the manufacturer’s instructions.
- Secure the vent with screws or nails.
Sealing And Securing Vents
Once all vents are installed, seal any gaps or openings around the vents with caulk or weatherstripping.
- Apply a bead of caulk around the vent to seal any gaps.
- Use weatherstripping to seal any gaps between the vent and the surrounding roofing material.
- Ensure all vents are securely fastened to the roof or soffit.

Credit: www.roofingcontractor.com
Common Installation Mistakes To Avoid
Installing roof ventilation might seem straightforward, but many homeowners make avoidable mistakes that can compromise your roof’s performance. These errors often lead to poor airflow, leaks, and even damage over time. Recognizing these common pitfalls helps you achieve a ventilation system that works efficiently and lasts longer.
Incorrect Vent Placement
Placing vents in the wrong spots disrupts airflow and reduces ventilation efficiency. Vents should be positioned to allow air to enter at the eaves and exit near the roof ridge. If vents are too close together or blocked by insulation, hot air won’t escape properly.
I once saw a project where vents were installed only on one side of the roof, causing moisture buildup inside the attic. Ask yourself: is the air flowing freely from intake to exhaust vents on your roof?
Poor Sealing Techniques
Failing to seal around vents correctly invites water leaks and drafts. Use high-quality roofing sealants and flashing to secure vents tightly against the roof surface. Remember, even a small gap can lead to costly water damage.
During a recent inspection, I found poorly sealed vents causing water stains on ceilings. Double-check your work and don’t rush the sealing process—your roof depends on it.
Ignoring Local Building Codes
Building codes exist to keep your home safe and your roof durable. Skipping code requirements can lead to fines, failed inspections, or worse, an unsafe ventilation system. Always review local codes before starting installation.
One homeowner I worked with faced delays because their vent type wasn’t approved for their area. Have you checked the rules that apply to your neighborhood before buying materials?
Maintenance Tips For Roof Vents
Proper maintenance keeps roof vents working well and extends their life. Regular checks and cleaning prevent damage and blockages. Maintaining vents helps air flow and keeps your home safe from moisture.
Regular Cleaning
Clean roof vents to remove dirt, leaves, and debris. Use a soft brush or cloth for cleaning. Clear any nests or insect buildup inside vents. Clean vents at least twice a year to avoid clogs.
Checking For Damage
Look for cracks, rust, or loose parts on vents. Check seals and flashing around vents to stop leaks. Replace damaged parts quickly to prevent water entry. Use a flashlight to inspect inside vents for hidden damage.
Seasonal Inspections
Inspect vents at the start of each season. Check for ice or snow buildup in winter. Look for signs of wear from sun and rain in summer. Seasonal checks help catch issues early and keep vents efficient.

Credit: www.jlconline.com
Frequently Asked Questions
What Is The Purpose Of Roof Ventilation?
Roof ventilation removes excess heat and moisture from your attic. It helps prevent mold, wood rot, and ice dams. Proper ventilation extends roof lifespan and improves energy efficiency.
How Do I Choose The Right Roof Vent Type?
Select vents based on roof design and climate. Common types include ridge vents, soffit vents, and gable vents. Choose vents that ensure balanced airflow for effective ventilation.
Can I Install Roof Ventilation Myself?
Yes, with basic tools and safety precautions, you can install roof vents. Follow manufacturer instructions and local building codes. For complex roofs, consider hiring a professional for best results.
How Often Should Roof Ventilation Be Inspected?
Inspect roof ventilation systems annually or after severe weather. Check for blockages, damage, and proper airflow. Regular maintenance ensures optimal performance and prevents roof problems.
Conclusion
Proper roof ventilation helps keep your home cool and dry. It prevents moisture build-up and extends your roof’s life. Installing vents is a simple way to improve airflow. Choose the right vent type for your roof style. Follow safety steps to avoid accidents during installation.
Regular checks keep your ventilation working well. Good ventilation saves energy and reduces repair costs. Start your project with clear instructions and the right tools. Your home will feel fresher and more comfortable with better airflow. Simple steps make a big difference in roof health.


