
Looking for a unique way to brighten up your space? Imagine creating a stylish desk lamp using just cardboard and a few simple tools.
You don’t need to be an expert or spend a lot of money to make something both functional and eye-catching. In this guide, you’ll discover easy, step-by-step instructions to craft your very own cardboard desk lamp. By the end, you’ll have a cool, eco-friendly light source that’s perfect for your workspace or bedroom.
Ready to get creative and see your room in a whole new light? Let’s dive in!

Credit: thangs.com
Materials Needed
Gathering the right materials is key to making a cardboard desk lamp that looks great and works well. Knowing what type of cardboard to use, choosing the correct lighting components, and having the right tools ready will save you time and frustration.
Types Of Cardboard
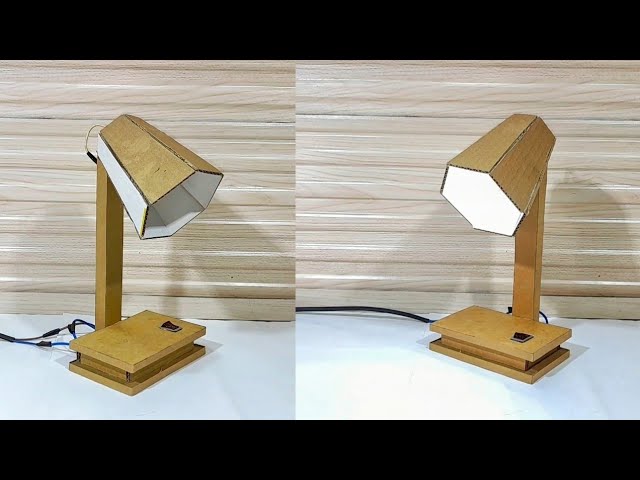
Not all cardboard is the same. You want sturdy, thick cardboard like corrugated cardboard, which has a fluted layer sandwiched between two flat layers. It holds shape well and supports the lamp structure.
Single-layer cardboard, like from cereal boxes, is too flimsy for the lamp’s body but can be useful for decorative parts. Think about recycling old shipping boxes or packaging that you have on hand.
Lighting Components
Choosing the right light source is crucial. LED bulbs are your best bet—they produce less heat and use less energy, making your lamp safer and more efficient.
- LED bulb (check the wattage and size)
- Socket compatible with your bulb
- Electrical cord with plug
- On/off switch (optional but handy)
Have you thought about using battery-powered LED lights? They can simplify wiring and let you place the lamp anywhere without worrying about outlets.
Tools Required
Having the right tools at hand makes your build smooth and precise. A sharp utility knife or box cutter works best for cutting cardboard cleanly.
- Ruler or measuring tape
- Pencil for marking
- Hot glue gun or strong craft glue
- Cutting mat to protect surfaces
- Scissors (for finer cuts)
Do you have a comfortable workspace? Setting up an area with good lighting and enough room will help you focus and avoid mistakes.
Design Ideas
Designing your cardboard desk lamp is where creativity meets practicality. You want a lamp that not only lights up your space but also reflects your style and fits your workspace. Let’s look at different design ideas that help you make a unique and functional lamp.
Simple Shapes
Start with basic shapes like cubes, cylinders, or pyramids. These forms are easy to cut and assemble from cardboard. A cube lamp, for example, offers a clean look and can be decorated with paint or paper.
Simple shapes also make it easier to balance the lamp and hide wiring. Have you thought about using a cylinder for a softer light effect? It gently diffuses light and adds a modern touch to your desk.
Creative Styles
Try mixing shapes or adding cut-out patterns to create interesting shadows. You can cut geometric patterns or abstract designs on the lamp’s surface to let light peek through in unique ways.
Consider adding layers of cardboard to create depth and texture. A layered design not only looks cool but also strengthens your lamp’s structure. Why settle for ordinary when your lamp can double as an art piece?
Customizing Your Lamp
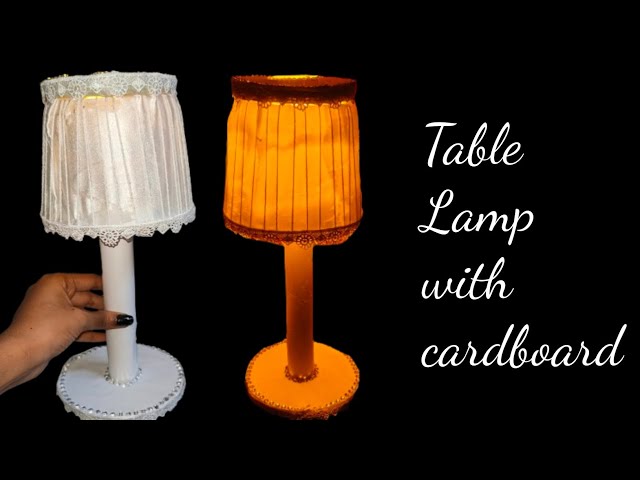
Make your lamp truly yours by customizing colors, finishes, and details. Paint your lamp in bold hues or use markers for detailed drawings that express your personality.
Adding small touches like a fabric lampshade cover or decorative tape can transform the cardboard into a stylish accessory. What small detail will you add to make your lamp stand out on your desk?
Cutting The Cardboard
Cutting cardboard carefully shapes pieces for your desk lamp. Use a sharp blade and a ruler to make clean, straight cuts. Precision ensures the lamp fits together well and looks neat.
Creating a cardboard desk lamp can be an exciting project that blends creativity with practicality. As you embark on this DIY journey, one of the most crucial steps is cutting the cardboard. Precision is key here to ensure your lamp not only looks good but also stands sturdy and functions well. Let’s dive into the essential aspects of cutting the cardboard effectively.Measuring And Marking
Before you cut, you need to measure and mark your cardboard accurately. Use a ruler or a measuring tape to get precise dimensions. This ensures that each piece fits perfectly together. Mark your measurements clearly with a pencil. A simple pencil mark is easy to follow and can be erased if you make a mistake. Double-check your measurements before making any cuts. Have you ever cut a piece only to realize it doesn’t fit? Taking the extra time to verify can save you from this common frustration.Safe Cutting Techniques
Safety is paramount when cutting cardboard. Always use a sharp utility knife or a box cutter, and make sure to cut away from your body. A dull blade can slip and cause injuries, while a sharp blade gives clean cuts. Place your cardboard on a stable surface before you cut. A cutting mat can protect your table and help prevent the blade from slipping. Consider using a metal ruler as a guide for straight cuts. It’s sturdier than a plastic one and offers better resistance. Remember to take breaks if you’re working on a large project. Fatigue can lead to mistakes or accidents. Have you ever found that stepping away for a moment gives you a fresh perspective and steadier hand? It’s a small tip that can make a big difference in your project’s outcome.Assembling The Lamp
Assembling your cardboard desk lamp is where your project starts to take real shape. This phase requires attention to detail and patience. You’ll see how simple pieces come together to form a sturdy and functional lamp that’s also eco-friendly.
Joining Cardboard Pieces
To join the cardboard pieces effectively, use a strong adhesive like hot glue or wood glue. Apply glue evenly along the edges to avoid weak spots. Hold pieces firmly together for at least 30 seconds to ensure a solid bond.
Try aligning the edges carefully before gluing to keep your lamp symmetrical. You might find it helpful to use clamps or heavy books to keep everything in place while drying. This prevents shifting and guarantees a neat finish.
Securing The Structure
Once the pieces are joined, reinforcing the structure is key to durability. Add extra layers of cardboard at stress points, like the lamp’s base and neck. These reinforcements help your lamp stay stable and upright.
Think about where your lamp will be used—will it be moved often or stay in one place? If it’s portable, consider using tape or small brackets for added security. This way, your lamp won’t wobble or fall apart over time.
Installing The Light
Installing the light is a crucial part of creating your cardboard desk lamp. It’s where your design starts to come alive and actually serves its purpose. Getting this right ensures your lamp is safe, functional, and looks great.
Wiring Basics
Before you start, make sure you have the right materials: a lamp cord with a plug, a light socket, and electrical tape. Understanding simple wiring helps you avoid any electrical hazards.
Connect the two wires from the lamp cord to the terminals on the socket. Usually, one wire attaches to the brass terminal and the other to the silver terminal. Make sure the connections are tight and secure to prevent any loose wiring issues.
Have you checked that your wire’s insulation is intact? If you see any exposed wire, wrap it carefully with electrical tape. Safety should be your top priority when working with electricity.
Fitting The Bulb And Socket
Choose a bulb that fits your socket and suits the lamp’s size. LED bulbs are a great choice because they don’t heat up much, which is safer for cardboard.
Secure the socket firmly inside the cardboard structure. You can use hot glue or small brackets, but make sure it doesn’t wobble or shift when you move the lamp.
Once the socket is in place, screw in the bulb gently. Avoid forcing it to prevent breaking the bulb or damaging the socket. Have you tested the lamp’s stability before plugging it in?

Credit: www.youtube.com
Finishing Touches
The finishing touches bring your cardboard desk lamp to life. They improve its look and protect it. These last steps make your lamp stand out and last longer. Focus on painting and decorating first. Then, add a protective coating for durability.
Painting And Decorating
Choose paint that works well on cardboard. Acrylic paint is a great option. It dries fast and gives vibrant colors. Use a small brush for detailed areas. A sponge brush covers larger parts quickly. Try these ideas for decorating:
- Paint solid colors for a clean, modern look.
- Add patterns like stripes or dots for fun.
- Use stencils to create shapes or letters.
- Attach decorative paper or fabric for texture.
Keep paint layers thin to avoid warping the cardboard. Allow each layer to dry before applying the next. This prevents smudges and uneven surfaces.
Adding Protective Coating
A protective coating keeps your lamp safe from spills and dust. It also makes the paint last longer. Use a clear spray sealant made for crafts. Apply it in a well-ventilated area. Hold the spray can about 12 inches from the surface. Spray light, even coats. Let each coat dry fully before the next. Two or three coats work best.
Another option is brushing on a clear varnish. Choose water-based varnish for easy cleanup. This adds a smooth, shiny finish. It also strengthens the cardboard against wear and tear.
These finishing touches transform your cardboard desk lamp into a stylish, durable piece. Enjoy your unique creation every day.
Safety Tips
Safety is the top priority when making a cardboard desk lamp. Cardboard is flammable and not designed for electrical use. Taking safety precautions prevents accidents and damage. Follow these tips to keep your project safe and functional.
Electrical Safety
Use low-voltage LED bulbs to reduce risk. Avoid high-watt bulbs that generate heat. Check all wires for damage before use. Secure connections tightly to prevent shorts. Use an appropriate lamp socket and plug. Never touch wires with wet hands. Keep the power off while assembling. Test the lamp in a safe space before daily use.
Fire Prevention
Keep the lamp away from flammable materials. Do not place the lamp near curtains or papers. Ensure good ventilation around the bulb area. Use fire-retardant spray on the cardboard if possible. Avoid leaving the lamp on unattended. Turn off the lamp when not in use. Place the lamp on a stable, non-flammable surface.
Troubleshooting
Troubleshooting your cardboard desk lamp helps keep it working well. Problems may happen during or after making the lamp. Knowing how to fix these issues saves time and frustration.
Most problems come from simple mistakes or material limits. Identifying the problem quickly makes repair easier. Some fixes only take minutes and little effort.
Common Issues
- Light bulb does not turn on
- Cardboard structure feels weak or wobbly
- Wires are loose or disconnected
- Light flickers or dims unexpectedly
- Switch does not work properly
- Excess heat causing cardboard to soften
Quick Fixes
- Check if the bulb is screwed in tightly
- Replace the bulb with a new one if burnt out
- Secure loose wires using tape or glue
- Reinforce weak spots with extra cardboard layers
- Test the switch; replace if broken or faulty
- Use LED bulbs to reduce heat and energy use
- Keep the lamp away from moisture and direct sunlight
Credit: www.youtube.com
Frequently Asked Questions
What Materials Are Needed For A Cardboard Desk Lamp?
You need cardboard sheets, a lamp kit, LED bulb, glue, scissors, and paint. These basic materials help create a sturdy, functional lamp.
How Do You Safely Wire A Cardboard Desk Lamp?
Use low-heat LED bulbs to prevent fire hazards. Secure all wiring with tape and keep connections insulated to ensure safety.
Can I Customize The Design Of My Cardboard Lamp?
Yes, you can cut and shape cardboard any way you like. Paint and decorate it to match your style and room décor.
How Long Does It Take To Make A Cardboard Desk Lamp?
Typically, it takes 1-3 hours depending on design complexity and drying time for glue or paint.
Conclusion
Making a cardboard desk lamp is fun and simple. You only need a few materials and some patience. This project saves money and helps the environment. Plus, you get a unique lamp made by your own hands. Try different shapes and colors to match your style.
Enjoy the warm light and the pride of your creation. Start crafting today and brighten your workspace naturally.


