
Are you ready to add a unique touch to your workspace? Imagine a desk lamp that not only lights up your room but also sparks your creativity with its vintage, industrial charm.
Making a steampunk desk lamp is easier than you think, and it gives you a chance to create something truly one-of-a-kind. In this guide, you’ll discover simple steps and insider tips to build your own lamp that stands out. Keep reading, and by the end, you’ll have all the tools to transform your desk into a stylish, inspiring haven.
Materials Needed
Gathering the right materials is crucial for creating a steampunk desk lamp that stands out. Each item you choose shapes the final look and functionality. Before you start, make sure you have everything ready to avoid interruptions and keep your creative flow going.
Essential Components
- Metal pipes and fittings:Copper or brass pipes work best for that authentic steampunk vibe.
- Light bulb:Edison bulbs add a vintage touch and warm glow.
- Lamp socket and wiring:Choose a socket compatible with your bulb and ensure safe wiring materials.
- Base:A sturdy wood or metal base keeps your lamp stable and complements the industrial style.
- Switch:A toggle or rotary switch fits well with the steampunk theme.
Have you ever noticed how the right bulb can change the whole atmosphere of a room? Picking an Edison bulb not only looks cool but also adds to the cozy feeling of your workspace.
Tools Required
- Screwdriver set for assembling parts.
- Wire stripper and cutter to prepare your electrical connections.
- Drill to create holes in the base or pipes if needed.
- Pliers and wrench for tightening fittings securely.
- Soldering iron (optional) for more durable electrical joins.
Having the right tools at hand makes the building process smoother and safer. If you’re missing a tool, consider borrowing rather than buying, especially if this is your first project.
Optional Decorative Items
- Gears and cogs to attach for added steampunk flair.
- Leather strips or straps to wrap around parts for texture.
- Antique clock parts or small gauges as eye-catching accents.
- Rust-effect paint or patina sprays to enhance the vintage look.
- Glass tubes or bulbs with filaments for a unique lighting effect.
Think about how much detail you want in your lamp. Do you prefer a subtle industrial look or an elaborate mechanical masterpiece? Adding small decorative pieces can turn a simple lamp into a conversation starter.
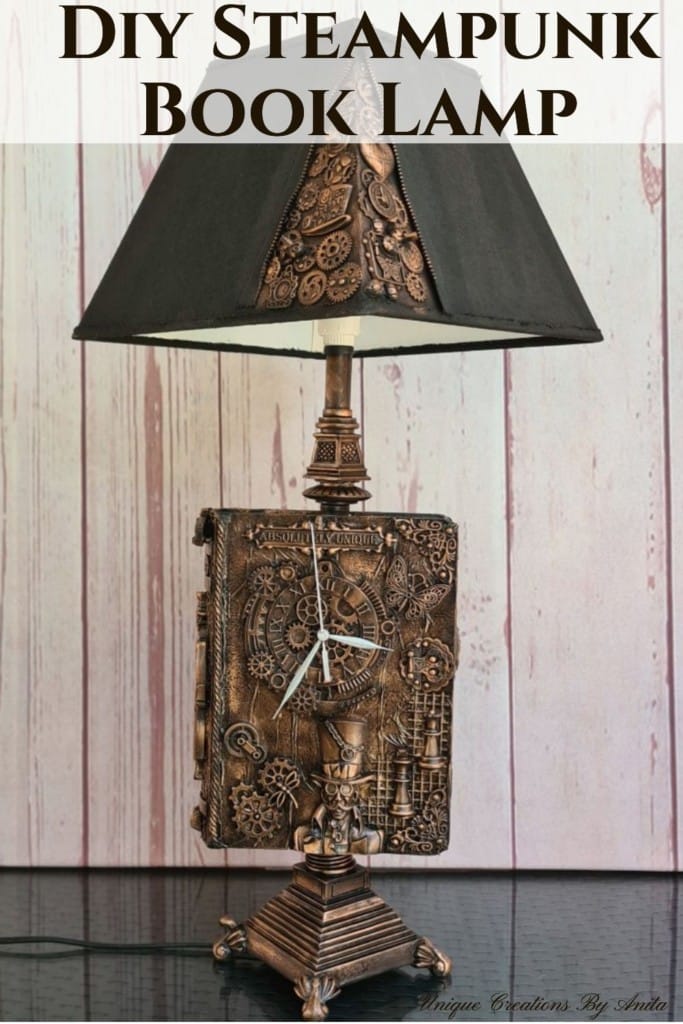
Credit: uniquecreationsbyanita.com
Design Ideas
Design ideas set the mood for your steampunk desk lamp. They help you shape a unique style that fits your space. Mixing old and new parts creates a striking look. Focus on details to bring the steampunk vibe alive.
Classic Steampunk Elements
Use copper, brass, and iron for authentic steampunk tones. Gear wheels and cogs add mechanical charm. Exposed pipes and tubes bring industrial flair. Edison bulbs fit well with vintage aesthetics. These elements build a timeless, rugged look.
Incorporating Vintage Parts
Old typewriter keys make great switches or decorations. Antique clock faces add character and detail. Repurposed camera lenses can serve as lamp shades. Vintage tools like wrenches or springs enhance the design. These parts tell stories and add depth.
Personalizing Your Lamp
Add your initials with metal letters or stamps. Use paint to create patinas or rust effects. Attach small trinkets that reflect your interests. Experiment with different bulb shapes and colors. Personal touches make your lamp truly yours.
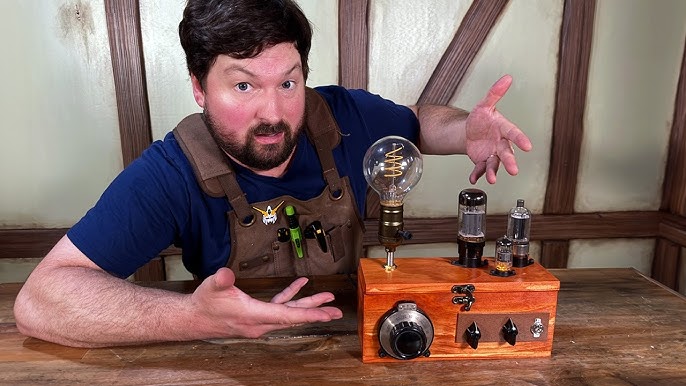
Building The Base
Creating a steampunk desk lamp is a thrilling DIY project that lets you blend vintage aesthetics with futuristic innovation. The foundation of this artistic journey is, without a doubt, building the base. A solid and aesthetically pleasing base sets the tone for the entire piece, ensuring it stands tall and proud on your desk. Let’s dive into the essential steps for crafting the base, from selecting the perfect material to ensuring it remains sturdy.
Selecting The Base Material
The choice of material for your lamp’s base is crucial. You want something that’s not only durable but also visually appealing. Many steampunk enthusiasts gravitate towards materials like wood, metal, or even antique finds like an old clock base.
Consider visiting local thrift stores or garage sales. You might stumble upon a vintage piece that perfectly fits your vision. Remember, the key is to think creatively and see the potential in every item.
Assembling The Base Structure
Once you’ve got your material, it’s time to bring your vision to life. Begin by cleaning your selected base thoroughly, ensuring there’s no dirt or rust. This step is crucial for both aesthetics and longevity.
Next, use screws or adhesive to secure any additional elements you want to incorporate. This could include gears, bolts, or other steampunk-inspired embellishments. Make sure everything is tightly fastened to avoid any wobbles.
Adding Stability Features
Stability is non-negotiable. A wobbly lamp not only looks unprofessional but is also a safety hazard. Consider adding rubber feet or felt pads to the bottom of your base to prevent slipping and protect your desk surface.
For heavier lamps, you might want to add a counterweight at the base to ensure it remains balanced. Think about the long-term use—will it endure daily movements and adjustments? Ensure the base is ready for anything.
With these steps, you lay the foundation for a steampunk desk lamp that’s both functional and a conversation starter. What unique twist will you add to your creation?

Credit: uniquecreationsbyanita.com
Creating The Lamp Body
Creating the lamp body is where your steampunk desk lamp starts to take shape and character. This part combines metalwork, mechanical details, and electrical wiring to bring your vision to life. It’s a hands-on process that requires patience and precision, but the satisfaction of seeing raw materials transform into a functional art piece is unmatched.
Shaping Metal Components
Begin by selecting the metal pieces you want to use—brass and copper sheets work beautifully for a vintage look. Use metal cutters and files to trim and smooth edges. You might want to create curved shapes or flat panels depending on your design.
Remember, metal can be tricky to bend perfectly without the right tools. A simple mallet and a wooden block can help shape pieces gently without dents. Take your time here; precise shaping makes assembly much easier later.
Attaching Pipes And Gears
Pipes and gears add the authentic steampunk vibe and also serve as structural elements. Arrange your pipes first to form the lamp’s frame—tight joints are key to stability.
- Use strong epoxy or a soldering iron to fix pipes together.
- Attach gears strategically to decorate or even function as switches or dials.
- Test the balance frequently to avoid a top-heavy lamp.
Have you considered how the arrangement affects both aesthetics and function? Make sure the gears don’t interfere with wiring or bulb placement.
Wiring The Lamp Body
Safety is your priority when wiring. Choose a lamp kit with a compatible socket and cord, and follow wiring instructions carefully.
Thread the wiring through your metal frame, securing it with clips or tape to avoid movement. Check connections twice to prevent shorts or loose wires.
Before final assembly, test the lamp by plugging it in. Does the light switch work smoothly? Is there any flicker? Fix any issues immediately to avoid frustration later.
Installing The Light
Installing the light in your steampunk desk lamp is where creativity meets functionality. This phase transforms your assembled parts into a working piece that can brighten your workspace with a vintage vibe. Ensuring the right components fit perfectly and work safely is key to achieving both style and reliability.
Choosing The Right Bulb
Pick a bulb that complements the steampunk aesthetic while providing sufficient light. Edison bulbs are a popular choice because of their warm glow and visible filaments, adding that nostalgic touch. Consider the wattage too—too bright can overpower the look, too dim can strain your eyes.
Do you want your lamp to serve as ambient lighting or task lighting? This decision influences the bulb type and brightness you select. LED filament bulbs offer energy efficiency without sacrificing style, a practical option for long-term use.
Fitting The Socket
Select a socket that matches your bulb and fits the lamp’s design securely. Most steampunk lamps use E26 or E27 sockets, which are standard and easy to find. Make sure the socket is firmly attached to the lamp base or arm to prevent wobbling or electrical issues.
When attaching the socket, keep wires neat and insulated to avoid any shorts. My first attempt involved loose wiring that caused flickering, so take your time to secure everything tightly. Using a socket with a built-in switch can add convenience, saving you a step in operation.
Testing Electrical Connections
Before final assembly, always test your electrical connections for safety and functionality. Use a multimeter to check continuity and ensure there are no shorts between wires. A lamp that flickers or doesn’t turn on usually points to a loose connection or a faulty socket.
Plug your lamp into a power source and observe it for a few minutes. If you notice any sparks or smell burning, unplug immediately and troubleshoot. What’s your plan if something doesn’t work? Having spare parts and tools ready can save a lot of frustration.
Finishing Touches
Finishing touches bring your steampunk desk lamp to life. They add character and protect your hard work. This stage is where you shape the final look and feel.
Applying Paint And Patina
Start by choosing paint colors that fit the steampunk style. Brass, copper, and bronze shades work well. Use spray paint or brush-on paint for even coverage. Let each coat dry completely before adding another.
Patina adds an aged, weathered look to metal parts. Use patina solutions or create your own with vinegar and salt. Apply it lightly, then wipe off excess. This step gives your lamp a vintage charm.
Adding Decorative Details
Small details boost the steampunk vibe. Attach gears, cogs, or clock parts using strong glue or small screws. Leather straps or old keys add texture and interest. Be creative but keep the design balanced and not too crowded.
Use rivets, bolts, or chains to enhance the industrial feel. These details make the lamp look like a piece from a different era.
Sealing And Protecting The Surface
Seal your lamp to protect the paint and patina. Use a clear spray lacquer or polyurethane. Choose matte or glossy finish based on your style choice.
Apply thin, even coats and allow drying time between layers. This step prevents rust and fading. Your lamp will stay beautiful for years to come.
Safety Tips
Safety is the top priority when building a steampunk desk lamp. Working with electrical parts and tools requires care. Follow simple rules to protect yourself and others. Safe practices help avoid accidents and ensure your lamp works perfectly.
Handling Electrical Components
Always unplug wires before starting. Check all parts for damage or wear. Use insulated tools to avoid shocks. Connect wires firmly to prevent loose contacts. Test the circuit with a multimeter before final assembly. Avoid touching live wires during testing.
Working With Tools Safely
Wear safety glasses to protect your eyes. Keep your work area clean and well-lit. Use the right tool for each task. Hold tools firmly and cut away from your body. Store sharp tools safely when not in use. Take breaks to avoid tired hands and mistakes.
Ensuring Lamp Stability
Choose a solid base to keep the lamp steady. Secure all parts tightly with screws or glue. Avoid heavy parts at the top to prevent tipping. Test the lamp’s balance on a flat surface. Add rubber pads under the base to stop slipping. Stability keeps your lamp safe and functional.
Maintenance Advice
Keeping your steampunk desk lamp in top shape ensures it remains a striking centerpiece and a reliable light source. Regular maintenance not only preserves its unique aesthetic but also extends its lifespan. Let’s dive into practical tips that help you care for your creation with ease.
Cleaning Your Lamp
Dust and grime can dull the metal and glass parts of your lamp. Use a soft, dry cloth to wipe down surfaces weekly. Avoid harsh chemicals; instead, try a mild soap solution on a damp cloth for tougher spots, especially on brass or copper components.
Pay attention to crevices where dirt tends to collect. A soft-bristled brush or cotton swabs work well here. Have you noticed how a little cleaning instantly brightens the intricate details you worked hard to assemble?
Replacing Bulbs
Choosing the right bulb is essential for both functionality and style. Check the lamp’s wattage limit before swapping bulbs to prevent damage or overheating. LED bulbs are a smart choice—they save energy and last longer, keeping your lamp glowing without frequent replacements.
Turn off and unplug your lamp before changing the bulb to stay safe. Handle bulbs gently to avoid fingerprints, which can reduce brightness. How often do you find yourself surprised by how much the right bulb changes the ambiance?
Repairing Wear And Tear
Steampunk lamps often have mechanical parts that may loosen or show signs of rust over time. Tighten screws and bolts periodically to keep everything secure. For minor rust, gently sand the affected area and apply a rust-inhibiting primer or paint.
If wires get frayed or connections fail, consider consulting a professional electrician. Your safety matters most, and a quick fix can prevent bigger problems later. Have you ever caught a small issue early and saved yourself hours of frustration?
Credit: www.lemon8-app.com
Frequently Asked Questions
What Materials Are Needed For A Steampunk Desk Lamp?
You need copper pipes, Edison bulbs, vintage switches, and metal fittings. Additional items include wires, a lamp base, and paint for finishing. These materials create the authentic steampunk look and ensure functionality.
How Long Does It Take To Build A Steampunk Desk Lamp?
Building a steampunk desk lamp usually takes 3 to 5 hours. The time varies based on your experience and complexity of design. Planning and careful assembly help speed up the process.
Can I Use Led Bulbs In A Steampunk Lamp?
Yes, LED bulbs are compatible and energy-efficient for steampunk lamps. They provide a vintage look with modern benefits like longer life and less heat. Choose Edison-style LED bulbs for authenticity.
Is It Safe To Make A Diy Steampunk Desk Lamp?
Yes, if you follow electrical safety guidelines and use proper tools. Ensure all wiring is insulated, and components are securely fastened. Testing the lamp before use is essential for safety.
Conclusion
Creating a steampunk desk lamp can be a fun and rewarding project. You get to combine creativity with simple tools. Each step adds a unique touch to your lamp. The finished product brings charm and light to any room. Enjoy the process and be proud of your work.
This lamp shows your style and effort clearly. Keep experimenting with ideas to make it even better. Your handmade lamp will stand out and impress guests. Try making one today and see the difference.


