
Are you tired of cluttered spaces and bulky shelves that take up too much room? Imagine having a sleek, modern shelf that seems to float effortlessly on your wall, holding your favorite books, plants, or decorations without sagging or falling.
You might think making a strong floating shelf is complicated, but it’s easier than you expect—and you can do it yourself. In this guide, you’ll discover simple steps and smart tips to build a sturdy floating shelf that not only looks great but lasts for years.
Ready to transform your space with a project you’ll be proud of? Let’s get started.
Choosing The Right Materials
Choosing the right materials is the foundation of building a strong floating shelf. The strength and durability of your shelf depend heavily on what you pick. Focusing on quality wood, sturdy brackets, and the right tools will save you time and frustration later.
Selecting Quality Wood
Wood quality directly affects the shelf’s strength and appearance. Hardwoods like oak, maple, or walnut are excellent choices because they hold weight well and resist warping. Avoid softwoods like pine if you plan to place heavy items; they tend to bend and dent easily.
Think about the shelf’s purpose. Will it hold books, plants, or decorative items? This helps you decide the thickness and type of wood. For example, a 1-inch thick oak board can support more weight than a thinner plywood piece.
Picking Suitable Brackets
Brackets do the heavy lifting behind the scenes. Choose metal brackets made from steel or iron for maximum strength. Look for brackets with a wide base and deep arms that can support the shelf evenly.
Don’t underestimate the importance of the bracket size. A longer bracket distributes weight better and reduces the risk of the shelf sagging. Also, check the weight rating to match your shelf’s load requirements.
Gathering Necessary Tools
Having the right tools on hand makes the project smoother and safer. Essential tools include a drill, level, stud finder, measuring tape, and a screwdriver. A quality drill bit set will help you handle different materials efficiently.
Missing a tool can slow you down or lead to mistakes. For example, a stud finder is crucial to securely anchor your brackets into the wall studs. Without it, your shelf might not hold up over time.

Credit: www.youtube.com
Preparing The Shelf Components
Preparing the shelf components carefully sets the foundation for a strong floating shelf. Precise measurements and clean cuts ensure the shelf fits well and looks neat. Smooth surfaces improve the finish and prevent splinters. Proper holes for brackets guarantee a secure fit to the wall, supporting the weight evenly.
Measuring And Cutting Wood
Start by measuring the space where the shelf will go. Mark the wood board clearly with a pencil. Use a straight edge to draw cutting lines. Cut the wood with a saw, following the lines exactly. Choose wood that is sturdy and smooth to hold weight well.
Sanding And Finishing
Sand all edges and surfaces using medium-grit sandpaper first. This removes rough spots and splinters. Follow with fine-grit sandpaper for a smooth finish. Wipe the wood clean with a damp cloth. Apply paint, stain, or sealant to protect the wood and improve its look.
Drilling Holes For Brackets
Mark the spots for bracket holes on the wood. Use a level to keep marks even and straight. Drill pilot holes to avoid splitting the wood. Make sure holes match the bracket size. Check holes align with wall studs for strong support.
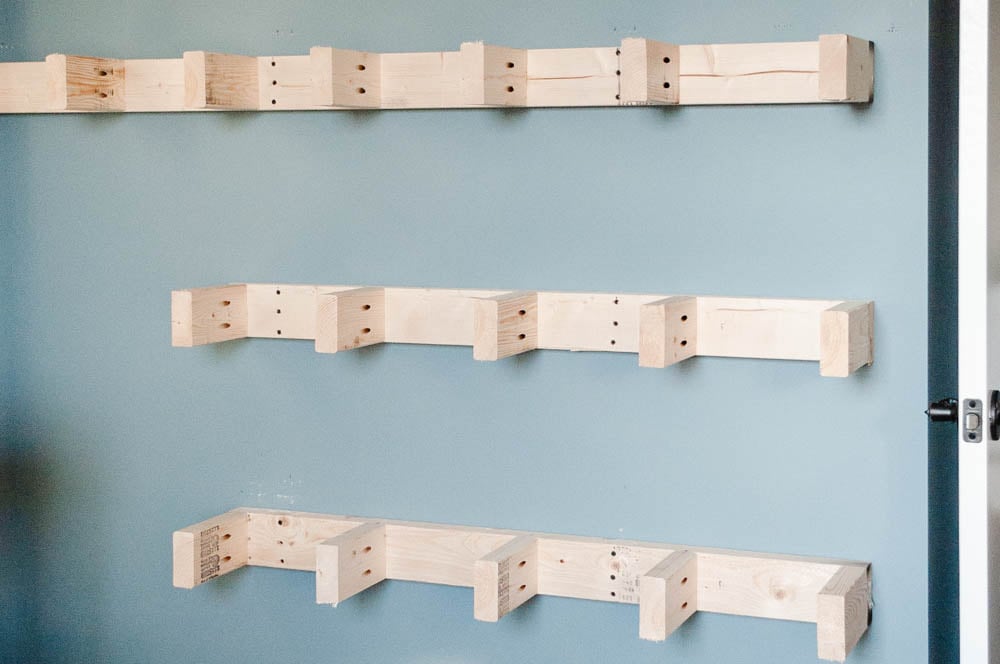
Installing Wall Supports
Installing wall supports is key to making a strong floating shelf. The shelf needs a solid base to hold weight without sagging or falling. Proper support helps keep the shelf steady and safe for use. Follow these steps to secure your shelf brackets correctly on the wall.
Locating Wall Studs
Wall studs provide the best support for floating shelves. Use a stud finder to locate the wooden studs behind the drywall. Move the finder slowly and mark each stud’s edge with a pencil. Check for at least two studs where you want to place the shelf. Avoid hanging shelves only on drywall, as it cannot hold much weight.
Marking Bracket Positions
Measure the shelf length and decide where brackets will sit. Place marks on the wall where the studs are located. Ensure the brackets align with these marks for strong support. Use a level to draw a straight line between marks. This step ensures the shelf will sit level and look neat.
Securing Brackets Firmly
Use screws designed for wood to attach brackets to the studs. Drill pilot holes first to prevent wood from splitting. Tighten screws until the bracket feels solid and does not move. Double-check that brackets are level and evenly spaced. Properly secured brackets will hold the shelf firmly for years.
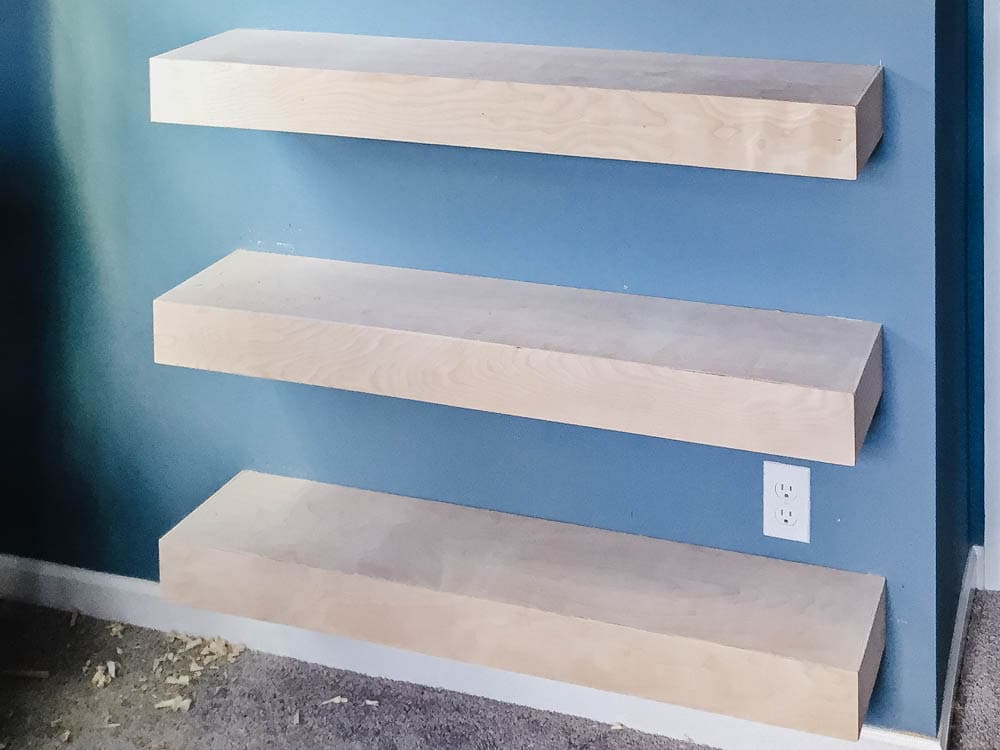
Mounting The Shelf
Choose strong wall studs to support your floating shelf securely. Use heavy-duty brackets or hidden supports for better stability. Ensure the shelf is level and tightly fixed to prevent sagging.
Mounting a floating shelf can seem daunting. But with the right guidance, it’s straightforward. This section will guide you on aligning, attaching, and ensuring your shelf is stable. Proper mounting ensures your shelf can hold weight and looks great on your wall.Aligning Shelf With Brackets
Start by marking the wall where the shelf will go. Use a measuring tape to ensure even placement. Place the brackets on the wall, aligning them with the markings. Ensure the brackets are level using a spirit level. This prevents the shelf from tilting.Attaching Shelf To Supports
Secure the brackets to the wall with screws. Use a power drill for firm attachment. Align the shelf with the mounted brackets. Slide the shelf onto the brackets, ensuring a snug fit. Use screws to secure the shelf to the brackets from underneath.Checking Level And Stability
Once attached, check the shelf’s level with a spirit level. Adjust if necessary by loosening screws and realigning. Press down gently on the shelf to test stability. If it wobbles, tighten the screws further. Ensure the shelf feels secure before placing items on it.Enhancing Shelf Durability
Enhancing the durability of a floating shelf ensures it holds weight and lasts long. Strong construction and good care prevent damage and sagging. Using the right materials and techniques supports the shelf firmly. Protecting the surface guards against scratches and moisture. Regular checks keep the shelf safe and stable.
Using Reinforcement Techniques
Reinforcement adds strength and prevents the shelf from bending. Metal brackets hidden under the shelf give extra support. Wooden cleats attached to the wall spread the load evenly. Adding a metal rod inside the shelf helps hold heavy items. Reinforcing the shelf frame boosts durability without changing its look.
Applying Protective Coatings
Protective coatings shield the shelf from water and dust. Use clear varnish or polyurethane for wood shelves. These coatings create a hard, smooth surface that resists scratches. Paint can also protect but choose one made for wood. Apply two or three thin layers for best results. Let each layer dry fully before adding another.
Regular Maintenance Tips
Check the shelf regularly for signs of wear or damage. Tighten loose screws and brackets to keep the shelf stable. Clean the surface with a soft cloth to remove dust. Avoid placing very heavy items that exceed the shelf’s limit. Fix small cracks or chips immediately to stop spreading. Proper maintenance extends the shelf’s life significantly.
Credit: www.christeneholderhome.com
Credit: www.christeneholderhome.com
Frequently Asked Questions
How Do I Ensure My Floating Shelf Is Strong?
Use sturdy materials like hardwood and strong wall anchors. Securely fasten the shelf to studs for maximum support and stability.
What Tools Are Needed To Build A Floating Shelf?
You need a drill, level, stud finder, screws, anchors, measuring tape, and a saw for cutting wood accurately.
How Much Weight Can A Floating Shelf Hold?
Weight capacity depends on materials and installation. Properly anchored shelves can support 20-50 pounds or more safely.
Can I Install Floating Shelves On Drywall?
Yes, but use strong wall anchors or mount directly on studs to prevent shelf failure and damage.
Conclusion
Building a strong floating shelf is simple with the right steps. Choose sturdy materials and use proper anchors for support. Measure carefully and follow each step to ensure safety. A well-made shelf holds your items securely and looks great. Take your time and enjoy the process.
Your new shelf will add style and function to any room. Give it a try and see the difference yourself.


