
Are you ready to make your home smarter and more energy-efficient? Learning how to program your Lutron motion sensor can save you time, cut down on electricity bills, and add a new level of convenience to your daily routine.
Whether you want lights to turn on automatically when you enter a room or ensure they switch off when no one’s around, this guide will walk you through every step. By the end, you’ll have full control over your sensor settings, making your space more comfortable and effortless.
Let’s get started and unlock the full potential of your Lutron motion sensor!

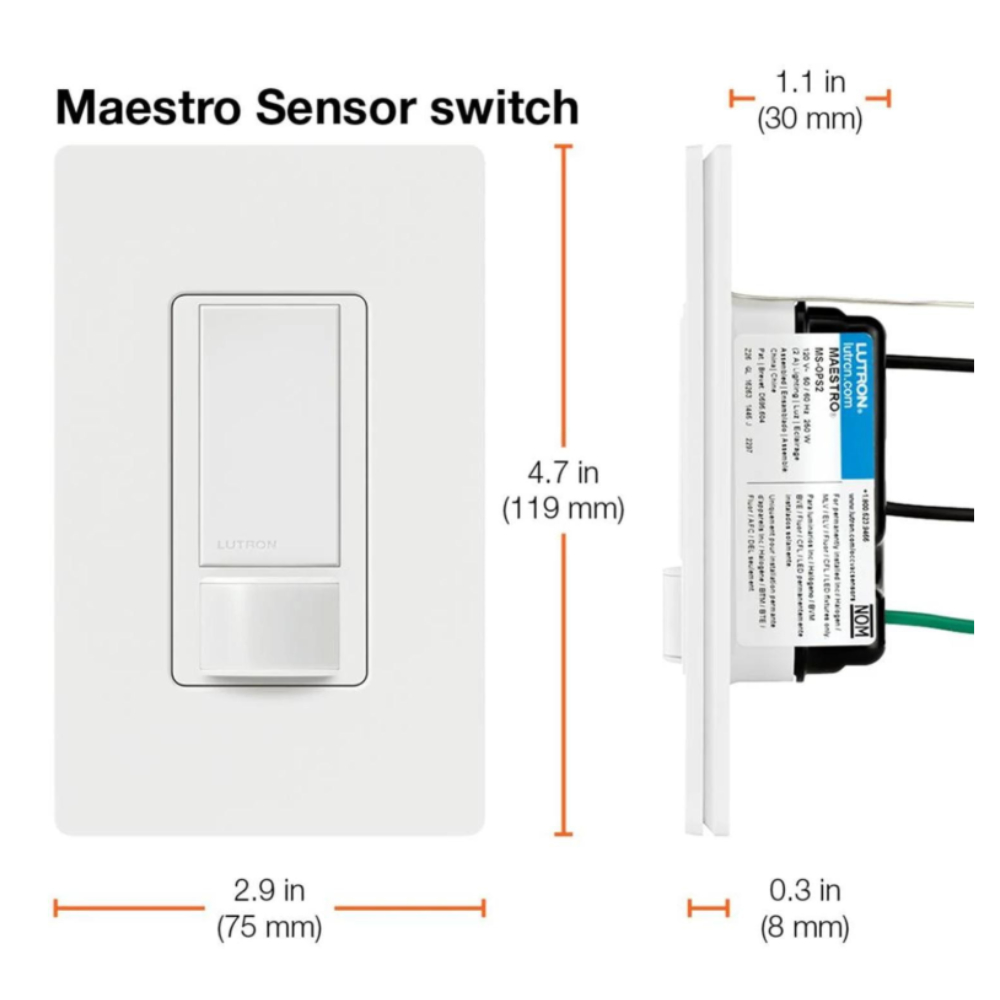
Credit: www.amazon.ca
Lutron Motion Sensor Basics
Understanding the basics of Lutron motion sensors is essential before you start programming them. These sensors are designed to detect movement and adjust your lighting accordingly, helping save energy and enhance convenience. Knowing how they work and what types are available gives you control over your smart lighting system.
Types Of Lutron Motion Sensors
Lutron offers a variety of motion sensors tailored to different needs and spaces. Some are wall-mounted, perfect for rooms and hallways, while others are ceiling-mounted, ideal for larger areas like offices or open living rooms.
There are also sensors designed for indoor use and others built to handle outdoor conditions. Choosing the right type depends on where you want to install it and the kind of coverage you need.
- Wall-Mounted Sensors:Detect motion across a room or hallway, typically with adjustable sensitivity.
- Ceiling-Mounted Sensors:Provide wider coverage, suitable for larger or open spaces.
- Outdoor Sensors:Weather-resistant and designed for exterior lighting control.
Key Features To Know
When programming your Lutron motion sensor, understanding its key features helps you customize settings to fit your lifestyle. Most sensors allow you to adjust sensitivity, so they only activate when needed.
Another important feature is the time delay, which controls how long the lights stay on after no motion is detected. This prevents lights from turning off too quickly, giving you a smoother experience.
Many models also include ambient light detection, meaning the sensor will only trigger the lights if the room is dark enough. This smart feature helps avoid wasting energy during daylight hours.
| Feature | Purpose | Why It Matters |
|---|---|---|
| Sensitivity Adjustment | Controls motion detection range | Prevents false triggers, saves energy |
| Time Delay | Sets how long lights stay on post-motion | Improves convenience and efficiency |
| Ambient Light Sensor | Detects natural light levels | Ensures lights activate only when needed |
Have you thought about how much energy you could save by fine-tuning these settings? Small adjustments can make a big difference in your home’s lighting efficiency and comfort.
Credit: ledco.ca
Preparing For Installation
Preparing for the installation of a Lutron motion sensor ensures a smooth setup and proper functioning. Careful preparation reduces errors and saves time. Gathering the right tools and understanding safety precautions are key steps before starting the process.
Tools And Materials Needed
Having all tools ready makes installation easier and faster. You will need:
- Screwdriver (Phillips and flathead)
- Wire stripper or cutter
- Voltage tester
- Electrical tape
- Mounting screws (usually included with the sensor)
- Lutron motion sensor device
- Battery (if required by the sensor model)
- User manual for reference
Check each item before starting to avoid delays.
Safety Precautions
Safety comes first in any electrical work. Turn off power at the circuit breaker to avoid electric shock. Use a voltage tester to confirm no power runs through the wires. Wear insulated gloves to protect your hands. Work in a dry area to prevent accidents. Follow the manufacturer’s instructions carefully. Keep children and pets away during installation. Avoid rushing to reduce the chance of mistakes or injury.
Installing The Sensor
Begin by mounting the sensor in a suitable location for motion detection. Connect the device to power and follow the programming guide to set sensitivity and timing. Adjust settings to fit the room’s lighting needs easily.
Installing a Lutron motion sensor is a simple process. It involves choosing the right location and mounting the sensor. These steps ensure optimal performance. Let’s break down the installation process.Choosing The Right Location
Select a location that covers the desired area. Ensure it has a clear line of sight. Avoid placing the sensor behind large objects. Test the range by walking in front of the proposed location. This helps to ensure it detects motion effectively. Avoid direct sunlight or heat sources. These can cause false activations. Choose a spot with minimal obstructions for better performance.Mounting The Sensor
Mount the sensor at the recommended height. This is usually between 6 and 8 feet. Use the provided screws or adhesive strips. Make sure the surface is clean and dry. Align the sensor according to the instructions. Ensure it is secure and stable. Test the sensor after mounting. Walk through the area to check its detection range. Adjust the angle if needed. Follow these steps for successful installation.Connecting To The System
Connecting a Lutron motion sensor to your system is the first key step. Proper connection ensures the sensor works smoothly with your lighting setup. This process involves safe wiring and pairing the sensor with compatible Lutron devices. Attention to detail during connection helps avoid future issues and enhances sensor performance.
Wiring Guidelines
Start by turning off the power supply to avoid shocks. Identify the sensor’s wires: typically, line, neutral, and load. Use a voltage tester to confirm no power is present. Connect the line wire from the power source to the sensor’s line input. Attach the neutral wire from the power source to the sensor’s neutral terminal. Connect the load wire from the sensor to the light fixture. Secure all connections with wire nuts and electrical tape. Follow local electrical codes for safe installation. Double-check all wiring before restoring power to the circuit.
Pairing With Lutron Devices
Ensure the motion sensor is powered on after wiring. Put the Lutron device into pairing mode; this usually involves pressing a button. Hold the sensor close to the Lutron controller or hub. Press the pairing button on the sensor to start the connection. Wait for a confirmation light or sound indicating successful pairing. Test the sensor by moving in its detection area to verify it controls the lights. Consult the Lutron app or manual for device-specific pairing steps. Repeat the pairing process for additional devices if needed.
Programming The Sensor
Programming your Lutron motion sensor tailors its performance to fit your specific needs. It’s where you control how it reacts to movement and light, ensuring it works just right in your space. Adjusting settings like sensitivity, time delays, and light thresholds can make a noticeable difference in comfort and energy savings.
Setting Sensitivity Levels
Sensitivity controls how much motion the sensor detects before it triggers. Too high, and it might turn on the lights for every small movement. Too low, and it could miss when you actually want it to work.
Try starting with a medium sensitivity. Walk around the room and see if the sensor responds appropriately. If it’s too jumpy or too slow, adjust it gradually until it matches your activity level.
Adjusting Time Delays
Time delays determine how long the lights stay on after motion stops. This setting is crucial for avoiding lights turning off too soon or staying on unnecessarily long.
Think about your typical room use. Do you often pause for a few seconds or leave briefly? Set the delay to cover these habits—usually between 30 seconds and 10 minutes works well. You can fine-tune this by observing how the sensor responds over a few days.
Configuring Light Thresholds
The light threshold setting tells the sensor when to activate based on the current brightness. This prevents the lights from turning on during the day or when natural light is enough.
Adjust the threshold according to your room’s lighting. If your room has large windows, set a higher threshold so the sensor waits until it’s darker. If it’s a dim space, a lower threshold ensures the lights come on when needed.
Have you noticed how this setting can save energy? It’s a simple tweak that stops unnecessary lighting, cutting down your electricity use without you thinking about it.
Testing And Troubleshooting
Testing and troubleshooting your Lutron motion sensor ensures it works correctly and saves energy. Proper testing confirms the sensor detects motion and controls lighting as expected. Troubleshooting helps fix common problems quickly and keeps your system reliable.
Performing Function Tests
Start by walking slowly through the sensor’s detection area. Watch if the lights turn on immediately after motion is detected. Wait to see if the lights turn off after the preset time without motion.
Test different speeds and directions of movement to check sensor sensitivity. Adjust settings if the sensor misses motion or reacts too late. Verify the sensor covers all desired areas without false triggers.
Use the sensor’s test mode if available. This mode often provides feedback like blinking lights to show detection status. Make multiple tests at different times of the day for consistent performance.
Common Issues And Fixes
- Sensor not detecting motion:Clean the sensor lens from dust. Check if the sensor is installed at the correct height and angle.
- Lights stay on constantly:Adjust the time delay setting to a shorter interval. Ensure no objects block the sensor’s view.
- Lights flicker or turn off too soon:Confirm the sensor’s power supply is stable. Replace batteries if the sensor uses them.
- False triggers:Move the sensor away from heat sources like vents or direct sunlight. Lower sensitivity settings to reduce unwanted activation.
Optimizing Sensor Performance
Optimizing the performance of your Lutron motion sensor means getting the most accurate and reliable response from the device. Proper setup is just the beginning; ongoing attention to details like sensor placement and upkeep ensures consistent efficiency. Small adjustments can make a big difference in how well your sensor detects movement and controls lighting.
Maintenance Tips
Keep your sensor clean by wiping it gently with a soft, dry cloth. Dust and grime can block the sensor’s view, causing delayed or missed detection. Avoid harsh chemicals that might damage the lens or casing.
Check the sensor regularly for any physical damage or loose connections. If you notice flickering lights or inconsistent activation, a quick inspection might reveal a simple fix. Replacing batteries on battery-operated sensors at the first sign of weakness can prevent downtime.
Enhancing Detection Accuracy
Position your sensor where it has a clear line of sight to the area you want to monitor. Avoid placing it near heating vents or windows where temperature changes or sunlight can trigger false alarms.
Adjust the sensitivity settings based on the size and layout of your space. Higher sensitivity works well in small rooms, while lower sensitivity prevents false triggers in larger areas with more movement sources.
Think about the typical movement patterns in your home or office. Placing sensors to cover main pathways instead of areas with occasional traffic can reduce unnecessary activations. Are you capturing the right zones for your daily activities?

Credit: manuals.plus
Frequently Asked Questions
How Do I Program A Lutron Motion Sensor?
To program a Lutron motion sensor, press and hold the programming button until the LED flashes. Follow the specific model’s instructions to set sensitivity and timing. Use the Lutron app or remote control for precise adjustments and save your settings to activate the sensor.
Can I Adjust Sensitivity On Lutron Motion Sensors?
Yes, Lutron motion sensors allow sensitivity adjustments. Use the programming button or Lutron app to increase or decrease detection range. Adjusting sensitivity helps avoid false triggers and optimizes sensor performance for your space and lighting needs.
What Is The Ideal Placement For Lutron Motion Sensors?
Place Lutron motion sensors where they cover main activity areas and entrances. Avoid pointing them at windows or vents to prevent false triggers. Proper placement ensures accurate detection and efficient lighting control throughout your room or hallway.
How Do I Reset A Lutron Motion Sensor?
To reset a Lutron motion sensor, press and hold the programming button for about 10 seconds until the LED blinks rapidly. This clears previous settings and restores factory defaults. You can then reprogram the sensor as needed.
Conclusion
Programming your Lutron motion sensor is simple and quick. Follow the steps carefully to set it up right. Adjust the settings to fit your room’s needs. Test the sensor to make sure it works well. You can save energy and add convenience to your space.
Regular checks keep the sensor running smoothly. Enjoy the benefits of smart lighting control every day.


