
Are you looking to add a fresh, personal touch to your space without the hassle of painting or wallpaper? Vinyl wall stickers are a simple and stylish way to transform any room quickly.
But how do you make sure they go up smoothly and look perfect? In this guide, you’ll discover easy, step-by-step tips to apply vinyl wall stickers like a pro. Keep reading, and you’ll be amazed at how a small change can make a big impact in your home.
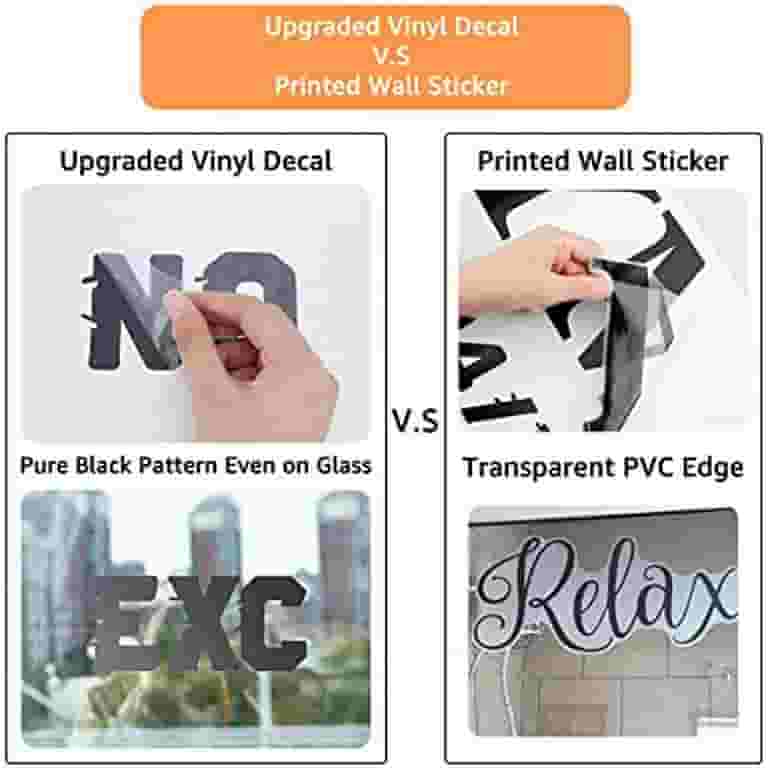
Choosing The Right Vinyl Stickers
Choosing the right vinyl stickers is key to a successful wall decoration. The right choice affects the look and how long the stickers last. It also helps the stickers stick well and avoid damage. Understanding the types, sizes, and surface compatibility makes the process easier.
Types Of Vinyl Stickers
Vinyl stickers come in various types. Some are glossy, giving a shiny finish. Others are matte, which look soft and non-reflective. Clear vinyl stickers blend with the wall color, making designs stand out. Removable vinyl stickers are easy to peel off without damage. Permanent vinyl stickers hold strong for a long time. Choose the type based on the room and style.
Selecting Sticker Size And Design
Size matters for wall stickers. Large stickers cover more space and create a bold look. Small stickers add subtle decoration or detail. Measure the wall area before buying. The design should match the room’s theme and colors. Simple designs work well in busy rooms. Complex designs fit better in calm spaces. Pick a size and design that fit your wall and taste.
Surface Compatibility
Not all surfaces work well with vinyl stickers. Smooth, clean walls are the best choice. Painted drywall, glass, and metal hold stickers firmly. Textured or rough surfaces may cause stickers to peel. Avoid sticky or dusty walls. Test a small sticker piece on the wall first. This prevents damage and ensures good adhesion. Knowing surface compatibility saves time and keeps walls safe.

Credit: bigfudgevinyl.com
Preparing The Wall Surface
Preparing the wall surface is a crucial step before applying vinyl wall stickers. The better the surface, the longer your stickers will stick and look flawless. A well-prepped wall prevents bubbles, peeling, and uneven edges, saving you time and frustration later.
Cleaning The Wall
Start by removing any dust, dirt, or grease from the wall. Use a mild soap solution and a soft cloth to wipe down the area where the sticker will go. Avoid harsh chemicals that can damage paint or leave residue.
After cleaning, dry the wall completely with a clean towel. A spotless surface helps the adhesive bond strongly. Have you ever tried sticking something on a dusty wall? You’ll notice it doesn’t hold well at all.
Smoothing Imperfections
Check the wall for bumps, cracks, or peeling paint. These imperfections can cause the sticker to lift or wrinkle. Use fine sandpaper to gently smooth out rough spots without damaging the wall.
If you find holes or cracks, fill them with lightweight spackle and let it dry. Once dry, sand the area smooth. This step creates a flat surface that allows your sticker to lay perfectly flat.
Ensuring Dryness
Moisture on the wall is the enemy of vinyl stickers. Even if the wall looks dry, humidity or leftover cleaning water can cause adhesion problems. Make sure the surface is completely dry before applying your sticker.
If you’re unsure, wait a few hours or use a fan to speed up drying. Have you ever rushed to apply a sticker on a damp wall? You probably noticed it started peeling within days.
Gathering Necessary Tools
Before you dive into the creative journey of putting up vinyl wall stickers, it’s crucial to gather all the necessary tools. Having the right equipment on hand not only simplifies the process but also ensures your stickers adhere smoothly and securely. Let’s explore the essentials and some handy extras that can make the task easier.
Basic Tools Checklist
- Measuring Tape:Ensure your stickers are positioned perfectly by measuring the space accurately.
- Level:Keep everything straight and even, avoiding any unintended tilts.
- Pencil:Lightly mark reference points on the wall to guide sticker placement.
- Squeegee:Smooth out any bubbles and help the sticker adhere evenly.
- Cleaning Cloth:Dust and dirt can interfere with adhesion, so a clean surface is a must.
Optional Accessories
- Craft Knife or Scissors:Trim any excess material for a perfect fit.
- Painter’s Tape:Temporarily hold stickers in place to preview their position.
- Heat Gun or Hair Dryer:Useful for applying stickers to curved surfaces, as gentle heat can improve flexibility and adherence.
- Step Ladder:Reach higher spots without stretching or straining.
Have you ever started a project, only to realize halfway through that you’re missing something crucial? Preparing your toolkit in advance can save you from unnecessary frustration. Imagine having everything you need within arm’s reach, making the process smoother and more enjoyable.
Are there any tools you thought of adding to the list? Share your thoughts and help others make their sticker application a breeze!
Planning The Sticker Layout
Planning the sticker layout is the most crucial part of applying vinyl wall stickers. Taking time here can save you from peeling off and repositioning later, which can damage both the wall and the sticker. Think about where you want the sticker to go, how it fits with your room’s style, and the space around it before you start sticking anything down.
Measuring And Marking
Start by measuring the wall space where you want your sticker. Use a tape measure to get accurate dimensions and note them down.
Mark the spot lightly with a pencil where the edges or center of the sticker will be. This helps you line it up perfectly.
Remember, even a small misalignment can make the whole design look off. Have you ever placed something only to realize it’s crooked after stepping back?
Using Templates Or Guides
Templates or guides can be lifesavers, especially with complex or multi-piece stickers.
You can create a paper template by tracing the sticker’s outline and taping it to the wall. This way, you can visualize the final look without committing.
Some stickers come with alignment guides or grids printed on the backing paper—use these to your advantage.
Try standing back and assessing the layout from different angles before peeling off the backing. How does the design flow with your furniture or other wall art?
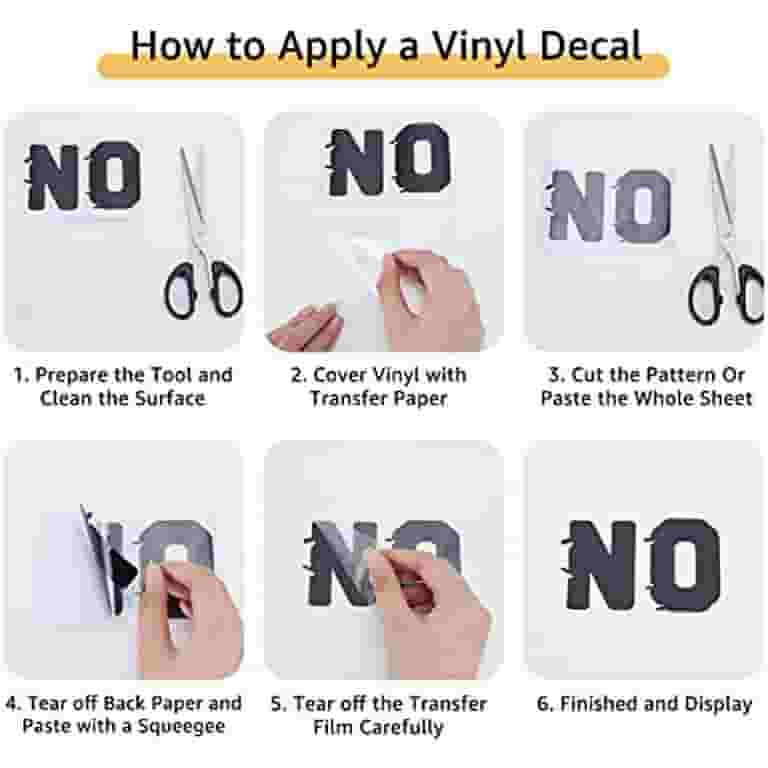
Applying Vinyl Wall Stickers
Applying vinyl wall stickers can be a game-changer for your space, but the process requires care to make sure your design looks flawless. Each step matters, from peeling the backing to smoothing out bubbles. Let’s dive into how to handle these stages for a perfect finish.
Peeling The Backing
Start by gently lifting a corner of the vinyl sticker’s backing paper. Avoid rushing—pull it slowly to prevent the sticker from stretching or tearing. If the sticker feels too sticky or resists, pause and try peeling from another corner.
It helps to work on a flat surface. This way, you can keep control and avoid accidental folds or creases. Have patience here; a careful peel sets the stage for smooth application.
Positioning The Sticker
Hold the sticker by its edges and bring it close to the wall. Take your time to align it exactly where you want it. Think about the room’s lighting and other decorations—how will the sticker complement these?
Try using painter’s tape to create temporary hinges on one edge. This technique lets you lift and reposition the sticker easily without losing your place. It’s a trick I’ve used countless times to avoid sticky mistakes.
Smoothing Out Bubbles
Once the sticker touches the wall, don’t press too hard immediately. Use a plastic card or a squeegee to gently push air bubbles outward, starting from the center and moving to the edges. This action prevents trapped air from ruining your design.
If small bubbles persist, prick them carefully with a pin and smooth again. Remember, a bubble-free sticker looks professional and lasts longer. Have you ever noticed how little air pockets can distract from an otherwise perfect design?
Fixing Application Mistakes
Fixing mistakes during vinyl wall sticker application is common. Small errors can affect the look, but most problems have simple fixes. Act quickly for the best results. Handle the sticker gently to avoid damage. Use the right tools like a soft cloth or a plastic card. Patience helps achieve a smooth, neat finish.
Removing Air Bubbles
Air bubbles can trap under the sticker, causing bumps. Press the sticker firmly from the center outward. Use a soft cloth or plastic card to smooth the surface. For stubborn bubbles, gently lift the sticker near the bubble. Slowly reapply while pushing out the trapped air. Avoid sharp tools that can tear the vinyl.
Repositioning The Sticker
Sometimes the sticker is not aligned properly. Carefully peel one corner of the sticker. Pull it back slowly to avoid stretching. Reposition the sticker to the correct spot. Press down firmly to stick it again. Work from the center toward the edges to remove air. This process works best when the adhesive is still fresh.
Dealing With Wrinkles
Wrinkles happen when the sticker folds or creases. Lift the wrinkled section slowly and carefully. Smooth the vinyl flat with your fingers or a card. Heat the sticker lightly with a hairdryer to soften it. This makes the vinyl more flexible and easier to smooth. Avoid overheating, which can damage the sticker. Repeat the smoothing process until wrinkles disappear.
Maintaining Vinyl Stickers
Maintaining your vinyl wall stickers is key to keeping them looking fresh and vibrant for a long time. Neglecting simple care can cause peeling, fading, or damage, which no one wants after putting in the effort to apply them. Let’s dive into practical ways you can protect your stickers and enjoy their beauty daily.
Cleaning Tips
Keep your vinyl stickers free from dust and grime by gently wiping them with a soft, damp cloth. Avoid using harsh chemicals or abrasive sponges as they can scratch or discolor the surface. A mild soap solution works well if you need to remove stubborn marks, but always test on a small area first.
Have you noticed fingerprints or smudges on your stickers? Quick cleaning prevents buildup that can dull their appearance. Remember to dry the sticker completely to avoid water spots or peeling edges.
Avoiding Damage
Protect your vinyl stickers from direct sunlight exposure, which can cause colors to fade over time. Position your stickers away from heating vents or areas with high humidity to prevent warping or bubbling. Sharp objects or rough handling can also tear the vinyl, so keep pets and kids in mind.
Think about how often you touch or brush against the stickers—could that be causing wear? Simple habits like avoiding frequent contact or placing stickers in less trafficked areas make a big difference.
Long-term Care
Consider applying a clear, removable laminate or protective spray designed for vinyl surfaces to extend the life of your wall stickers. This adds a layer of defense against scratches and fading. Check the product compatibility before use to avoid damage.
Plan to inspect your stickers every few months for any signs of peeling or lifting edges. Promptly pressing down or reapplying edges can prevent further damage. How do you usually care for your wall decor? Small, regular actions keep your space looking sharp without much effort.
Credit: www.walmart.com
Credit: www.etsy.com
Frequently Asked Questions
How Do I Prepare The Wall For Vinyl Stickers?
Clean the wall with mild soap and water. Ensure the surface is dry, smooth, and free of dust or grease. Avoid textured or rough walls for best adhesion.
Can Vinyl Wall Stickers Be Removed Easily?
Yes, vinyl stickers can be removed without damage. Peel slowly from one corner. Use heat from a hairdryer to soften adhesive if needed.
What Tools Are Needed To Apply Vinyl Wall Stickers?
You need a squeegee or credit card, a clean cloth, and a tape measure. These help smooth out air bubbles and align the sticker correctly.
How Long Do Vinyl Wall Stickers Last On Walls?
Vinyl stickers typically last 3 to 5 years indoors. Their lifespan depends on wall condition, exposure to sunlight, and humidity levels.
Conclusion
Vinyl wall stickers add style to any room quickly and easily. Clean and dry the wall before applying for best results. Take your time to place the sticker smoothly without bubbles. Press firmly to make sure it sticks well. You can change or remove stickers without damage.
Enjoy your new wall look in minutes. Simple steps lead to great results. Try it yourself and see the difference.


