
Are you tired of your plain can lights and ready to give your space a fresh, stylish look? Replacing can lights with pendant lights can instantly transform the atmosphere of any room, adding warmth and personality.
But you might wonder if it’s complicated or if you need a professional. The good news is, with the right steps, you can do it yourself and save money while upgrading your home’s lighting. Keep reading, and you’ll discover simple tips that make this switch easy and rewarding.
Your dream lighting makeover is closer than you think!

Credit: www.amazon.com
Tools And Materials Needed
Replacing can lights with pendant lights requires specific tools and materials. Having everything ready makes the process smooth and safe. Prepare by gathering all essentials before starting your project.
Essential Tools
- Voltage tester to ensure power is off
- Screwdrivers (flathead and Phillips)
- Wire strippers for clean wire connections
- Wire nuts to secure wiring
- Drill with bits for mounting
- Measuring tape for accurate placement
- Utility knife for cutting drywall or insulation
- Step ladder to reach ceiling fixtures
Selecting Pendant Lights
Choose pendant lights that match your room style and size. Consider the height and shape that fits well in the space. Look for energy-efficient bulbs to save electricity.
Check the weight of the fixture to ensure your ceiling can support it. Pick lights with adjustable cords or rods for flexible hanging lengths.
Safety Gear
- Insulated gloves to prevent electric shock
- Safety goggles to protect eyes from debris
- Dust mask if working with insulation or drywall
- Non-slip shoes for stable footing on ladders
Prepare The Workspace
Preparing your workspace is a crucial step before replacing can lights with pendant lights. It sets the stage for a smooth and safe installation process. Taking the time to organize and check everything upfront can save you from unexpected problems down the line.
Turn Off Power
Your safety depends on this step. Always switch off the power at the circuit breaker before touching any electrical components. Double-check by flipping the light switch to confirm the power is off. Have a voltage tester handy to verify there’s no current running through the wires.
Remove Existing Can Lights
Removing can lights can feel tricky if you’ve never done it before. Start by gently pulling down the trim and unscrewing any clips or fasteners holding the fixture. Be careful not to damage the drywall around the light opening. Keep all screws and parts—you may need them later or for reference.
Check Electrical Box
After removing the can light, inspect the electrical box inside the ceiling. Is it large enough to support the pendant light’s weight? If it’s flimsy or too small, you’ll need to replace it with a more secure box designed for hanging fixtures. This step is often overlooked but is vital for safety and stability.
Install Pendant Light Fixtures
Installing pendant light fixtures after removing can lights transforms the ambiance of your room. It’s a hands-on task that requires attention to detail but brings rewarding results. Let’s break down the process into clear, manageable steps to help you confidently install your new pendant lights.
Attach Mounting Bracket
Start by securing the mounting bracket to the electrical box in your ceiling. This bracket holds the weight of your pendant light, so make sure it’s tightly fastened. Use the screws provided with your fixture and double-check that the bracket is level before moving on.
Connect Wiring
Next, connect the wires from your pendant light to the house wiring. Match the colors carefully—usually black (hot) to black, white (neutral) to white, and green or bare copper (ground) to the ground wire. Twist the wire connectors firmly and gently tug on the wires to ensure a secure connection.
Secure Pendant Light
Finally, attach the pendant light to the mounting bracket. This often involves aligning screws or hooks and tightening them until the fixture feels stable. Adjust the length of the pendant cord or chain to your preferred height before fully securing it.
Have you ever noticed how the right lighting instantly changes a room’s feel? Installing pendant lights yourself not only saves money but also lets you customize your space exactly how you want it. What style of pendant light will you choose to highlight your decor?

Credit: www.mstarrdesign.com
Adjust Pendant Height
Adjusting the height of your pendant lights is key for both style and function. The right height ensures good lighting and complements your room’s look. It also helps avoid glare or shadows.
Measure Desired Length
Start by measuring the distance from the ceiling to the spot you want the light. Common pendant height is between 28 and 34 inches above a table or countertop. In open spaces, aim for 72 inches from the floor to the bottom of the pendant.
Shorten Or Lengthen Cord
Adjust the cord length to match your measured height. For shorter cords, carefully cut the excess wire and secure the ends. To lengthen, add a matching cord or extension kit if needed. Always turn off power before working with electrical wires.
Test Light Position
Once the pendant is hung, switch on the light to check its position. Stand in different areas to see how the light spreads. Adjust the height again if the light is too bright or too dim in certain spots. Repeat until the light feels just right.
Final Checks And Testing
Ensure all wires are securely connected and the pendant light is firmly mounted. Test the light switch to confirm proper operation and check for any flickering or issues.
As you near the completion of your project to replace can lights with stylish pendant lights, it’s crucial to ensure everything is working perfectly. This final stage of checks and testing not only validates your hard work but also ensures safety and functionality. Before you celebrate your new lighting upgrade, let’s walk through some essential steps.Restore Power
Start by carefully restoring the power to your lighting circuit. Head to your breaker panel and switch the circuit back on. It’s an exciting moment, but take a moment to double-check that everything is secure and in place before flipping the switch.Test Light Functionality
Now, turn on the light switch to test the new pendant light. Does it illuminate as expected? Stand back and admire the glow, but also ensure the light is stable and not flickering. A stable light means your connections are solid.Troubleshoot Common Issues
If the light doesn’t turn on, don’t panic. Start by checking the bulb to see if it’s properly screwed in. If that’s not the issue, revisit your wiring connections to ensure nothing came loose. Consider if there’s a chance the circuit was not properly reset. Sometimes, a quick reset of the breaker can solve the problem. Did you face any unexpected issues during your installation? Share your experience below to help others who might encounter the same challenges.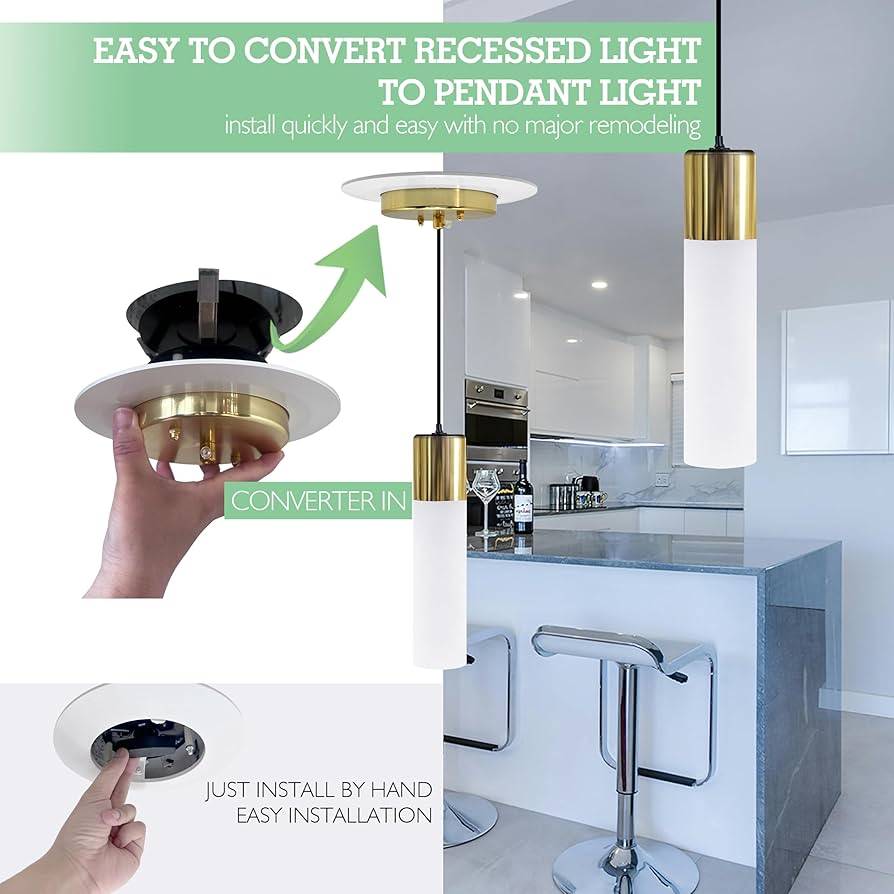
Credit: www.amazon.com
Tips For A Professional Finish
Replacing can lights with pendant lights changes your room’s look instantly. Achieving a clean, professional finish makes a big difference. Small details create a polished and stylish space. Follow these tips to ensure your new lighting looks great and functions well.
Hide Wires Neatly
Visible wires make the installation look messy. Use wire covers or conduits matching the ceiling color. Tuck wires into the ceiling cavity before securing the fixture. Secure wires tightly with cable clips inside the junction box. This keeps everything safe and out of sight. A clean wire setup improves the overall appearance.
Choose Complementary Fixtures
Select pendant lights that match your room’s style. Consider the size and shape of existing decor. Match metal finishes with other hardware in the room. Choose colors that blend or contrast nicely with walls. Avoid oversized pendants in small spaces. Balanced fixtures enhance the room’s design and feel.
Maintain Consistent Lighting
Keep the same brightness level as your old can lights. Use bulbs with similar wattage and color temperature. Position pendants at even heights for uniform light spread. Layer lighting by adding floor or table lamps if needed. Consistent lighting creates comfort and avoids harsh shadows.
Frequently Asked Questions
How Do I Remove Can Lights Safely?
Turn off the power at the circuit breaker. Use a voltage tester to confirm no electricity flows. Unscrew the can light housing carefully. Disconnect the wiring, noting connections for the new fixture. Always wear safety gloves and goggles during removal.
Can Pendant Lights Fit Existing Can Light Wiring?
Yes, pendant lights can connect to existing can light wiring. Ensure the wiring matches the pendant’s voltage and type. You may need a junction box for secure installation. If unsure, consult an electrician to avoid electrical hazards or code violations.
What Tools Are Needed To Replace Can Lights With Pendants?
You’ll need a voltage tester, screwdriver, wire stripper, wire nuts, and a ladder. Optional tools include a drill and electrical tape. These tools help safely remove can lights and install pendant fixtures efficiently.
How Do I Choose The Right Pendant Light Size?
Measure the space below the fixture for clearance and visual balance. Smaller pendants suit compact areas; larger ones fit open spaces. Consider ceiling height and room size to select a pendant that complements your décor.
Conclusion
Replacing can lights with pendant lights can change your room’s look. It adds style and better lighting in key areas. Take your time to choose the right fixtures. Follow safety steps to avoid any problems. A few tools and careful work make the job easier.
Enjoy your new lighting and the fresh feel it brings. Bright rooms create happy, cozy spaces for everyone. This simple switch can make a big difference in your home.


