

Want to make your outdoor space glow with cozy charm? Stringing lights on a tree is one of the easiest and most stunning ways to do it.
But if you’re unsure where to start or worried about making mistakes, don’t worry—you’re in the right place. In this guide, you’ll discover simple, step-by-step tips to wrap your tree lights safely and beautifully. By the end, your yard will be the envy of the neighborhood, shining bright for any occasion.
Ready to transform your outdoor space? Let’s get started!
Choosing The Right Lights
Choosing the right lights for stringing on your outdoor tree sets the foundation for both the look and longevity of your display. It’s about balancing style, energy use, and durability to suit your environment and personal taste. What kind of atmosphere do you want to create? Are you thinking of a soft glow or a bright, festive shine?
Types Of Outdoor String Lights
There are several types of string lights designed specifically for outdoor use, each offering a distinct vibe and brightness level.
- Incandescent bulbs:These give off a warm, classic light but consume more power and have shorter lifespans.
- LED bulbs:Known for their bright, clear light and energy efficiency, LEDs come in various colors and styles.
- Solar-powered lights:These are ideal if you want to avoid wiring and save on electricity costs, but they depend heavily on sunlight.
- Fairy lights:Tiny and delicate, perfect for a subtle twinkle effect on smaller trees or branches.
Think about your tree’s size and the mood you want before picking the type. Have you tested how each light looks during the day versus at night?
Energy Efficiency Options
Energy efficiency matters, especially if you plan to keep your lights on for long hours. LEDs use up to 75% less energy than traditional bulbs, reducing your electric bill without sacrificing brightness.
Solar string lights offer a renewable option, but consider if your tree location gets enough sunlight daily. Another tip: look for lights with timers or remote controls to manage usage easily.
Durability And Weather Resistance
Your outdoor lights must withstand rain, wind, and temperature changes. Check for lights with a high IP (Ingress Protection) rating—IP65 or higher is best for outdoor conditions.
Materials like waterproof casings and shatterproof bulbs extend your lights’ lifespan. Have you noticed how some lights lose brightness after a season? Investing in durable options prevents frequent replacements.
Credit: serwalloutdoor.com
Preparing The Tree
Preparing the tree is a key step before stringing lights outdoors. A well-prepared tree holds lights better and looks brighter. Careful preparation ensures safety and neat results. Focus on location, cleaning, and safety to get started.
Selecting The Best Tree Location
Choose a tree visible from your main outdoor area. Pick one near a power source for easy plug-in access. Avoid trees close to water or where cords may cause tripping. The tree should have strong branches to hold lights safely.
Cleaning And Trimming Branches
Remove dead or broken branches to clear the tree’s shape. Trim branches that block the view or make stringing difficult. Clear away leaves and debris around the tree base. This helps lights shine through better and prevents fire risks.
Safety Precautions
- Use a sturdy ladder on level ground for reaching higher branches.
- Wear gloves to protect hands from sharp twigs.
- Check lights for damaged wires before use.
- Keep cords away from walkways to avoid tripping.
- Turn off lights before climbing or handling cords.
Gathering Necessary Tools
Gathering the right tools makes stringing lights on a tree easier and safer. Prepare before starting to avoid interruptions. Having everything ready saves time and effort.
Ladders And Safety Gear
Choose a sturdy ladder that fits the tree height. Use a ladder with non-slip feet for stability. Wear gloves to protect your hands from branches. Safety goggles keep your eyes safe from debris. A helmet adds extra protection during work.
Extension Cords And Timers
Select outdoor-rated extension cords for safety and durability. Measure the distance from the power source to the tree. Use timers to control when lights turn on and off. Timers save energy and make lighting hassle-free.
Hooks, Clips, And Fasteners
Use plastic hooks or clips designed for outdoor use. Avoid nails or staples to prevent tree damage. Fasteners help keep lights in place during wind or rain. Choose reusable options for easy removal after holidays.
Planning The Layout
Planning the layout is the first step in stringing lights on an outdoor tree. A clear plan helps avoid tangles and uneven lighting. This stage saves time and creates a beautiful, balanced look. Start by understanding the size and shape of your tree. Then decide how much of the tree you want to light. Finally, map out the wiring path for safety and ease.
Measuring The Tree
Measure the height and width of your tree. Use a tape measure or a long piece of string. Note the length of the trunk and the main branches. This helps estimate how many lights you need. Accurate measurement prevents buying too many or too few lights.
Deciding Light Coverage
Choose how much of the tree to cover with lights. Cover the entire tree for a full glow. Or light only the trunk and main branches for a subtle effect. Think about the distance between lights. Closer lights create a dense look. Spread out lights for a soft, twinkling effect.
Creating A Wiring Path
Plan a safe and neat path for the wiring. Avoid crossing wires or tight bends. Start from the power source and move upward or around the tree. Secure wires with clips or ties made for outdoor use. Keep plugs and connections off the ground to prevent water damage.
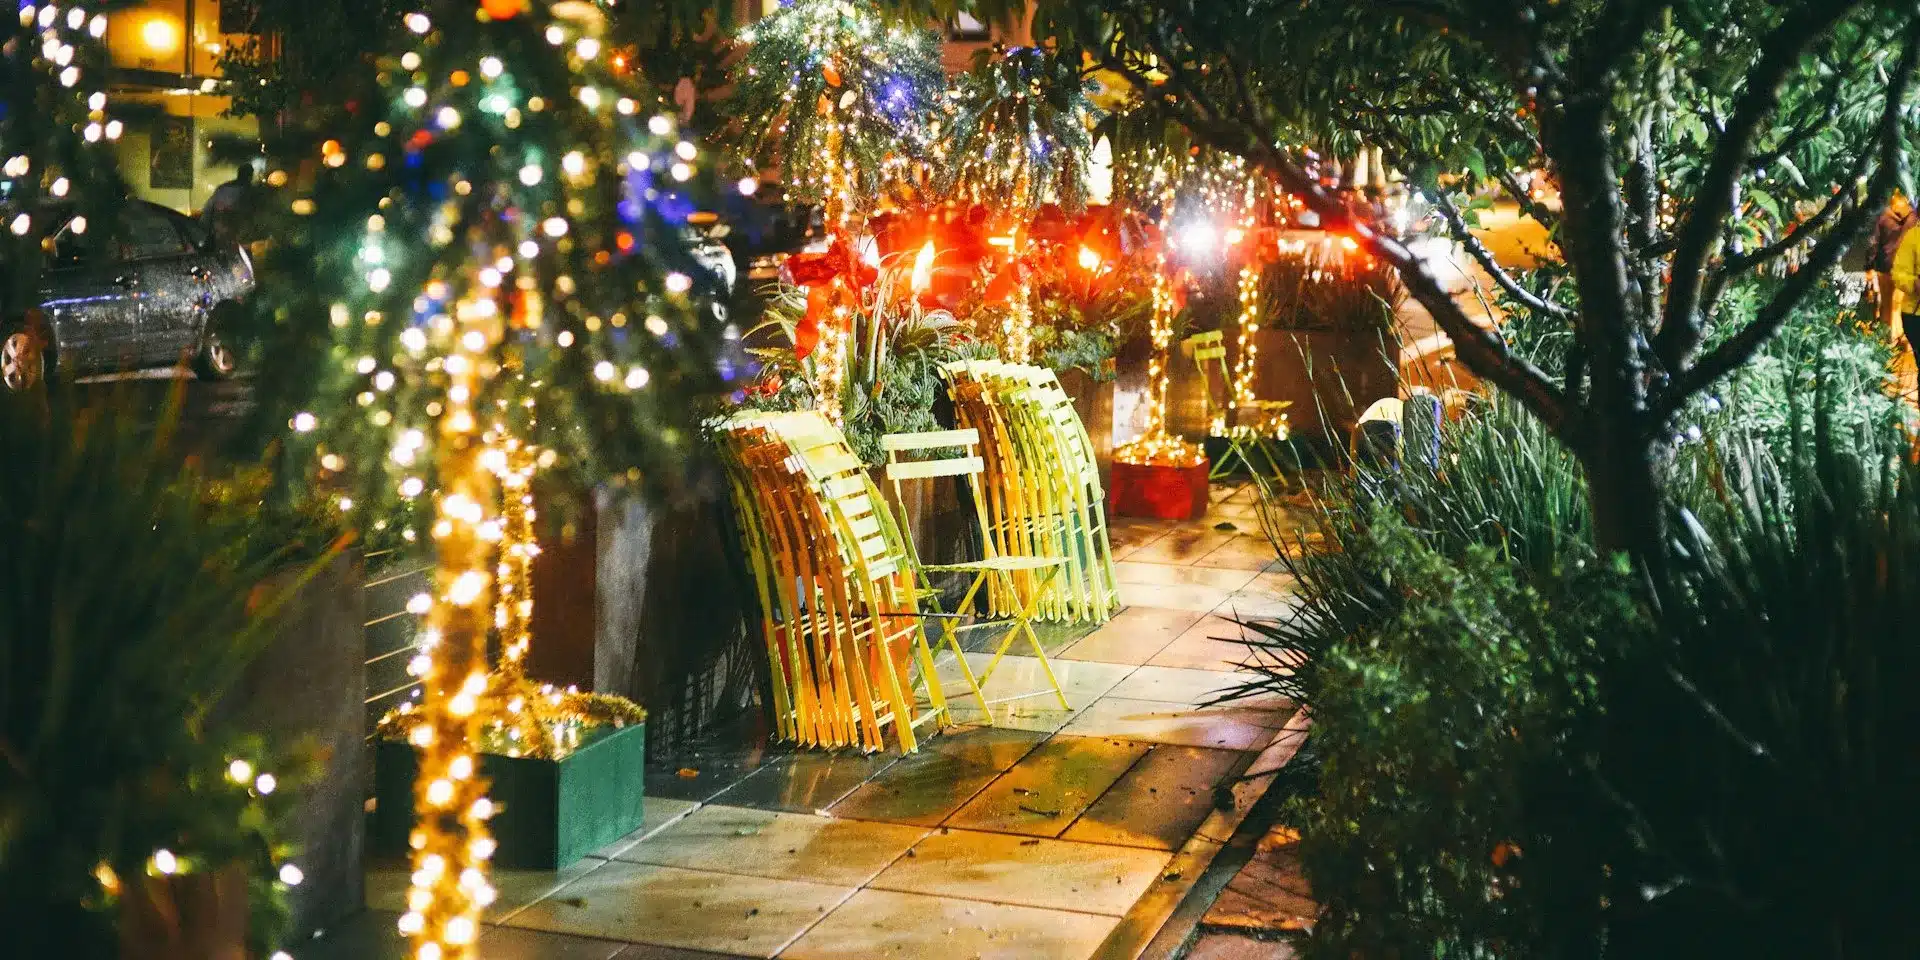
Stringing The Lights
Stringing lights on an outdoor tree can transform your space into a magical setting. The key is to approach the task with care and a clear plan. Taking your time while wrapping and securing the lights ensures a beautiful and lasting display.
Wrapping Techniques For Branches
Start by choosing a main branch to anchor your lights. Wrap the lights tightly but not too tight around the branch, allowing some flexibility. Spiral the lights evenly, moving from thicker parts of the trunk or branches to thinner tips for a balanced glow.
Try wrapping the lights both clockwise and counterclockwise on different branches to create depth. Don’t forget to space the bulbs so they don’t bunch up in one spot. This technique keeps your lights looking neat and maximizes their shine.
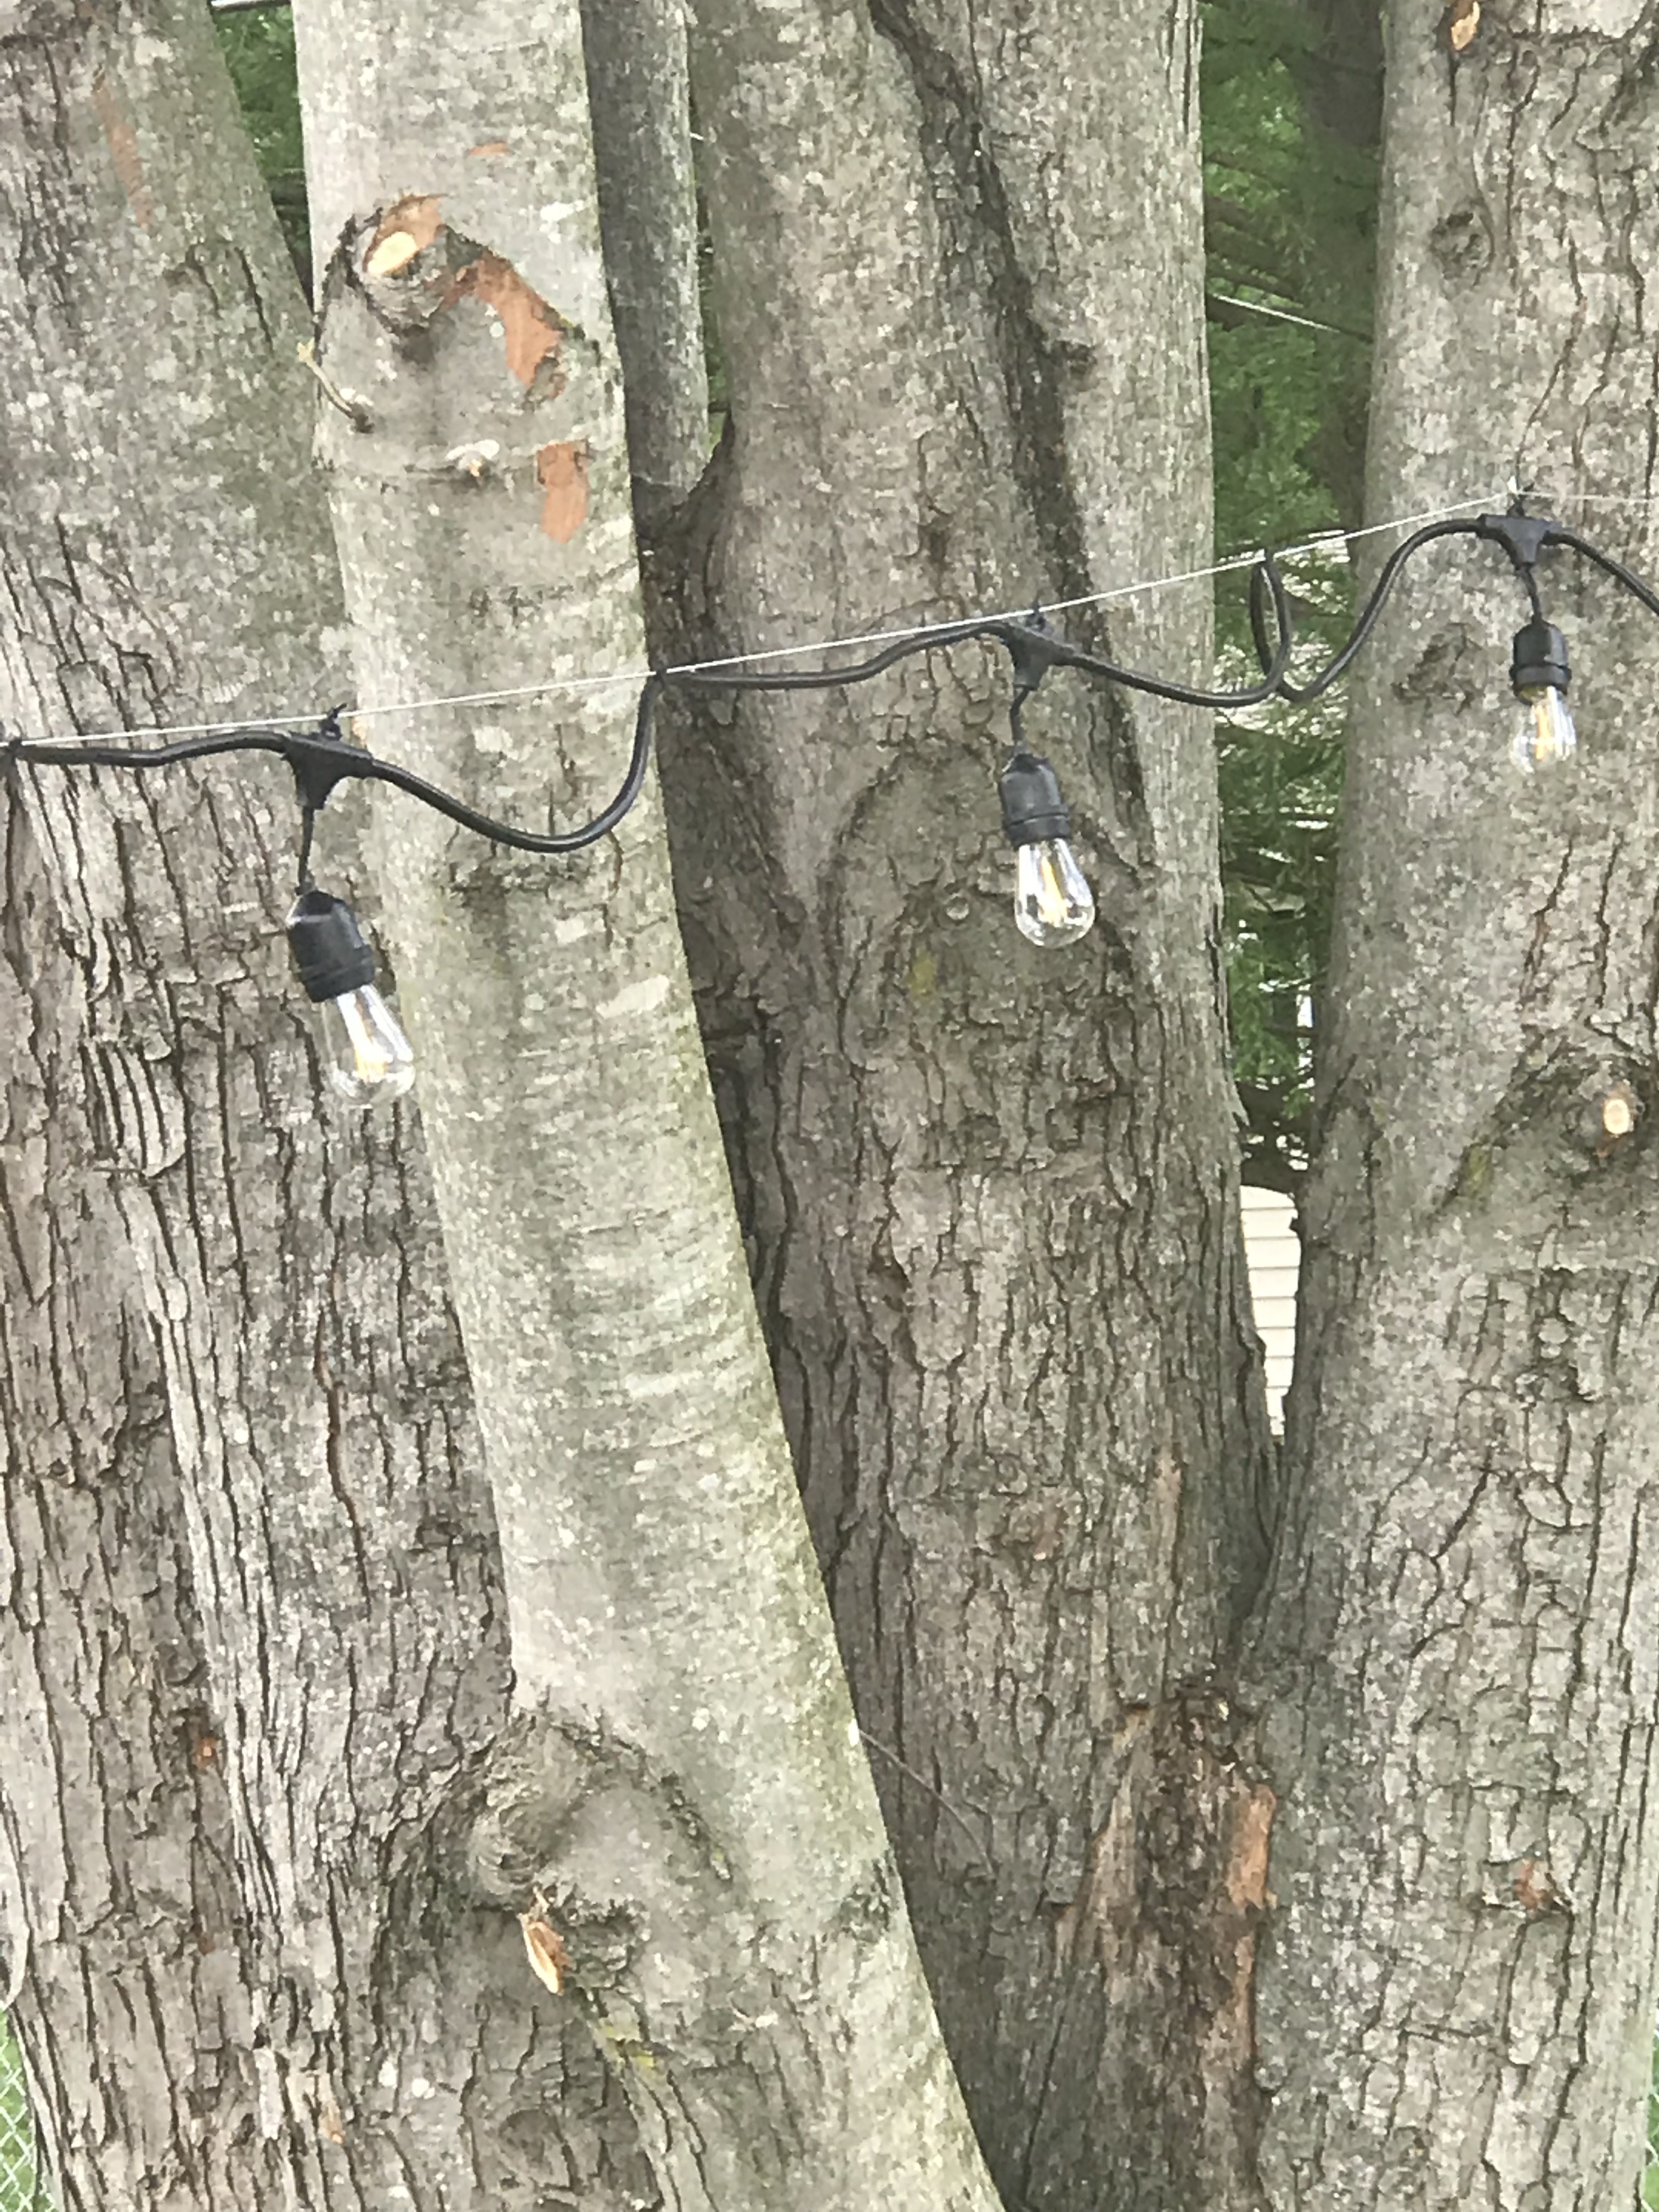
Securing Lights Without Damage
Use soft twist ties, velcro strips, or garden clips designed for outdoor use to secure the lights. Avoid nails or staples, which can harm the bark and the wires. These gentle fasteners hold your lights firmly without causing any damage.
Check that the securing method doesn’t pinch or strain the cords. You want the lights to stay put through wind and rain but also be easy to remove after the season. Have you noticed how some trees look stressed by harsh clips? Protect your tree by choosing gentle options.
Testing Lights As You Go
Plug in your lights before wrapping each section to catch any faulty bulbs early. This way, you avoid having to unwrap large areas later to fix issues. Testing as you go saves time and prevents frustration.
If you spot a flicker or dark spot, replace the bulb immediately. Remember, many outdoor lights connect in series, so one bad bulb can affect the whole strand. Are your lights shining bright, or do you see room for improvement?
Credit: www.acupfullofsass.com
Finishing Touches
Finishing touches bring your outdoor tree lighting project from good to great. They add polish and ensure your display looks clean, functional, and inviting. Paying attention to these small details can make a big difference in how your lights are enjoyed.
Hiding Cords And Plugs
Visible cords and plugs can distract from the beauty of your tree lights. Use natural elements like branches, leaves, or bark to tuck cords away. You can also wrap cords around branches or secure them with twist ties to keep them neat.
Consider using outdoor-rated cord covers or green electrical tape to blend cords with the tree. This not only looks better but also protects cords from weather damage. Have you ever tripped over a stray cord? Keeping them hidden helps avoid accidents.
Adding Decorative Elements
Decorative accents can elevate your tree lights and create a unique look. Try hanging lightweight ornaments, ribbons, or faux snowflakes among the lights. These add texture and interest without overpowering the glow.
Mixing colors and shapes can make your display more dynamic. For example, small lanterns or glass baubles can catch the light beautifully. What small detail could you add to make your setup stand out?
Setting Timers For Convenience
Timers make your lighting setup effortless and energy-efficient. You can program lights to turn on at dusk and off late at night automatically. This keeps your display consistent without the need to remember switching lights on or off.
Smart plugs or outdoor timers are widely available and simple to install. They also give you flexibility to adjust lighting schedules based on your lifestyle or weather. Wouldn’t it be great to come home to your tree already lit up every evening?
Maintaining Your Light Display
Carefully wrap lights around tree branches to ensure even coverage. Secure wires tightly to prevent slipping and avoid damage from wind or rain. Check connections regularly to keep your display bright and safe.
Maintaining your light display ensures it shines brightly throughout the season. Regular care prevents wear and tear. It also enhances safety and prolongs the life of your lights.Regular Inspection Tips
Check your light display weekly. Look for frayed wires or loose connections. These can be fire hazards. Secure any loose lights to the tree. This prevents them from falling or tangling.Replacing Faulty Bulbs
Replace any dim or dead bulbs quickly. Faulty bulbs can affect the entire strand. Use bulbs of the same wattage for replacements. Always unplug lights before changing bulbs to ensure safety.Storing Lights After Season
Store lights properly to extend their lifespan. Use a spool or wrap them around cardboard. This prevents tangling. Keep them in a dry, cool place to avoid moisture damage. Label each strand for easy future use.
Credit: www.marksandspencer.com
Frequently Asked Questions
How Do I Start Stringing Lights On An Outdoor Tree?
Begin by choosing weatherproof lights and a power source. Test the lights first. Start wrapping from the trunk, moving to branches evenly. Secure with clips or ties to prevent slipping.
What Types Of Lights Are Best For Outdoor Trees?
LED string lights are energy-efficient and durable. Choose waterproof, outdoor-rated lights for safety. Warm white or multicolor options enhance tree beauty. Solar-powered lights offer eco-friendly, easy installation.
How Can I Safely Power Outdoor Tree Lights?
Use outdoor-rated extension cords and plugs with ground fault circuit interrupters (GFCI). Keep connections off the ground and protected from moisture. Turn off lights when not in use to prevent hazards.
How Many Lights Do I Need For A Tree?
Calculate based on tree size; 100 lights per 6-7 feet of tree height is ideal. Dense wrapping requires more lights for full coverage. Adjust quantity for desired brightness and effect.
Conclusion
Stringing lights on a tree outdoors brings warmth and charm to any space. Start with planning your design and choose safe, weatherproof lights. Wrap lights carefully around branches for even coverage. Check connections and use outdoor plugs for safety. Enjoy the cozy glow that brightens your yard or garden.
Simple steps create a magical look easily. Try different patterns to find what suits your tree best. Lighting your tree can make evenings feel special and inviting.


