
Wiring your Flourance desk lamp might seem tricky at first, but with the right steps, you can do it safely and easily. Imagine having a beautifully lit workspace that matches your style perfectly—without spending extra money on professional help.
In this guide, you’ll discover simple, clear instructions that anyone can follow. By the end, you’ll not only have your lamp ready to use but also a new skill you can be proud of. Ready to bring your desk lamp to life?
Let’s get started!
Tools And Materials Needed
Before you start wiring your Flourance desk lamp, gathering the right tools and materials is essential. Having everything ready will save you time and prevent frustration during the process.
Think about the last time you began a project without proper preparation. Did it go smoothly? Probably not. So, let’s make sure you have exactly what you need to wire your lamp safely and efficiently.
Essential Tools For Wiring Your Flourance Desk Lamp
- Screwdriver:A flathead or Phillips screwdriver will help you open the lamp casing and secure wiring connections.
- Wire Strippers:These allow you to strip insulation from the wires without damaging the metal core.
- Needle-Nose Pliers:Useful for bending and positioning wires inside tight spaces.
- Multimeter:To check for continuity and ensure your wiring is correct before plugging in the lamp.
- Electrical Tape:For insulating wire connections and adding an extra layer of safety.
- Wire Nuts or Connectors:These secure wire ends together safely without loose strands.
Materials Required For Your Desk Lamp Wiring
- Replacement Cord:Choose a cord rated for the lamp’s wattage and with the correct plug type for your outlet.
- Socket Assembly:If your lamp’s socket is damaged or outdated, a new one ensures safe bulb installation.
- Light Bulb:Use the wattage recommended by Flourance to avoid overheating.
- Heat Shrink Tubing (Optional):Adds professional-quality insulation around connections.
Why Having The Right Tools And Materials Matters
Using the wrong tools can damage delicate parts or cause unsafe wiring. For example, stripping wires with a knife might nick the copper, leading to shorts later on.
Investing in quality materials means your lamp will last longer and work safely. Would you rather fix issues repeatedly, or get it right the first time with proper gear?
Preparing your workspace with good lighting and a clean surface also helps. It’s easier to work carefully and avoid mistakes when you’re comfortable and organized.

Credit: www.pedalisaart.com
Safety Precautions
Safety is the top priority when wiring a Flourance desk lamp. Taking the right precautions prevents accidents and electrical hazards. Small mistakes can cause shocks or damage. Follow these guidelines to stay safe and work confidently on your lamp.
Turn Off The Power Source
Always unplug the lamp or switch off the circuit before starting. This stops electric current from flowing. Never work on a live wire. Double-check power is off using a voltage tester for extra safety.
Use Insulated Tools
Choose tools with insulated handles to protect against electric shock. Avoid metal tools without insulation. This simple step reduces the risk of injury when handling wires.
Work In A Dry Area
Make sure your workspace is dry and clean. Water and electricity do not mix. Keep the lamp, wires, and tools away from moisture. This lowers the chance of electric shock or short circuits.
Wear Protective Gear
- Use safety goggles to shield your eyes from sparks or debris.
- Wear rubber-soled shoes to reduce shock risk.
- Consider using gloves designed for electrical work.
Check Wire Condition
Inspect all wires for cracks, frays, or damage. Replace any worn or broken wires before wiring. Damaged wires can cause short circuits or fire hazards.
Follow Wiring Instructions Carefully
Read the lamp’s wiring guide thoroughly. Use the correct wire colors and connections. Wrong wiring can cause malfunction or danger. Take your time and double-check each step.
Identifying Lamp Components
Before wiring a Flourance desk lamp, knowing each part is vital. Understanding the components helps you wire safely and correctly.
Each component has a specific role in the lamp’s function. Identifying them clearly avoids mistakes and damage.
Base And Stand
The base supports the lamp and holds it steady. The stand is the arm or pole that connects the base to the lamp head. It often contains the wiring channel.
Lamp Head And Socket
The lamp head holds the light bulb. Inside it, the socket connects the bulb to the wiring. The socket must match the bulb type.
Power Cord And Plug
The power cord brings electricity from the outlet to the lamp. The plug connects the cord to the power source. Check the cord for any damage before use.
Switch
The switch controls the lamp’s power. It can be on the cord, base, or lamp head. Identifying the switch type helps in wiring it correctly.
Wiring And Connections
Wiring runs inside the stand and connects all parts. It includes live, neutral, and ground wires. Proper connection ensures the lamp works safely.
Preparing The Workspace
Getting your workspace ready is the foundation of a smooth wiring process for your Flourance desk lamp. A well-prepared area keeps you safe and organized, reducing the risk of mistakes or accidents.
Clear The Area
Start by removing any clutter from your desk or work surface. You need enough room to spread out all the parts and tools without feeling cramped.
I once tried wiring with a cramped space, and it slowed me down and made it easy to lose small screws. You want a clean, flat surface where everything is visible and easy to reach.
Gather Your Tools And Materials
Having all your tools at hand saves time and frustration. For wiring a Flourance desk lamp, you’ll usually need a screwdriver, wire stripper, electrical tape, and a voltage tester.
Place everything in a small container or tray nearby to keep them from rolling away. This setup helps maintain focus and efficiency throughout the task.
Check Your Lighting And Ventilation
Good lighting is crucial. You don’t want to strain your eyes or miss important details while working with wires. Natural light or a bright overhead lamp works best.
Also, ensure the room is well-ventilated, especially if you plan to use electrical tape or solder. Fresh air reduces any discomfort and keeps you alert.
Safety First: Power Off And Test
Before touching any wires, unplug the lamp or switch off the power source. Use a voltage tester to confirm there’s no current running through the wires.
This step might seem obvious, but skipping it can lead to shocks or damage. Are you confident you’ve fully disconnected the power before starting?
Removing The Old Wiring
Old wiring should be carefully removed to avoid damage to the lamp. Disconnect wires gently and clear any leftover insulation for a clean start.
Removing the old wiring from your flourance desk lamp is an essential step in the rewiring process. This task not only sets the stage for adding new components but also ensures safety and efficiency. Many DIY enthusiasts find this step quite satisfying, as it involves a tangible transformation of the lamp from outdated to ready-for-renewal.Gather Necessary Tools
Before you start, make sure you have all the necessary tools. A screwdriver, pliers, and a wire stripper will be your best friends here. Having these tools handy can make the process smoother and more efficient.Unplug The Lamp
Safety first! Always unplug the lamp before beginning any wiring work. This simple precaution can prevent unexpected shocks and keep you safe.Disassemble The Lamp
Carefully disassemble the lamp to access the old wiring. Typically, this involves removing the lampshade and unscrewing the base. Take note of each component’s position so you can easily reassemble later.Identify Old Wiring
Once open, identify the old wiring. Look for any worn or frayed wires that need to be replaced. This inspection step ensures that you focus on the right areas for improvement.Remove The Wiring
Use your screwdriver and pliers to gently remove the old wiring. Be careful not to damage the lamp’s structure. This process can be a bit fiddly, but patience pays off.Keep Track Of Components
As you remove the wiring, keep track of the small components. A small container or magnetic tray can help here. Losing a screw can halt your progress, so stay organized.Reflect On The Process
What did you learn during this step? Reflect on your observations and any challenges faced. These insights can be valuable as you move forward to wiring the lamp with new components. Removing the old wiring is more than just a mechanical task; it’s about setting a foundation for your lamp’s new life. Are you ready to breathe new energy into your lamp with fresh wiring?
Credit: sundialwire.com
Selecting The Right Wire
Selecting the right wire is key to safely wiring your Flourance desk lamp. The wire must handle the lamp’s power needs without overheating. Using the correct wire type and size ensures proper function and safety. This section explains how to choose the best wire for your project.
Understanding Wire Gauge
Wire gauge measures the thickness of the wire. A lower gauge means a thicker wire. Thicker wires carry more electricity safely. For most desk lamps, 18 or 20 gauge wire works well. Choose the gauge based on the lamp’s wattage and length of the wire run.
Choosing Wire Type
Wires come in different types. For desk lamps, use UL-listed lamp cord wire. This wire is flexible and insulated for safety. Avoid using household wiring or extension cords. Look for two-conductor lamp wire with clear or black insulation.
Checking Wire Insulation
Insulation protects the wire and prevents shocks. Use wire with heat-resistant insulation. PVC or rubber-coated wires are common for desk lamps. Make sure the insulation is intact and without cracks. This keeps the lamp safe during use.
Considering Wire Length
Use enough wire length to reach the plug without stretching. Too short wires cause tension and possible damage. Too long wires can create clutter and trip hazards. Measure the distance from the lamp base to the power outlet before cutting wire.
Safety Standards And Certifications
Pick wires with safety certifications like UL or CSA. Certified wires meet strict safety rules. This reduces fire and electric shock risks. Check the wire packaging for these marks before buying.
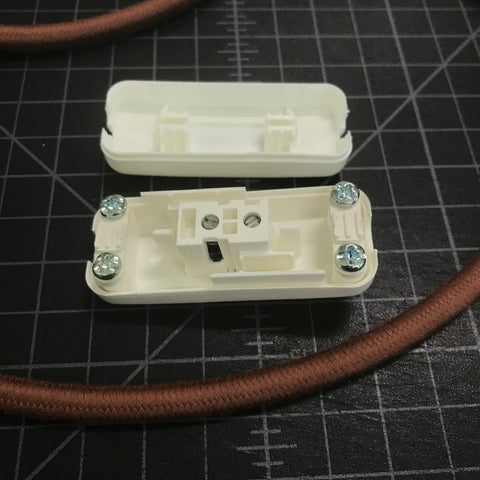
Connecting The Wires
Connecting the wires is a crucial step in wiring a Flourance desk lamp. Proper connections ensure the lamp works safely and efficiently. Each wire has a specific role and must be attached correctly to avoid electrical hazards.
Use wire strippers to remove the insulation from the ends of each wire. This exposes the copper needed for a solid connection. Keep wire ends clean and straight for better contact.
Attaching The Hot Wire
The hot wire carries electricity to the lamp. It is usually black or red. Connect this wire to the lamp’s brass or gold-colored terminal.
Twist the exposed copper wire clockwise around the terminal screw. Tighten the screw firmly to hold the wire in place. A loose connection can cause flickering or shorts.
Attaching The Neutral Wire
The neutral wire completes the electrical circuit. It is typically white or light gray. Connect this wire to the silver-colored terminal on the lamp.
Wrap the wire around the terminal screw in a clockwise direction. Tighten the screw securely. This ensures a steady return path for the current.
Securing The Ground Wire
The ground wire protects against electrical shock. It is green or bare copper. Attach this wire to the green grounding screw or metal frame of the lamp.
Loop the wire around the grounding screw. Tighten the screw firmly. This creates a safe path for electricity to flow away if a fault occurs.

Credit: www.pedalisaart.com
Testing The Wiring
Testing the wiring of your Flourance desk lamp is a crucial step. It ensures safety and confirms the lamp works correctly. This process helps spot any wiring mistakes before using the lamp daily.
Performing a thorough test prevents electrical shorts and potential hazards. It also guarantees the lamp lights up without flickering or failure.
Gathering Necessary Tools
Prepare a few simple tools before testing the wiring. You will need:
- A multimeter or continuity tester
- A screwdriver
- Electrical tape
- A light bulb compatible with the lamp
Checking Connections Visually
Inspect all wire connections carefully. Make sure wires are securely attached to terminals. Look for any loose strands or exposed wires. Proper insulation is important to avoid shorts.
Using A Multimeter To Test Continuity
Set the multimeter to the continuity setting. Touch the probes to the lamp’s wires and terminals. A beep or zero reading means good connectivity. No beep indicates a broken wire or bad connection.
Testing The Lamp With A Light Bulb
Insert the correct bulb into the socket. Plug the lamp into a power outlet. Turn the lamp switch on. The bulb should light up steadily without flickers. If not, recheck wiring and connections.
Reassembling The Lamp
Reassembling the Flourance desk lamp is the final step. It brings everything back together for safe use. Careful handling prevents damage and ensures the lamp works well. Follow each part carefully for a smooth process.
Aligning The Lamp Components
Start by placing the lamp base on a flat surface. Align the socket with the base hole. Make sure the wires are not pinched. Fit the metal arm into the base securely. Tighten any screws to hold parts firmly.
Securing The Lampshade
Place the lampshade over the bulb socket. Match the shade holder with the socket threads. Turn gently to screw the shade in place. Check that the shade sits straight. Avoid over-tightening to prevent damage.
Testing The Electrical Connections
Before final assembly, test the wiring. Plug the lamp into a power outlet. Turn the switch on and off a few times. Look for a steady light without flickering. Unplug the lamp before finishing assembly.
Final Tightening And Safety Check
- Ensure all screws and parts are tight.
- Check that wires are hidden and secure.
- Confirm the switch moves smoothly.
- Verify the lamp stands stable without wobbling.
Tips For Optimal Lighting
Proper lighting enhances both work and mood at your desk. Position the Flourance desk lamp to reduce glare and shadows. Use the right bulb wattage for clear, comfortable light.
When wiring a Flourance desk lamp, achieving optimal lighting is crucial. Proper lighting enhances your workspace and reduces eye strain. Here, we share essential tips to ensure your lamp provides the best light quality.Choose The Right Bulb
Selecting the right bulb is vital. Use LED or CFL bulbs for energy efficiency. Ensure the bulb fits the lamp’s socket size and wattage capacity.Position The Lamp Correctly
Position your lamp to reduce glare. Place it to the side of your working area, not directly in front of you.Adjust The Lamp Height
Adjust the lamp height to suit your needs. A flexible lamp arm helps with directing light precisely where needed.Consider Color Temperature
Choose a bulb with a suitable color temperature. A bulb around 5000K provides a daylight effect, ideal for tasks.Maintain A Clean Lamp
Dust and clean the lamp regularly. This ensures the light remains bright and clear, enhancing productivity.Frequently Asked Questions
How Do I Safely Wire A Flourance Desk Lamp?
To wire a Flourance desk lamp safely, first unplug it. Use insulated tools and connect wires according to the color code. Ensure all connections are tight and secure. Test the lamp before final assembly to confirm proper wiring and functionality.
What Materials Are Needed To Wire A Flourance Lamp?
You need a replacement cord, wire strippers, screwdrivers, electrical tape, and a lamp socket. Also, use a voltage tester to ensure no current is present. These materials help make wiring efficient and safe for your Flourance desk lamp.
Can I Wire A Flourance Lamp Without Electrical Experience?
Basic wiring can be done by beginners if safety rules are followed. However, if unsure, consult a professional electrician to avoid hazards. Always unplug the lamp before starting and double-check connections to ensure safety.
How Do I Identify Wire Colors In A Flourance Lamp?
Typically, black or brown wires are live, white or blue are neutral, and green or bare wires are ground. Always verify with a multimeter. Proper identification prevents incorrect wiring and potential electric shocks.
Conclusion
Wiring a Flourance desk lamp is simple and safe with clear steps. Take your time and follow each instruction carefully. Double-check connections before turning on the lamp. A properly wired lamp gives good light and lasts longer. Enjoy your bright workspace with confidence.
Keep safety in mind to avoid any problems. This guide helps you handle the task easily at home. Now, your desk lamp is ready to use.


