
Are you tired of fumbling in the dark or constantly forgetting to turn off your lights? Wiring a motion sensor light switch could be the simple solution you need.
Imagine your lights turning on automatically the moment you enter a room and going off when you leave. It saves energy, adds convenience, and boosts your home’s security. If you think wiring one is complicated, don’t worry—you can do it yourself with the right steps.
Keep reading, and you’ll learn exactly how to wire a motion sensor light switch safely and easily. Your home will thank you for it!
Tools And Materials Needed
Installing a motion sensor light switch requires a few basic tools and materials. Having the right items ready makes the job easier and safer. This list covers everything needed for a smooth installation.
Essential Tools
- Screwdriver (flathead and Phillips)
- Wire stripper
- Voltage tester
- Needle-nose pliers
- Electrical tape
- Wire nuts
- Drill (optional, for mounting)
Required Materials
- Motion sensor light switch
- Electrical box (if replacement needed)
- Wire connectors
- Replacement screws (usually included)
- Instruction manual from the switch manufacturer
Safety Gear
- Insulated gloves
- Safety glasses
- Flashlight or portable light source
Choosing The Right Motion Sensor Switch
Choosing the right motion sensor switch is key to a successful installation. The correct switch ensures safety, efficiency, and convenience in your space. Understanding the types and wiring compatibility helps you pick the perfect switch for your needs.
Types Of Motion Sensors
Motion sensor switches come in various types. Each type detects movement differently and suits different settings.
- Passive Infrared (PIR):Detects body heat and movement. Ideal for indoor use.
- Ultrasonic:Sends sound waves to detect motion. Works well in areas with obstacles.
- Dual-technology:Combines PIR and ultrasonic sensors. Reduces false triggers and improves accuracy.
- Microwave:Uses microwave signals to sense motion. Covers a larger area but may detect movement through walls.
Compatibility With Existing Wiring
Check your current wiring before buying a motion sensor switch. Not all switches fit every wiring setup.
- Neutral wire:Many switches need a neutral wire for power. Older homes may lack this wire.
- Single-pole vs. three-way:Know if your switch controls one or multiple lights. Choose a switch that matches.
- Voltage rating:Ensure the switch supports your home’s voltage, usually 120V or 240V.
- Load capacity:Confirm the switch can handle the wattage of your light fixture.
Preparing For Installation
Before you start wiring your new motion sensor light switch, getting ready is key to a smooth and safe installation. Taking the time to prepare helps avoid accidents and makes the process faster. Let’s focus on two critical steps: turning off power safely and removing the old switch.
Turning Off Power Safely
Always begin by cutting off the power to the circuit you’ll be working on. Locate your home’s circuit breaker panel and switch off the breaker that controls the room’s lighting. If you’re unsure which breaker to turn off, test the light switch to confirm the power is off before proceeding.
Use a non-contact voltage tester to double-check that wires are not live. This tool is inexpensive and adds a layer of safety. Have you ever experienced the shock of forgetting this step? Avoid it by testing twice—it’s worth the extra caution.
Removing The Old Switch
After ensuring the power is off, remove the switch cover plate with a screwdriver. Keep the screws in a safe place; you’ll need them later. Carefully unscrew the old switch from the electrical box and gently pull it out to expose the wiring.
Take a clear photo of the wiring setup before disconnecting any wires. This visual reference will help you connect the new motion sensor switch correctly. If wires are attached with screws, loosen them; if they have push-in connectors, release them carefully.

Credit: www.youtube.com
Identifying Wires In The Box
Identify each wire inside the box by its color and function before wiring the motion sensor switch. Typically, black wires carry power, white are neutral, and green or bare wires are ground. Using a voltage tester can help confirm which wire is live.
Identifying wires in the box is crucial when wiring a motion sensor light switch. It might seem daunting at first, but with a little patience and attention to detail, you’ll be able to navigate through the wires with ease. Understanding which wire is which ensures that your installation is safe and effective.Line, Load, And Neutral Wires
In most electrical boxes, you will encounter three main types of wires: line, load, and neutral. The line wire is usually black and carries power from the main electrical panel to the switch. This is the wire that you will need to connect to the motion sensor switch to power it. The load wire, often red or black, carries power from the switch to the light fixture. Connecting this wire correctly is crucial for the motion sensor to control the light properly. The neutral wire, typically white, completes the electrical circuit. It’s essential for the proper operation of most modern motion sensor switches. Make sure to identify these wires accurately to avoid any mishaps.Ground Wire Importance
The ground wire is another critical component you should not overlook. Often green or bare, this wire is vital for your safety, as it directs any stray electricity away from the switch and into the ground. This prevents electrical shocks and potential fires, safeguarding both you and your home. Connecting the ground wire might seem like an extra step, but it’s a necessary one for a safe and compliant installation. Always ensure that it’s securely fastened to the switch and, if available, to the grounding screw in the electrical box. Have you ever thought about how essential these wires are to your daily life? With a little knowledge, you can confidently handle them, making your home safer and more efficient.Wiring The Motion Sensor Switch
Wiring a motion sensor switch requires careful attention to the wires in your electrical box. Understanding the connections helps ensure the sensor works correctly and safely. Follow clear steps to connect each wire properly.
Connecting Line And Load Wires
The line wire brings power into the switch. The load wire sends power to the light fixture. First, identify the line wire by testing or checking the breaker.
Connect the line wire to the terminal marked “Line” on the motion sensor. Attach the load wire to the terminal marked “Load.” Tighten the screws securely to avoid loose connections.
Attaching Neutral Wire
The neutral wire completes the electrical circuit. It usually has white insulation. Locate the neutral wires bundled inside the electrical box.
Connect the neutral wire from the motion sensor switch to the bundle of neutral wires using a wire nut. Make sure the connection is tight and no copper is exposed.
Securing The Ground Wire
The ground wire protects against electrical shocks. It is often green or bare copper. Attach the ground wire from the switch to the grounding screw in the box.
If the box has a grounding wire bundle, connect the switch’s ground wire to it with a wire nut. Proper grounding is essential for safety and code compliance.
Mounting The Switch And Testing
After connecting the wires of your motion sensor light switch, the next critical step is mounting the switch and making sure it works properly. Proper installation ensures both safety and functionality. Let’s dive into how to secure the switch in the wall box and test its performance effectively.
Securing The Switch In The Wall Box
Carefully tuck the wires back into the wall box without forcing them. Overcrowding the box can damage wires or interfere with the switch’s operation.
Align the switch’s mounting holes with the holes in the box. Use the provided screws to fasten the switch securely but avoid overtightening, which can crack the switch or strip the screws.
Before attaching the faceplate, double-check that the switch is flush against the wall and the wires are not pinched. A loose or crooked switch can cause wiring issues or look unprofessional.
Restoring Power And Testing Functionality
Turn the power back on at the circuit breaker. Don’t forget this step—testing won’t work without electricity!
Test the motion sensor by moving in front of it to see if the light turns on promptly. If the light doesn’t activate, try adjusting the sensor’s sensitivity or detection range, which are usually controlled by small dials or switches on the unit.
Also, check if the light stays on for the expected duration after motion stops. If it shuts off too quickly or stays on too long, tweak the timer settings to match your needs.
Have you ever installed a switch only to find the light flickering or not responding? Sometimes loose connections or improper sensor settings cause these issues. Take your time to verify all connections and settings before assuming the switch is faulty.
Adjusting Sensor Settings
Adjusting the sensor settings on your motion sensor light switch is key to getting the perfect lighting response for your space. Each adjustment tailors how the switch reacts to movement, time, and light, helping you save energy and improve convenience. Let’s look at the main settings you’ll want to tweak for the best results.
Sensitivity Controls
Sensitivity controls determine how much motion the sensor needs to detect before turning the light on. If the sensitivity is too high, the light might trigger from small movements like pets or curtains moving. Too low, and it might miss someone walking in.
Try adjusting the sensitivity gradually. Start at a medium level and test by walking through the sensor’s range. Ask yourself: does the light come on only when you want it to, or too often?
Time Delay Settings
The time delay setting controls how long the light stays on after motion stops. You can set it for a few seconds or several minutes. This helps avoid the light turning off too quickly or wasting energy by staying on too long.
Think about how you use the space. For a hallway, a shorter delay might work best. For a garage or workshop, a longer delay could be more practical. Adjust and test the timing until it matches your routine.
Daylight Detection
Daylight detection prevents the light from turning on if there’s enough natural light in the room. This feature can save energy by keeping the light off during the day or when outdoor lighting is sufficient.
Check if your sensor switch has a daylight sensor or a setting to adjust this feature. You might want to lower the threshold if the light stays off when you actually need it, or raise it if it comes on unnecessarily. How bright does your space need to be before you want artificial light?
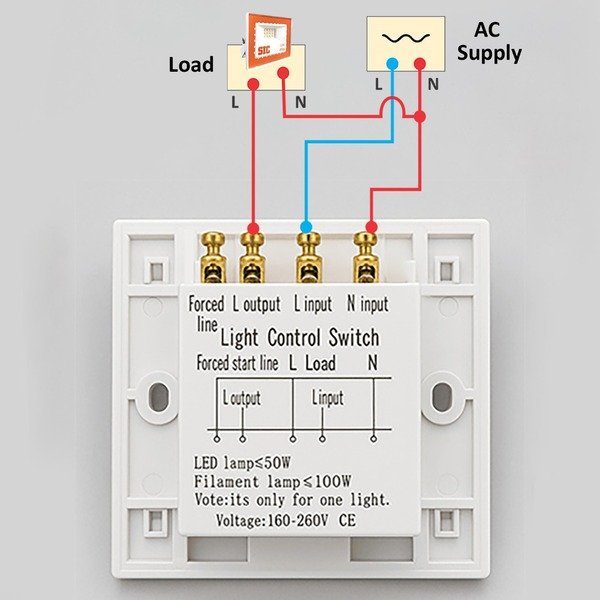
Credit: sicproducts.pk
Troubleshooting Common Issues
Running into problems with your motion sensor light switch can be frustrating, especially after you’ve put in the effort to wire it correctly. Understanding common issues and how to fix them saves time and prevents unnecessary calls to an electrician. Let’s break down the most frequent problems and what you can do to get your motion sensor light switch working perfectly.
Switch Not Turning On
If your motion sensor switch doesn’t turn on at all, start by checking the power supply. Make sure the circuit breaker is on and the switch is wired to the live and neutral wires properly.
Loose connections are often the culprit. Take a moment to tighten all wire nuts and screws.
Sometimes, the sensor itself can be faulty. If wiring looks correct and power is available, consider testing the switch with a multimeter or swapping it with a known good unit to isolate the issue.
Light Staying On Continuously
When the light stays on without turning off, the sensor might be detecting constant motion or a false trigger. Objects like curtains moving in the breeze or pets can cause this.
Adjust the sensor’s sensitivity settings or reposition the unit to avoid these false triggers.
Also, check if the time delay setting is too long. Reducing this can help the light turn off sooner after no motion is detected.
Sensor Not Detecting Motion
Your motion sensor might not detect motion if it’s obstructed or installed incorrectly. Ensure nothing blocks the sensor’s field of view.
Install the sensor at the recommended height and angle, usually around 6 to 10 feet high and tilted slightly downward.
Environmental factors like bright sunlight or reflective surfaces can interfere with the sensor. Test the sensor in different lighting conditions to see if performance improves.

Credit: www.avatarcontrols.com
Frequently Asked Questions
How Do I Connect Wires To A Motion Sensor Switch?
To connect wires, first turn off power. Match black to black (live), white to white (neutral), and green or bare wire to ground. Use wire nuts to secure connections. Follow the manufacturer’s wiring diagram carefully for proper installation.
Can I Install A Motion Sensor Switch Myself?
Yes, if you have basic electrical knowledge. Always turn off power before starting. Follow instructions step-by-step and use a voltage tester to ensure safety. If unsure, consult a professional electrician to avoid hazards.
What Tools Do I Need To Wire A Motion Sensor Switch?
You’ll need a screwdriver, wire stripper, voltage tester, wire nuts, and electrical tape. These tools help safely remove old switches and connect new wires correctly. Having the right tools ensures a smooth and safe installation process.
How Do I Test A Motion Sensor Light Switch?
Turn the power back on and walk in front of the sensor. The light should turn on automatically. Adjust the sensitivity or timer settings as needed for optimal performance. If it doesn’t work, recheck wiring connections.
Conclusion
Wiring a motion sensor light switch can save energy and add convenience. Follow the steps carefully for safety and success. Double-check connections before turning the power back on. Test the switch to ensure it works properly. With patience and attention, anyone can do this project.
Enjoy automatic lighting that responds to movement. Simple upgrades like this improve your home’s comfort and efficiency. Keep your tools ready for future electrical tasks. Small efforts bring great benefits.


