
Are you tired of fumbling for the light switch when you walk into a dark room or outside at night? Imagine your lights turning on automatically the moment you step into the space.
Wiring a motion sensor to your existing light can make this a reality, adding convenience and saving energy without a complete overhaul. In this guide, you’ll learn simple, step-by-step instructions to upgrade your lighting with a motion sensor—no expert needed.
Keep reading, and by the end, you’ll have the confidence to make your home smarter and safer in just one afternoon.

Credit: support.konnected.io
Tools And Materials Needed
Before you start wiring a motion sensor to your existing light, gathering the right tools and materials is crucial. Having everything at hand not only makes the job smoother but also safer. Missing even a small tool can turn a simple task into a frustrating experience.
Essential Tools
- Voltage Tester:Ensures the power is off before you begin working on the wiring. Safety first—never skip this step.
- Wire Strippers:Needed to remove insulation from wires cleanly without damaging them. Good wire strippers make your job easier and the connections more secure.
- Screwdrivers:Both flathead and Phillips types will come in handy for removing and securing light fixtures and sensor mounts.
- Electrical Tape:Helps insulate wire connections after you join them, preventing shorts or exposed wires.
- Wire Nuts:These are small plastic caps that twist onto wire ends to keep connections safe and tight.
- Drill:Sometimes necessary for mounting the sensor if your existing light fixture doesn’t have a convenient spot.
- Ladder:You’ll likely need this to reach ceiling fixtures or outdoor lights safely.
Required Materials
- Motion Sensor Kit:Choose a sensor compatible with your existing light type and wiring. Some sensors are designed specifically for indoor or outdoor use.
- Electrical Wire:Usually 14 or 12 gauge, depending on your home wiring. Make sure the wire length is sufficient to reach from your light to the sensor installation point.
- Wire Connectors:These secure the wire connections inside the fixture and the sensor housing.
- Mounting Brackets or Plates:Often included in sensor kits, but double-check to ensure you have what’s needed for a stable installation.
- Protective Gloves:Not strictly required but highly recommended for safe handling of wires and tools.
Do you have all these tools and materials ready? Preparing well upfront can save you from multiple trips to the hardware store and reduce the risk of mistakes. Trust me, having a voltage tester alone once prevented a nasty shock during my first DIY wiring project.
Credit: www.diychatroom.com
Safety Precautions
Working with electrical wiring can be risky if you don’t take proper safety steps. Before you start wiring a motion sensor to your existing light, it’s crucial to protect yourself and your home. Ignoring safety precautions might lead to serious injuries or damage.
Power Shutoff
Always turn off the power at the circuit breaker before touching any wires. Even if the light switch is off, the wires can still carry electricity. I once overlooked this step and got a painful shock that could have been avoided.
Double-check by using a voltage tester on the wires to confirm no current is flowing. This simple test adds an extra layer of safety and peace of mind. Never rush this step—your safety depends on it.
Using Protective Gear
Wear insulated gloves and safety goggles to protect yourself from shocks and flying debris. Gloves act as a barrier against accidental contact with live wires. Goggles keep your eyes safe from sparks or dust while working.
Make sure your tools have insulated handles as well. Even a small slip can cause injury if your tools conduct electricity. Taking these precautions keeps you safe and confident during the wiring process.
Locate Existing Light Wiring
Begin by turning off the power to the light circuit. Find the existing light wiring in the fixture or switch box to connect the motion sensor safely.
Locating existing light wiring is crucial for installing a motion sensor. This process ensures proper functionality and safety. You need to identify and understand your current wiring setup. This will help avoid any electrical mishaps. Let’s break down the steps for an easy wiring experience.Find The Light Fixture
First, identify the light fixture you wish to modify. It might be in your hallway, porch, or garage. Make sure to turn off the power to this fixture. This prevents any electrical accidents while you work. Use a voltage tester to confirm the power is off. Safety first!Access The Junction Box
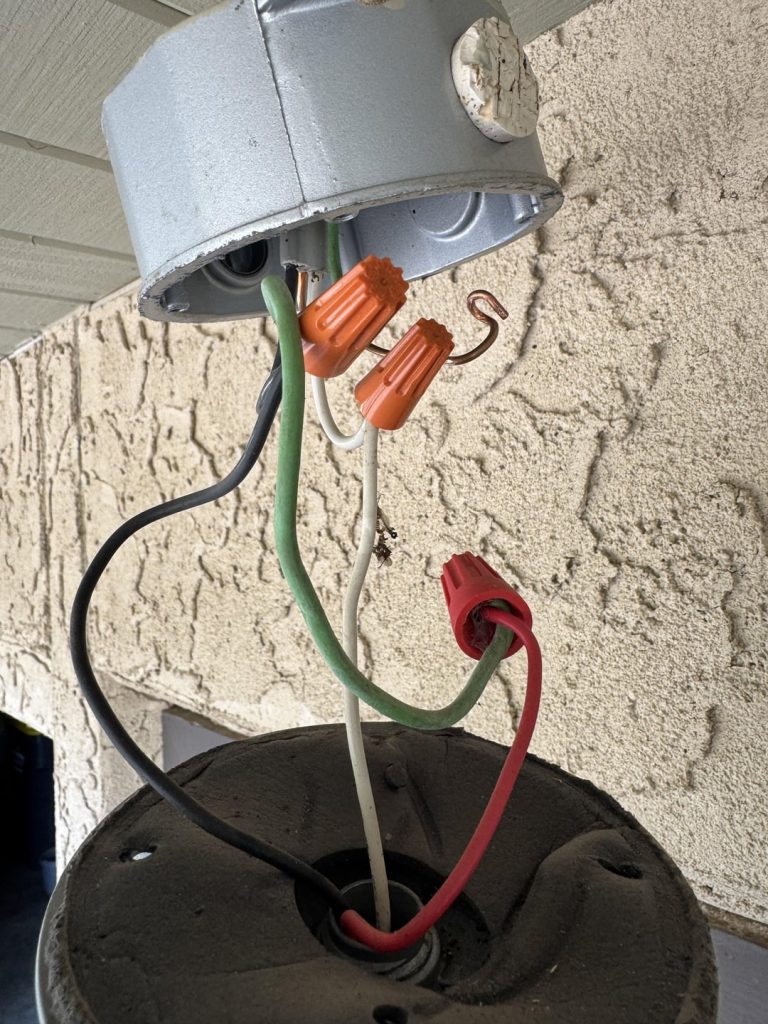
Next, locate the junction box connected to your light. The junction box is a protective container. It houses the wiring connections for the light fixture. Gently remove the light fixture cover or casing. Use a screwdriver if necessary. Once open, observe the wiring inside. You should see wires of different colors. Typically, black or red for power, white for neutral, and green or bare for ground. Take note of these colors. They are essential for your motion sensor setup. Now, with a clear view, begin preparing for the motion sensor installation. Ensure your tools and materials are ready. Double-check the power remains off. This preparation leads to a smooth wiring process.Identify Wiring Components
Before wiring a motion sensor to an existing light, it is essential to identify the key wiring components. Understanding these wires helps ensure a safe and correct installation. Each wire has a specific role in the electrical circuit. Knowing their function prevents mistakes and electrical hazards.
Hot Wire
The hot wire carries electrical current from the power source. It is usually black or red in color. This wire supplies power to the light and motion sensor. Always handle the hot wire with care to avoid electric shock.
Neutral Wire
The neutral wire completes the electrical circuit by returning current to the power source. It is typically white or gray. This wire does not carry current unless the circuit is complete. It is important to connect the neutral wire properly for the device to work.
Ground Wire
The ground wire provides a safety path for electricity in case of a fault. It is usually green or bare copper. This wire helps prevent electric shocks and electrical fires. Make sure to connect the ground wire securely to the grounding system.
Connect Motion Sensor Wires
Connecting the motion sensor wires is a key step in installing your sensor. It requires careful attention to each wire. Proper connections ensure the sensor works safely and efficiently. Always turn off the power before starting any wiring work. Use a voltage tester to confirm the power is off.
Wiring The Hot Line
The hot line carries electricity to the sensor. Identify the black wire in your sensor and the black wire in your electrical box. Twist these wires together using a wire connector. This connection allows the sensor to receive power from your home’s electrical system.
Connecting The Neutral Wire
The neutral wire completes the electrical circuit. Locate the white wire from the sensor and the white wire in the electrical box. Join these two wires by twisting them together and securing with a wire nut. A secure connection is important to avoid electrical issues.
Attaching The Ground Wire
The ground wire protects against electrical shocks. Find the green or bare copper wire from the sensor. Connect it to the ground wire in the electrical box or to the grounding screw on the mounting bracket. Tighten the connection to ensure safety and proper function.
Credit: www.doityourself.com
Mount The Motion Sensor
Mounting the motion sensor correctly is vital for efficient operation. The sensor must detect movement clearly and respond promptly. Proper placement and secure attachment ensure the sensor works well over time.
Choose The Best Location
Select a spot where the sensor can cover the desired area. Avoid placing it near heat sources like vents or direct sunlight. These can cause false triggers. Position the sensor about 6 to 10 feet above the ground for best detection.
Avoid corners or narrow spaces that limit the sensor’s view. Aim for an open space with a wide field of vision. Consider the sensor’s detection angle to cover entrances or pathways effectively.
Secure The Sensor In Place
<puse and="" bracket="" come="" drill="" easier="" for="" hold="" holes="" if="" installation.Attach the sensor firmly to prevent it from moving or falling. Check the sensor’s angle after mounting. Adjust as necessary to maximize coverage and reduce blind spots.
Test The Motion Sensor
Testing the motion sensor is a crucial step to ensure it works correctly with your existing light. This process confirms the sensor detects movement and triggers the light as expected. Proper testing avoids future issues and guarantees reliable operation.
Restore Power
Turn the power back on at the circuit breaker. This action powers the motion sensor and the light fixture. Check for any warning lights on the sensor, which may indicate a problem. Stand in front of the sensor to see if the light activates when you move. Walk slowly and then quickly to test sensitivity. If the light stays off, double-check wiring connections and power supply.
Adjust Sensor Settings
Locate the adjustment knobs or switches on the motion sensor. These controls usually include sensitivity, time delay, and light level settings. Increase or decrease sensitivity to match the detection range you need. Set the time delay for how long the light stays on after motion stops. Adjust the light level sensor to prevent activation during daylight. Test the sensor again after each adjustment to find the best settings.
Troubleshooting Tips
Sometimes motion sensors do not work as expected. Troubleshooting helps find and fix common issues quickly. This section shows key problems and simple fixes to get your light working right.
Sensor Not Triggering
Check if the sensor is connected to power properly. Loose wires can stop it from working. Ensure the sensor is aimed where movement happens. Dirt or obstacles can block its view. Test the sensor by moving in front of it slowly. Adjust the sensitivity settings if available. Replace the battery if it uses one and seems weak.
Light Staying On
Light staying on means the sensor might sense constant movement. Check for heat sources like vents or sunlight near the sensor. These can trigger it falsely. Reset the timer on the sensor to a shorter time. Clean the sensor lens to remove dust and bugs. Make sure the sensor is not facing reflective surfaces. These can confuse the sensor’s detection.
False Activations
False activations happen if the sensor reacts to small animals or wind. Adjust the sensor height to avoid sensing ground movement. Lower the sensitivity to reduce false triggers. Remove nearby plants or objects that move in the wind. Check for electrical interference from other devices. Use a shield or cover around the sensor for better focus.
Frequently Asked Questions
How Do I Connect A Motion Sensor To An Existing Light?
First, turn off the power at the breaker. Connect the sensor’s live wire to the power source live wire. Attach the sensor’s load wire to the light’s live wire. Finally, connect all neutral wires together and secure ground wires.
Can I Install A Motion Sensor Without Rewiring?
Yes, if your light fixture has accessible wiring, you can add a motion sensor inline. Use wire nuts to connect the sensor between the power source and the light fixture. Always ensure power is off before starting.
What Tools Are Needed To Wire A Motion Sensor?
You’ll need a voltage tester, wire strippers, screwdriver, wire nuts, and electrical tape. A ladder may be necessary for ceiling or high wall fixtures. Always follow safety guidelines to avoid electric shocks.
How Do I Test A Motion Sensor After Installation?
Restore power and walk in front of the sensor. The light should turn on immediately. Adjust the sensor’s sensitivity and timer settings if needed. If it doesn’t work, double-check your connections and power supply.
Conclusion
Wiring a motion sensor to an existing light is a smart way to save energy. It adds convenience and improves safety around your home. Follow the steps carefully and use proper tools. Double-check all connections before turning the power back on.
This small upgrade can make a big difference in daily life. Take your time, stay safe, and enjoy the benefits of automatic lighting. Simple changes like this help make your home more efficient and secure.


