
Thinking about adding a stylish pendant light to your room? Knowing how to wire a pendant light yourself can save you time and money.
You don’t need to be an expert electrician to do it right. With the right steps and safety tips, you’ll have your new light shining in no time. Keep reading, and by the end, you’ll feel confident handling the wiring on your own.
Let’s get started!
Tools And Materials Needed
Gathering the right tools and materials is essential before wiring a pendant light. This preparation ensures safety and smooth installation. Using proper equipment helps avoid common mistakes and speeds up the process.
Below is a list of everything needed to wire a pendant light effectively.
Basic Tools
- Screwdriver (flathead and Phillips)
- Wire stripper
- Voltage tester
- Needle-nose pliers
- Electrical tape
- Drill (if mounting holes are needed)
Materials For Wiring
- Pendant light fixture
- Wire nuts/connectors
- Electrical wire (usually 14 or 16 gauge)
- Mounting bracket or plate
- Light bulb (compatible with fixture)
- Ceiling box (if not already installed)
Safety Equipment
- Insulated gloves
- Safety goggles
- Step ladder

Credit: 100things2do.ca
Safety Precautions
Before you start wiring a pendant light, safety should be your top priority. Handling electrical wiring without proper precautions can lead to serious injury or damage. Taking a few moments to prepare can save you from costly mistakes and keep your home safe.
Turn Off The Power At The Circuit Breaker
Never rely on just switching off the light switch. Go directly to your home’s circuit breaker and switch off the correct breaker. This completely cuts power to the wiring, preventing accidental shocks while you work.
Have you ever thought about how easy it is to forget this step? I once assumed the switch was enough and got a painful shock. That experience taught me to always double-check the power source before touching any wires.
Use A Voltage Tester To Confirm Power Is Off
Even after switching off the breaker, use a voltage tester to confirm no electricity is flowing through the wires. This tool is simple to use and provides peace of mind before you start handling wires.
Imagine working blindly without this step—it’s like walking into a dark room without a flashlight. A voltage tester ensures your work area is truly safe.
Wear Protective Gear
Wear insulated gloves and safety goggles to protect yourself from sparks or accidental contact with live wires. Good footwear can also prevent shocks from grounding through your body.
Your safety gear is your last line of defense. Skipping it because the job feels “simple” can lead to unexpected accidents.
Follow Manufacturer Instructions Carefully
Each pendant light may have specific wiring requirements. Reading and following the manufacturer’s instructions ensures you connect everything correctly and avoid potential hazards.
Skipping instructions might save time but can cause wiring mistakes. Have you ever tried assembling something only to find a step you missed caused problems later? Electrical work is no different.
Keep Your Work Area Dry And Clear
Water and electricity are a dangerous combination. Make sure your workspace is dry, and keep tools and wires organized to avoid tripping or accidental contact with live wires.
Think about how clutter or moisture could increase risks. A clean, dry area helps you focus and work efficiently without distractions or hazards.
Turning Off The Power
Turning off the power ensures safety when wiring a pendant light. Locate the circuit breaker and switch it off. Double-check with a voltage tester to confirm there’s no electricity.
Properly wiring a pendant light begins with ensuring your safety. Turning off the power is a crucial first step. It’s not just about flipping a switch; it’s about understanding and respecting the power of electricity. Mistakes can lead to serious accidents. Do you know where your circuit breaker is located? If not, it might be time to find out. This knowledge could prevent potential hazards. Let’s dive into the specifics of safely turning off the power.Locate Your Circuit Breaker
Knowing the location of your circuit breaker is vital. It’s usually in a utility room, basement, or garage. Spend a moment to familiarize yourself with its location and layout. This will save you time and stress during any electrical project.Identify The Correct Circuit
Finding the right circuit to turn off can be tricky. Many breakers aren’t labeled clearly. Consider labeling them for future reference. If you’re unsure, turn off the main breaker for total safety, but be prepared for a temporary loss of power throughout your home.Use A Voltage Tester
Once the power is off, use a voltage tester to ensure there’s no electricity flowing. This tool checks wires for active current. It’s an extra step, but one that reinforces your safety. Are you willing to take the risk without it?Communicate With Others
Inform others in your household about your project. You don’t want someone accidentally turning the power back on. Clear communication can prevent potential mishaps. Would you appreciate the same courtesy if roles were reversed?Take Your Time
Turning off the power is not a race. Rushing can lead to mistakes and accidents. Take a deep breath and ensure everything is in place before proceeding. A calm approach fosters a safe environment. By thoroughly preparing and taking these steps, you’re setting the stage for a successful pendant light installation. Remember, safety comes first.Removing The Old Fixture
Removing the old fixture is the first task before installing a new pendant light. It prepares the space and ensures safety. Taking out the old light carefully avoids damage and helps with smooth wiring.
Before starting, turn off the power at the circuit breaker. This step prevents electric shocks. Always test the wires with a voltage tester to confirm no power flows.
Gather Necessary Tools
Get tools ready for removing the fixture. Common tools include:
- Screwdriver (flathead and Phillips)
- Voltage tester
- Wire cutters or pliers
- Step ladder
- Flashlight
Remove The Light Bulbs And Shades
Take out bulbs and any glass or plastic shades first. This makes the fixture lighter and easier to handle. Place bulbs safely aside to avoid breakage.
Unscrew The Fixture From The Ceiling
Locate the screws or bolts holding the fixture base. Unscrew them carefully. Support the fixture with one hand to avoid it falling. Slowly pull the fixture away from the ceiling.
Disconnect The Wiring
Find the wire connectors that join the fixture wires to the house wires. Unscrew or untwist the connectors. Separate the fixture wires from the house wires gently. Keep track of wire colors and positions.
Inspect The Electrical Box
Check the electrical box for any damage or loose parts. Ensure it is secure and ready for the new pendant light. Fix or replace the box if needed before wiring the new fixture.
Preparing The Pendant Light
Preparing the pendant light is a crucial step before installation. It ensures safety and proper function. Take your time to understand each part. Gather all tools and materials needed for the job. This preparation sets the foundation for a smooth wiring process.
Assembling The Fixture
Start by carefully unpacking the pendant light. Check all parts against the instructions. Lay them out on a clean surface. Attach the canopy to the fixture body. Secure screws tightly but avoid over-tightening. Connect any decorative elements as shown in the manual. Make sure the socket is firmly in place. This keeps the bulb stable and safe.
Adjusting The Cord Length
Measure the distance from the ceiling to the desired hanging height. Mark the cord at the right length. Use wire cutters to trim excess wire carefully. Strip the insulation from the ends to expose the wires. Leave enough wire to connect to the ceiling box. Avoid pulling the cord too tight after adjustment. This keeps the light balanced and stable.
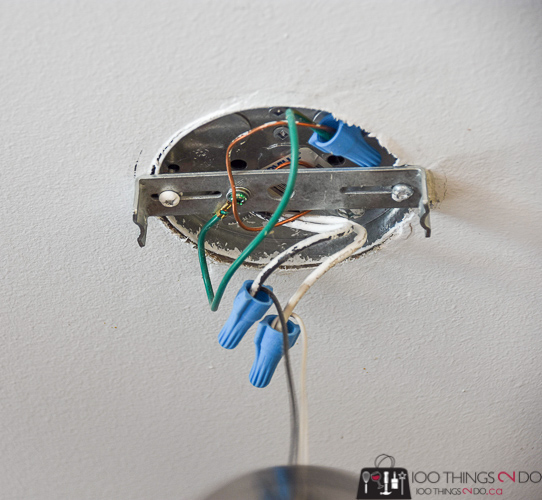
Connecting The Wires
Connecting the wires is a crucial part of wiring your pendant light safely and effectively. It requires attention to detail and a clear understanding of the wires involved. Getting this right ensures your light functions properly and minimizes the risk of electrical issues.
Identifying Wire Types
Look closely at the wires coming from your ceiling and pendant light. Typically, you will find three types: the live (hot) wire, the neutral wire, and the ground wire. The live wire carries electricity to the light, the neutral wire completes the circuit, and the ground wire provides safety by preventing electrical shocks.
Each wire has a distinct texture or coating, so take a moment to identify them correctly. If you are unsure, use a voltage tester to confirm which wire is live before proceeding.
Matching Wire Colors
Wire colors usually follow a standard code to help you match them correctly. The live wire is often black or red, the neutral wire is white, and the ground wire is green or bare copper. Matching these colors correctly is essential to avoid short circuits or electrical hazards.
Sometimes, wires may differ slightly in color due to age or manufacturer differences. If you encounter this, focus on the wire’s function rather than just the color. Double-check the wiring diagram that came with your pendant light to be sure.
Securing Wire Connections
Once you have matched the wires, connect them securely using wire nuts or connectors. Twist the wires together firmly before screwing on the wire nut to ensure a solid connection. Loose connections can cause flickering lights or even sparks, so don’t rush this step.
After securing the connections, gently pull on each wire to test its stability. Wrap electrical tape around the wire nuts for extra safety if you want. Remember, a strong connection today prevents problems tomorrow.
Mounting The Pendant Light
Mounting the pendant light is a crucial part of the installation process. It ensures your fixture is safely and securely attached to the ceiling, providing both stability and style. This step requires attention to detail, as a poorly mounted light can be unsafe or look unprofessional.
Attaching The Mounting Bracket
Start by locating the electrical box in your ceiling. The mounting bracket usually fits directly onto this box, so make sure it aligns correctly.
Use the screws provided with your pendant light to fasten the bracket firmly. Tighten them just enough to hold the bracket steady without stripping the screws.
Double-check the bracket’s position. It should be level and secure enough to support the weight of your fixture without wobbling.
Securing The Fixture To The Ceiling
Once the mounting bracket is in place, lift your pendant light and align it with the bracket.
Most fixtures have screws or hooks that connect directly to the bracket. Attach these carefully, ensuring they click or tighten securely.
After securing the fixture, gently tug it downward to test if it’s firmly attached. If it moves or feels loose, recheck your connections.
Have you noticed how a well-mounted pendant light instantly upgrades a room’s feel? Take your time here—it’s worth it for both safety and style.
Testing The Light
Testing the light is a crucial step after wiring a pendant light. It ensures the fixture works safely and correctly. This step prevents electrical issues and saves time on repairs. Follow clear actions to check your new pendant light.
Turn On The Power
Switch the circuit breaker back on to restore electricity. Use the light switch to turn on the pendant light. Watch carefully to see if the bulb lights up. No light? Double-check your wiring connections and power source.
Use A Voltage Tester
Verify power at the light fixture with a voltage tester. Touch the tester to the wires inside the junction box. A positive reading means electricity is flowing correctly. No reading? The power may still be off or the wiring is incorrect.
Check The Light Bulb
Make sure the bulb is compatible with the pendant light socket. Use a working bulb to avoid confusion. Replace the bulb if it is burnt out or damaged. Test the light again after changing the bulb.
Inspect For Flickering Or Dim Light
Look for flickering or dim light as signs of wiring issues. Loose connections or bad bulbs often cause these problems. Tighten wire nuts and secure all connections firmly. Replace faulty bulbs to maintain steady light output.
Confirm Switch Operation
Operate the wall switch multiple times to test stability. The light should respond immediately without delay. If the switch feels loose or faulty, consider replacing it. A good switch ensures reliable control of your pendant light.
Troubleshooting Common Issues
Wiring a pendant light can sometimes lead to unexpected issues. Knowing how to troubleshoot common problems will save you time and frustration. Let’s look at some typical hurdles and how you can overcome them with clear, simple steps.
Light Doesn’t Turn On
One common issue is the pendant light not turning on. First, check if the bulb is screwed in tightly and isn’t burned out. If the bulb is fine, verify that the power is turned on at the circuit breaker.
Sometimes, the problem lies in the wiring connection. Make sure the wires are connected correctly and securely—matching the black (hot) wires, white (neutral) wires, and grounding wire. A loose wire can interrupt the power flow.
If everything seems in place but the light still won’t turn on, test the switch or try another bulb. Could your switch be faulty? Testing with a multimeter can help identify this.
Flickering Light
Flickering can be annoying and may signal a wiring problem. Start by checking if the bulb is compatible with your fixture. Using a dimmable bulb in a non-dimmable fixture, or vice versa, often causes flickering.
Loose connections are another frequent culprit. Inspect the wire nuts and terminal screws to ensure they’re tight. Even a slight wiggle can cause the light to flicker intermittently.
Sometimes the issue is in the switch itself, especially if it’s old or worn out. Replacing the switch might be the easiest fix to stop that annoying flicker.
Loose Fixture
A pendant light that moves or sways can be unsettling and unsafe. Check if the mounting bracket is firmly attached to the ceiling box. Loose screws or a poorly secured bracket often cause the fixture to hang unevenly.
If the fixture has a canopy, make sure it’s snug against the ceiling. Sometimes, the decorative cover hides loose screws that need tightening.
Have you ever felt your pendant light swinging every time you walk by? Securing every connection point can stop this and protect your fixture from damage.

Credit: www.reddit.com

Credit: www.amazon.ca
Frequently Asked Questions
How Do I Safely Wire A Pendant Light?
Turn off the power before starting. Connect the black wire to the live wire and white to neutral. Secure ground wires properly. Use wire nuts and electrical tape to ensure safe connections. Follow local electrical codes for safety.
What Tools Are Needed To Wire A Pendant Light?
You need a voltage tester, wire stripper, screwdriver, wire nuts, and electrical tape. These tools help you safely connect wires and secure the fixture. Having the right tools makes wiring easier and safer.
Can I Wire A Pendant Light Without Professional Help?
Yes, if you have basic electrical knowledge and follow safety rules. Turn off power, use correct tools, and follow wiring instructions. If unsure, consult a professional to avoid risks and ensure proper installation.
How Do I Connect Ground Wires In Pendant Lighting?
Connect the green or bare copper ground wire from the fixture to the house ground wire. This ensures electrical safety by preventing shock. Secure the connection with a wire nut and wrap with electrical tape.
Conclusion
Wiring a pendant light can be simple and safe with the right steps. Always turn off the power before starting any work. Follow instructions carefully and check all connections twice. Use the right tools and parts for the job. Taking time ensures your light works well and looks great.
Enjoy the new light and the cozy space it creates. Safety first, and you’ll have a bright, beautiful room. Ready to light up your home?


