
Are you looking to transform your space quickly and stylishly? Installing 3D wall panels is one of the easiest ways to add depth and character to any room.
Imagine turning a plain wall into a stunning focal point that impresses everyone who walks in. In this guide, you’ll discover simple, step-by-step instructions to put up 3D wall panels like a pro—no special skills needed. Keep reading, and you’ll learn how to upgrade your walls and boost your home’s appeal in no time.

Credit: dundeedeco.com
Choosing The Right 3d Panels
Choosing the right 3D wall panels is a crucial step that shapes the entire look and feel of your space. The panels you pick should match your room’s style, meet your functional needs, and fit your budget. Taking the time to understand the different options available can save you from costly mistakes and help you achieve the impact you want.
Materials And Textures
3D wall panels come in a variety of materials, each offering unique benefits. PVC panels are lightweight and water-resistant, making them perfect for kitchens and bathrooms. MDF or wood panels add warmth and a natural feel, but they require more care to avoid moisture damage.
Texture plays a huge role in how your panels will interact with light and shadow. Smooth panels give a modern, sleek look, while rough or patterned textures create depth and interest. Think about the mood you want to set—do you want your walls to be bold and dynamic or calm and subtle?
Panel Sizes And Designs
The size of each panel can change the entire scale of your wall design. Large panels cover more area quickly and create a bold statement. Smaller panels offer more flexibility and allow you to create detailed patterns or mosaics.
Designs range from geometric shapes to organic waves and abstract patterns. Ask yourself if your space benefits more from a repetitive pattern that adds rhythm or from unique, irregular designs that become a focal point. Remember, the design should complement your furniture and decor rather than compete with them.
Color Selection Tips
Color affects the atmosphere and perceived size of your room. Lighter colors tend to make a space feel larger and more open. Darker shades add coziness but can make a room feel smaller if overused.
Consider the existing color palette in your room. Choosing a color that contrasts with your walls can make the 3D panels pop. Alternatively, picking a shade close to your wall color creates a subtle, elegant effect. Have you thought about how lighting in your room will change the panel’s appearance throughout the day?
Preparing Your Wall Surface
Preparing your wall surface is essential before installing 3D wall panels. A clean and smooth wall ensures the panels stick well and look great. Taking time to prepare the wall saves effort later.
Proper preparation helps the panels last longer and keeps them safe from damage.
Cleaning And Repairing
Start by cleaning the wall with a damp cloth or sponge. Remove dust, dirt, and grease spots. These can stop the panels from sticking properly.
Check for holes, cracks, or bumps. Use spackle or filler to fix any damage. Let the repair dry completely. Sand the patched areas smooth for a flat surface.
Measuring And Marking
Measure the wall’s height and width carefully. Mark the center point with a pencil. This helps align the panels evenly.
Use a level to draw straight horizontal and vertical guide lines. Mark where each panel will go. Precise marks make installation easier and neater.
Gathering Necessary Tools
Collect all tools before starting the project. Common tools include:
- Measuring tape
- Level
- Pencil
- Spackle and putty knife
- Sanding block
- Adhesive or glue recommended for panels
- Utility knife or saw for cutting panels
- Protective gloves and goggles
Having tools ready speeds up the work and avoids interruptions.
Cutting And Arranging Panels
Cutting and arranging 3D wall panels requires care and precision. Proper preparation ensures a clean, professional look. It also saves time and materials. This section explains how to cut panels safely, plan their layout, and test fit before installation.
Safe Cutting Techniques
Use a sharp utility knife or fine-toothed saw for cutting panels. Work on a stable surface to avoid slips. Wear safety goggles to protect your eyes from dust and debris. Cut slowly and steadily to get clean edges. Mark the cut lines clearly with a pencil before cutting. Avoid rushing to prevent mistakes and injuries.
Creating A Layout Plan
Measure the wall area carefully before placing panels. Sketch the wall on paper and note measurements. Plan the panel arrangement to minimize small cuts. Focus on symmetry and balance for a neat look. Decide which panel edges will be visible or hidden. Keep extra panels for future repairs or adjustments.
Dry Fitting Panels
Place panels on the wall without glue or nails first. Check for fit and alignment across the entire surface. Adjust panels as needed for tight seams and smooth transitions. This step helps spot any measurement errors early. Dry fitting saves material waste and improves final results.
Applying Adhesive And Fixing Panels
Applying adhesive and fixing 3D wall panels can transform a plain wall into a stunning feature. This process requires attention to detail and the right materials to ensure the panels stay secure and look flawless over time. Let’s break down how to choose the best adhesive, apply it correctly, and secure the panels for a lasting finish.
Choosing The Right Adhesive
The type of adhesive you pick can make or break your project. Most 3D wall panels work best with strong construction adhesives or specialized panel adhesives designed for your panel material, such as PVC, wood, or gypsum.
Look for adhesives that offer quick bonding and are waterproof if you’re applying panels in humid areas like bathrooms. Avoid generic glues that might not hold the weight or could damage the panel’s surface. Have you checked if your adhesive is compatible with both your wall surface and panel material?
Step-by-step Application
- Clean your wall surface thoroughly to remove dust, grease, or loose paint.
- Apply adhesive generously to the back of the panel using a caulking gun or trowel, focusing on the edges and center for an even hold.
- Don’t spread the adhesive too thin; a good layer ensures the panel sticks firmly without gaps.
- Work on one panel at a time to prevent the adhesive from drying before you fix it.
Applying adhesive evenly can be tricky, but imagine the frustration of panels falling off later because you skimped on glue. Take your time—it’s worth it.
Pressing And Securing Panels
Once the adhesive is applied, press the panel firmly against the wall. Use consistent pressure across the surface to avoid air bubbles or uneven spots.
Consider using a level to check alignment and a soft rubber mallet to tap the edges gently. If your panels come with interlocking edges, make sure they fit snugly before the adhesive sets.
Temporary supports or painter’s tape can hold panels in place while the adhesive cures. How often do you think about these small details that keep your walls looking professional?
Finishing Touches
Ensure all panels align smoothly for a clean look. Fill gaps with matching paint or caulk to blend edges seamlessly. Finish by cleaning surfaces to remove dust and adhesive residue.
Once you’ve installed your 3D wall panels, the finishing touches can transform them from good to great. This step is where you ensure everything looks polished and seamless. It’s all about attention to detail and taking the time to perfect your work.Filling Gaps And Seams
Even the most precise installations can leave tiny gaps or seams. To achieve a flawless look, fill these with a quality sealant or filler. This process not only enhances the visual appeal but also ensures the panels are securely attached. Apply the filler with a caulking gun for precision. Smooth it out with a putty knife for a seamless finish. Allow it to dry thoroughly before moving on to the next step.Painting And Sealing
Once the gaps and seams are filled, consider painting your panels to match or contrast with your existing decor. Choose a paint that complements your space and enhances the texture of the panels. Use a primer first to ensure the paint adheres well. After painting, sealing the panels will protect them from moisture and stains, prolonging their life.Maintaining Your 3d Walls
Regular maintenance will keep your 3D walls looking fresh and vibrant. Dusting the panels with a soft cloth prevents dirt buildup. If your walls are in a high-traffic area, consider washing them occasionally with a mild soap solution. Have you noticed any damage over time? A quick touch-up with paint or filler can restore their original beauty. Remember, a little care goes a long way in maintaining the stunning look of your 3D panels.
Credit: dundeedeco.com
Common Mistakes To Avoid
Installing 3D wall panels can transform any space, but a few common mistakes can turn your project into a frustrating experience. Avoiding these pitfalls saves time, money, and effort while ensuring your walls look professional and last longer. Let’s look at some frequent errors and how you can steer clear of them.
Incorrect Measurements
Measuring your wall inaccurately is one of the quickest ways to waste panels and money. Don’t just rely on a rough estimate or eyeball it—use a tape measure and write down exact dimensions.
Remember to measure the height and width at several points because walls can be uneven. If you don’t, you might end up with panels that don’t fit properly or gaps that ruin the look.
Have you double-checked your numbers? Taking time to measure twice prevents costly mistakes.
Using Wrong Adhesives
The type of adhesive you choose makes a huge difference in how well your panels stick and hold up over time. Using generic glue or the wrong kind can cause panels to peel off or damage your walls.
Look for adhesives specifically recommended for 3D wall panels or the material of your panels, whether it’s PVC, wood, or MDF. If you’re unsure, ask for advice at your local hardware store.
Applying too much adhesive can also create messes, while too little won’t secure the panels properly. Balance is key.
Ignoring Wall Preparation
Skipping wall preparation is a mistake many make, but it can seriously affect the final result. Your wall must be clean, dry, and smooth before installation.
Remove any dust, dirt, or loose paint. If the wall has bumps or holes, fill and sand them down to create a flat surface.
Have you ever tried sticking something on a dusty wall? It rarely holds well. Taking the time to prep your wall pays off in a flawless finish.
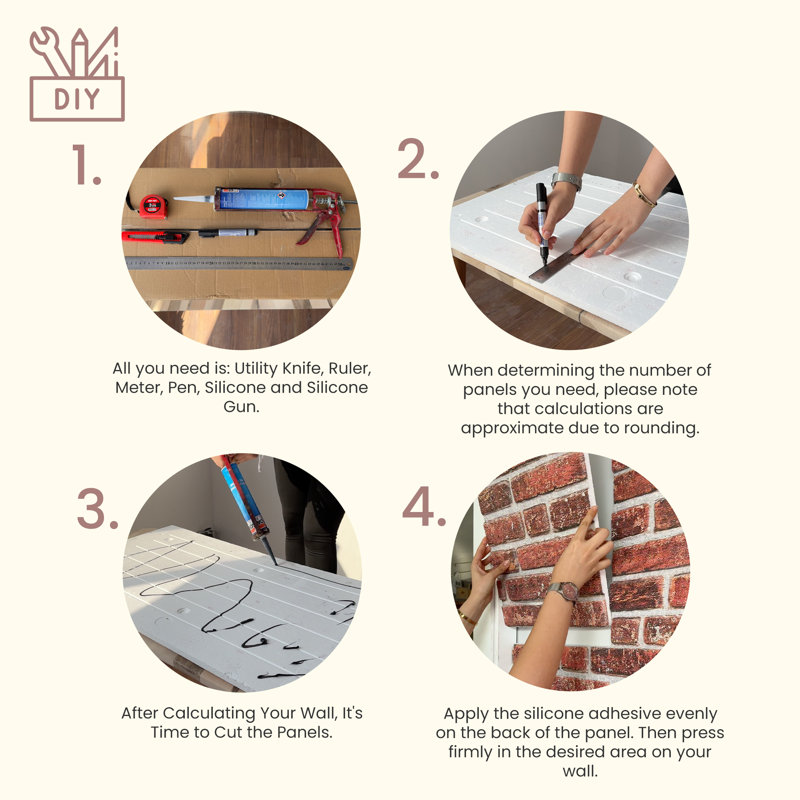
Credit: www.wayfair.com
Frequently Asked Questions
How Do You Prepare Walls For 3d Panel Installation?
Clean the wall surface thoroughly and repair any cracks. Ensure the wall is dry, smooth, and free of dust or grease before installing panels.
What Tools Are Needed To Install 3d Wall Panels?
You need adhesive, a level, measuring tape, a utility knife, and a rubber mallet for proper 3D wall panel installation.
Can 3d Wall Panels Be Installed On Any Wall Type?
Yes, 3D wall panels work on drywall, plaster, wood, and concrete, as long as the surface is clean and smooth.
How Long Does It Take To Install 3d Wall Panels?
Installation typically takes a few hours for one wall, depending on wall size and panel complexity.
Conclusion
Installing 3D wall panels can change any room’s look quickly. Follow the steps carefully and take your time. Use the right tools and materials for best results. Clean the wall surface before you start for better grip. Measure and plan the layout to avoid mistakes.
Keep panels aligned and secure them firmly. Enjoy the new texture and style you create. This simple project adds depth and interest to your space. Try it yourself and see the difference it makes.


