
Are you tired of clutter taking over your space? Mounting a shelf to your wall can instantly organize your room and add a stylish touch.
But if you’ve never done it before, the idea might feel overwhelming. Don’t worry—you’re closer than you think to creating a neat, functional space with your own hands. In this guide, you’ll discover simple, step-by-step instructions that anyone can follow.
By the end, you’ll have the confidence to mount your shelf securely and beautifully. Ready to transform your wall and your room? Let’s get started!

Credit: medium.com
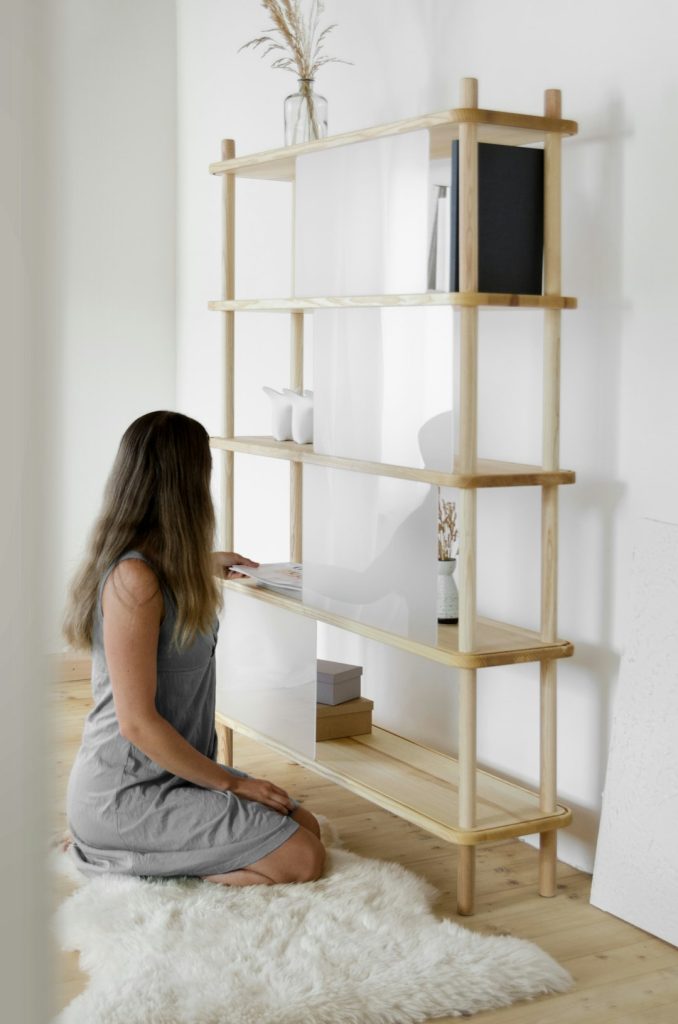
Choosing The Right Shelf
Choosing the right shelf is more than just picking what looks good on your wall. It affects how much weight you can hold, how long the shelf lasts, and how well it fits your space. Before drilling any holes, consider what type of shelf suits your needs and the conditions of your room.
Types Of Shelves
Shelves come in many forms, each serving different purposes. Floating shelves offer a clean, modern look and don’t show brackets, but they usually hold less weight. Bracket shelves are sturdy and visible, making them ideal for heavy items like books or tools.
Corner shelves help you use tight spaces effectively, while ladder shelves provide flexible storage without wall mounting. Think about what you plan to store and where you want the shelf—this will guide your choice.
Material Considerations
The material of your shelf affects durability and style. Wood is warm and strong but can be heavy and may warp if exposed to moisture. Metal shelves are sleek and sturdy but might not fit every decor.
Glass shelves look elegant and are great for light items, but they require careful handling. MDF or particleboard shelves are budget-friendly but less durable. Ask yourself, how much wear and tear will your shelf face daily?
Weight Capacity
Knowing how much weight your shelf can hold is crucial for safety and longevity. Check the shelf’s specifications and the strength of the wall where you’ll mount it. Drywall alone won’t support heavy loads without anchors or studs.
For heavy items like kitchenware or books, find shelves rated for higher weight limits. Have you measured the heaviest item you plan to place? Overestimating weight capacity is safer than underestimating it.
Gathering Tools And Materials
Gathering the right tools and materials sets the foundation for a sturdy shelf mount. Proper preparation saves time and ensures safety. It helps achieve a neat and lasting result. Below are the key items to have ready before starting your project.
Essential Tools
- Drill with drill bits
- Screwdriver or screw gun
- Stud finder
- Level
- Measuring tape
- Pencil for marking
- Hammer
- Wall anchors (if needed)
Hardware Selection
Choose screws and brackets that suit your shelf and wall type. Heavy shelves need strong brackets and long screws. Drywall requires anchors to hold weight safely. Wood walls allow screws to grip directly. Pick hardware that fits your shelf’s size and expected load.
Safety Gear
- Safety glasses to protect your eyes
- Gloves to avoid splinters and cuts
- Dust mask if drilling into drywall
- Ear protection for loud tools
Preparing The Wall
Clear the wall surface and check for studs using a stud finder. Mark the spots to ensure strong support for your shelf. Clean dust and dirt to help adhesives or anchors stick properly.
Mounting a shelf to a wall involves careful planning. Preparing the wall is crucial for a stable and secure shelf. This step ensures your shelf will hold weight and stay aligned.Locating Studs
Find the studs in your wall. Studs provide strong support for heavy items. Use a stud finder to locate them. Slide the tool across the wall. It will beep or light up when it finds a stud. Mark these spots with a pencil.Marking Placement
Decide where you want the shelf. Use a level to ensure straight lines. Mark the corners of the shelf on the wall. Make sure these marks align with the studs. This will keep your shelf balanced and sturdy.Checking For Obstacles
Ensure the area is clear of obstacles. Avoid electrical wires and plumbing pipes. Use a wire detector for safety. Avoid drilling into these areas. It prevents damage and ensures safety.Installing The Brackets
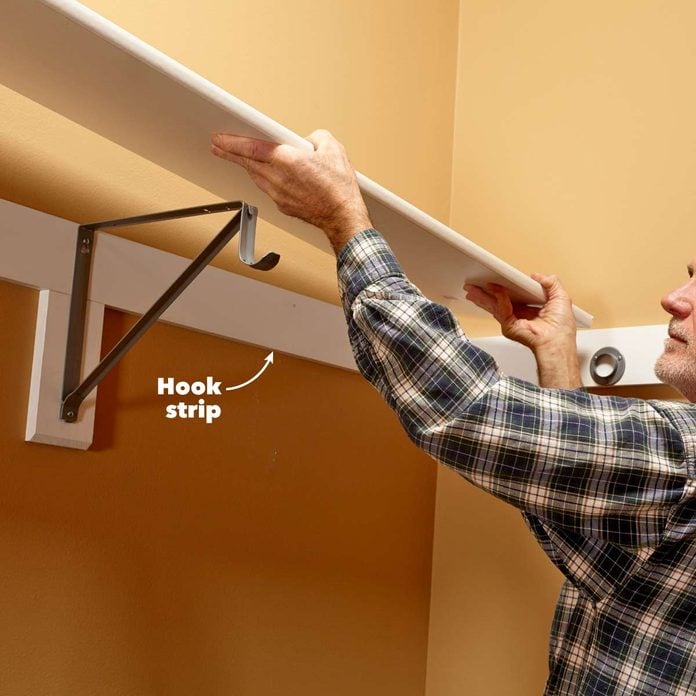
Installing the brackets is a crucial part of mounting a shelf to a wall. The brackets support the weight of your shelf and everything you place on it, so precision and care here make all the difference. If your brackets aren’t firmly attached or properly aligned, your shelf could become unstable or even fall.
Drilling Pilot Holes
Start by marking where each bracket will go. These marks should line up with wall studs or anchors for maximum support.
Use a drill bit slightly smaller than your screws to create pilot holes. These holes make it easier to drive screws in and reduce the risk of splitting the wall or bracket.
Think about the type of wall you have—drywall, plaster, or concrete—and choose the right drill bit accordingly. Have you checked your drill settings? Too much force can damage your wall.
Securing Brackets
Once your pilot holes are ready, hold the bracket firmly against the wall and drive in your screws. Use a screwdriver or drill with a clutch setting to avoid over-tightening.
For heavier shelves, consider using wall anchors or toggle bolts to give extra holding power. Don’t just assume the screws will hold—test the firmness by gently pulling on the bracket after installation.
Are you using screws long enough to reach the stud behind the drywall? Short screws may not provide the strength you need.
Ensuring Level Alignment
Before tightening all screws fully, place a level on the bracket to check alignment. Even a slight tilt can cause your shelf to look off or make objects slide off.
If you notice the bracket isn’t level, adjust it slightly and double-check. This step is easier to fix now than after the shelf is mounted.
Would you rather fix a small alignment issue now or deal with a crooked shelf later? Take your time here—it pays off with a professional look and function.
Mounting The Shelf
Mounting the shelf is the key part of the project. It must be done carefully to ensure the shelf stays strong and stable. A well-mounted shelf holds weight without wobbling or falling. This section guides you through placing the shelf, fixing it to brackets, and making final checks.
Positioning The Shelf
Start by deciding the exact spot on the wall. Use a level tool to keep the shelf straight. Mark the points where the brackets will attach. Check the height and space around the shelf for easy access. Make sure the shelf is at a comfortable level for use.
Attaching To Brackets
Place the shelf on the mounted brackets carefully. Align the holes on the shelf with bracket holes. Use screws to fasten the shelf tightly. Do not overtighten; this may damage the shelf or brackets. Confirm all screws are secure and the shelf feels firm.
Final Adjustments
Check the shelf with a level tool again. Adjust screws if the shelf is not perfectly horizontal. Test the shelf by gently pressing on different spots. Look for any movement or wobble. Tighten or reposition brackets if needed to ensure stability.

Credit: www.youtube.com
Testing Stability
Testing the stability of your mounted shelf is crucial for safety and durability. It ensures the shelf holds items without shifting or falling. This step helps you catch any issues before placing heavy objects on the shelf.
Weight Testing
Start by placing light items on the shelf. Gradually add weight in small amounts. Watch for any signs of movement or bending. Make sure the shelf stays level and secure. If the shelf holds light items well, test with heavier objects next. This careful approach avoids sudden damage.
Troubleshooting Wobbles
Wobbles indicate loose fittings or weak support. Check screws and brackets to ensure they are tight. Use a screwdriver to tighten any loose screws. If wobbling continues, inspect the wall anchors. Replace weak anchors with stronger ones if needed. Adjust the shelf position for better balance. Stability improves with firm and even support.
Maintenance Tips
Regular checks keep your shelf safe over time. Tighten screws every few months. Avoid overloading the shelf beyond its weight limit. Keep the shelf clean to spot damage early. Replace worn parts quickly to prevent accidents. Proper care extends the life of your shelf and keeps it stable.
Credit: www.familyhandyman.com
Frequently Asked Questions
How Do I Find Studs For Mounting A Shelf?
Use a stud finder to locate studs behind the wall. Mark the spots with a pencil for accurate shelf support. Studs provide the strongest anchoring points for your shelf.
What Tools Are Needed To Mount A Shelf?
You need a drill, level, screws, anchors, measuring tape, and a screwdriver. These tools ensure precise and secure shelf installation.
Can I Mount A Shelf On Drywall Without Studs?
Yes, use heavy-duty wall anchors or toggle bolts for drywall. These provide sufficient support when studs are unavailable.
How High Should I Mount A Shelf On The Wall?
Mount shelves at eye level or slightly higher for easy access. Consider the shelf’s purpose and room layout for optimal placement.
Conclusion
Mounting a shelf to a wall is simple with the right steps. Use proper tools and find strong wall studs for support. Measure carefully to keep the shelf level and secure. Taking time to do it right ensures safety and durability.
Enjoy your new shelf for storage or display. A little effort creates a useful and neat space. Now, you can hang shelves confidently in any room.


