
Are you tired of your recessed lighting and ready for a fresh, stylish change? Replacing those hidden lights with pendant fixtures can transform your space, adding personality and warmth.
But if you’re unsure where to start or worried about the process, don’t worry—you’re in the right place. In this guide, you’ll learn simple, step-by-step tips to swap out your recessed lights for stunning pendants that make your room shine.
Keep reading, and discover how easy it is to bring new life to your lighting—and your home.
Tools And Materials Needed
Replacing recessed lighting with pendant lights can transform the look and feel of your space. Before you start, gathering the right tools and materials is key to a smooth and safe installation. Having everything ready will save you time and frustration during the process.
Essential Tools
You’ll need a few basic tools to complete this lighting swap. A voltage tester is crucial to ensure the power is off before you touch any wiring. A screwdriver set will help you remove the recessed light trim and secure the new fixture.
Wire strippers make it easier to prepare the wires for connection without damaging them. A drill can be helpful if you need to create new mounting holes for the pendant. Don’t forget a ladder or step stool to reach your ceiling comfortably and safely.
- Voltage tester
- Screwdriver set (flathead and Phillips)
- Wire strippers
- Drill with bits
- Measuring tape
- Ladder or step stool
- Wire nuts and electrical tape
Choosing The Right Pendant Lights
Picking pendant lights involves more than just style. Consider the size of your room and the height of your ceiling. Large pendants in a small room can feel overwhelming, while tiny ones might get lost in a big space.
Think about the light output you need. Pendants come with different wattage recommendations, so check if the fixture supports bulbs bright enough for your task or ambiance. Also, look for adjustable cords or rods to set the perfect hanging height.
Have you thought about the fixture’s weight? Heavy pendants may require additional ceiling support. Make sure your electrical box can handle the load to avoid safety issues.

Credit: hellofromliz.com
Safety Precautions
Working with electrical fixtures can be risky if you overlook safety. Before you replace recessed lighting with pendant lights, taking proper safety precautions is essential to protect yourself and your home. Small mistakes can lead to shocks or fire hazards, so it’s worth spending extra time on safety.
Turning Off Power
Always switch off the power at the circuit breaker before starting any electrical work. Don’t rely on just turning off the light switch because the wiring can still carry electricity.
Label the breaker to avoid someone accidentally turning it back on while you’re working. Double-check that the lights you’re replacing don’t respond when switched on to confirm the power is truly off.
Using A Voltage Tester
A voltage tester is your best friend for confirming that the wiring is dead before touching anything. Even if you turned off the breaker, wires could still hold a charge due to wiring errors or shared circuits.
Touch the tester’s probe to the wires inside the recessed light box. If the tester lights up or beeps, the power is still on. Only proceed once you’ve confirmed zero voltage.
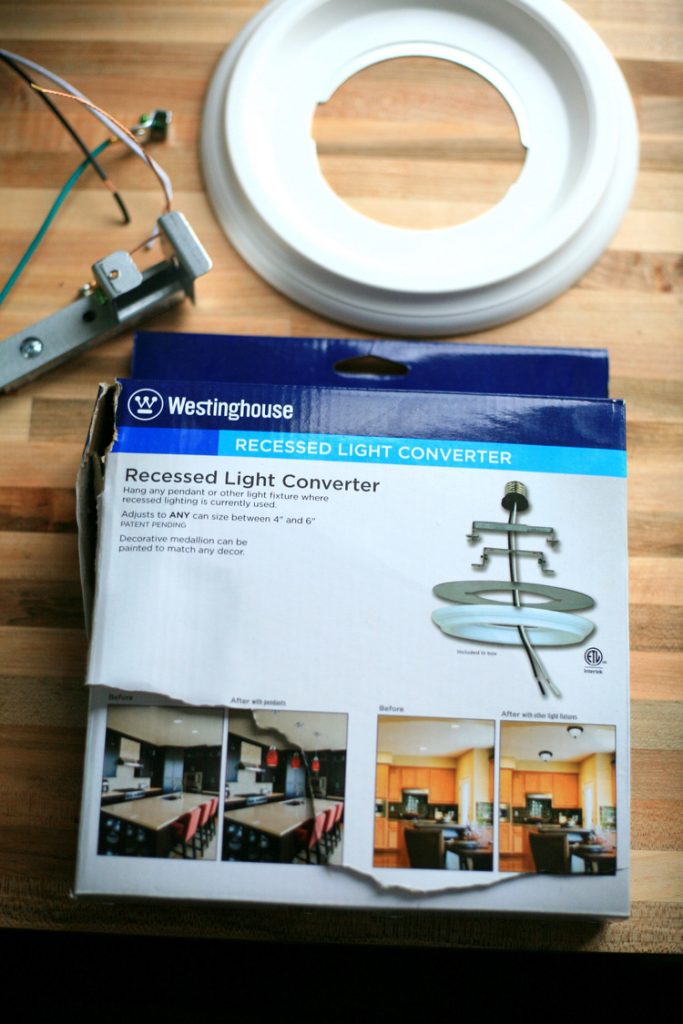
Removing Recessed Lighting
Removing recessed lighting involves safely disconnecting the fixtures and wiring. Replace them by installing pendant lights, which add style and focused light to any room. This process updates your space with a fresh, modern look.
Replacing recessed lighting with pendant lights can transform a room’s ambiance, adding a touch of style and character. Before you can enjoy the fresh look, you’ll need to remove the existing recessed lighting. This task might seem daunting at first, but with a step-by-step approach, you can tackle it confidently. Let’s delve into the process of removing recessed lighting, which involves detaching the trim and bulb, disconnecting the wiring, and finally, removing the housing. Each step is crucial, so let’s break it down.Detaching The Trim And Bulb
The first step in removing recessed lighting is to detach the trim and bulb. Ensure the power is off to avoid any electrical hazards. Carefully remove the bulb by unscrewing it counterclockwise. Once the bulb is out, you can remove the trim by gently pulling it away from the ceiling. Some trims might be held by springs or clips—be cautious not to damage them. Have you ever noticed how a simple change like this can dramatically alter a room’s feel?Disconnecting The Wiring
With the trim and bulb removed, the next phase involves disconnecting the wiring. Use a voltage tester to double-check that the electricity is off. Safety first! Carefully pull down the recessed light fixture to access the wiring. You’ll typically find three wires: black, white, and green or bare copper for grounding. Use a screwdriver to disconnect these wires from the fixture. Have you ever thought about how understanding your home’s wiring can empower you to tackle more DIY projects?Removing The Housing
The final step is to remove the housing of the recessed light. Depending on your fixture, the housing might be attached with screws or clips. Unscrew or unclip the housing from the ceiling. Gently pull it down, ensuring not to damage the surrounding drywall. Once removed, you’ll have a clean slate to install your new pendant light. Doesn’t it feel satisfying to complete a task that initially seemed out of reach? By following these steps, you’re well on your way to upgrading your lighting. Each action you take builds your confidence and skillset, paving the way for more home improvement adventures. Have you considered what your next project might be after this?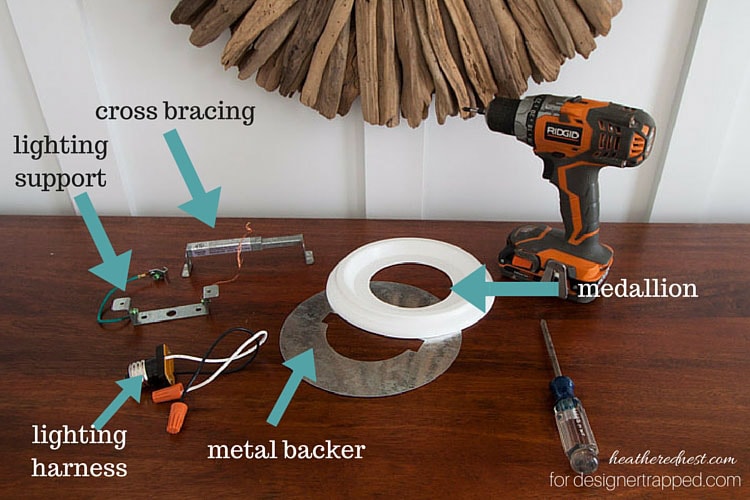
Credit: designertrapped.com
Preparing For Pendant Installation
Preparing to replace recessed lighting with pendant fixtures involves more than just swapping bulbs. You need to make sure your ceiling can support the new fixtures safely and that all electrical components are ready for the change. Taking time to prepare properly can save you from headaches later and ensure your new lighting looks great and functions well.
Assessing Ceiling Support
Not all ceilings are built the same, and pendant lights can be heavier than recessed cans. Before you start, check if your ceiling joists can handle the added weight. Look for a solid wooden joist or beam near your existing recessed light location.
If you don’t find a sturdy support, you might need to add a brace or a mounting bar between joists. This extra step ensures the pendant won’t sag or cause damage over time. Have you considered how much your new fixture weighs compared to the old one?
Installing A Junction Box
Recessed lights often connect directly to wiring without a proper junction box, but pendant lights require one for safety. The junction box holds the wiring connections securely and supports the fixture’s mounting hardware.
Before installation, turn off the power at the breaker. Then remove the recessed light and install an electrical junction box rated for ceiling support in its place. Make sure the box is flush with the ceiling surface to avoid gaps.
Use wire nuts to connect the pendant’s wiring to the house wiring inside the box. Double-check these connections to prevent shorts or flickering lights. Have you checked that your junction box is rated for the weight of your pendant light?
Installing Pendant Lights
Installing pendant lights in place of recessed lighting can transform your space with style and warmth. It requires careful attention to both the electrical and physical setup to ensure safety and a professional finish. Here’s how to handle the key steps of installing pendant lights effectively.
Wiring The Pendant
First, turn off the power at the circuit breaker to avoid any accidents. Carefully remove the recessed light fixture and locate the wiring in the ceiling box.
Match the wires from your pendant light to the existing wires: usually black to black (hot), white to white (neutral), and green or copper to ground. Use wire nuts to secure the connections tightly and wrap them with electrical tape for extra safety.
If you’re unsure about any wiring, it’s best to consult a licensed electrician. Proper wiring ensures your pendant light will function safely and reliably.
Securing The Fixture
Once the wiring is complete, attach the mounting bracket that comes with your pendant light to the ceiling box. This bracket supports the weight of the fixture, so make sure it’s firmly screwed in.
Next, connect the pendant light canopy to the mounting bracket. This step usually involves aligning screws or hooks and tightening them to hold the fixture flush with the ceiling.
Check that the fixture feels secure. A loose pendant can be dangerous and look unfinished, so don’t rush this step.
Adjusting Height And Position
Adjusting the height of your pendant light is key to achieving the perfect look and functionality. Most pendants come with adjustable cords or rods—loosen the mechanism to slide the fixture to your desired height.
Consider the room’s purpose: lower pendants work well over kitchen islands for focused light, while higher placements suit general ambient lighting. Stand back and see how the light interacts with the space before final tightening.
Don’t forget to center your pendant over the area you want illuminated. A well-positioned pendant light can completely change the room’s vibe and usability.
Finishing Touches
Finishing touches bring your new pendant lighting to life. After installing, small details make a big difference. These steps ensure your lighting looks great and works well.
Testing The Light
Turn on the power and test the pendant light. Check if it lights up evenly and bright enough. Adjust the height or angle for the best look. Listen for any buzzing or flickering sounds. These could mean wiring issues. Fix problems before cleaning up.
Cleaning Up
Remove all tools and debris from the area. Wipe dust off the new fixture with a soft cloth. Clean the surrounding ceiling and walls gently. Dispose of old recessed light parts properly. Keep the workspace neat to enjoy your new lighting fully.
Common Mistakes To Avoid
Replacing recessed lighting with pendant lights can transform a room’s look and feel. Mistakes during this process can cause extra work and added costs. Avoiding common errors ensures a smooth upgrade and a stylish result.
Knowing what to watch for helps keep the project safe and efficient. Here are typical mistakes to avoid during your lighting swap.
Ignoring Ceiling Height And Pendant Length
Ceiling height affects how low pendants should hang. Too low can block views and movement. Too high may reduce light impact. Measure carefully before choosing fixture length.
Not Turning Off Power Before Work
Electricity is dangerous. Always switch off power at the circuit breaker. Test with a voltage tester to confirm no current flows. Safety first to avoid shocks or injury.
Failing To Check Electrical Box Size
Pendant lights need a compatible electrical box. Recessed lighting boxes may not support heavier fixtures. Replace or reinforce boxes to hold new pendants securely.
Overlooking Wire Compatibility And Connections
Wires for recessed lights differ from pendant wires. Use proper connectors and wire types. Double-check connections to prevent shorts and flickering.
Choosing Pendant Style Without Considering Room Design
Pendants must match the room’s style and size. Large pendants overwhelm small spaces. Small pendants can look lost in big rooms. Pick designs that blend with decor.
Not Hiring A Licensed Electrician For Complex Jobs
Some installations need expert skills. Complex wiring or code requirements demand a pro. Hiring a licensed electrician avoids safety risks and code violations.

Credit: hellofromliz.com
Frequently Asked Questions
What Tools Are Needed To Replace Recessed Lighting With Pendant Lights?
You will need a ladder, screwdriver, wire stripper, voltage tester, wire nuts, and the pendant light kit. Safety gear like gloves and goggles is also recommended. These tools help safely remove old fixtures and install new pendant lights.
How Do I Safely Remove Recessed Lighting Fixtures?
Turn off the power at the breaker. Remove the trim and bulb carefully. Disconnect wiring by unscrewing wire nuts and pulling apart connections. Always test wires with a voltage tester to ensure no electricity flows before handling.
Can I Use Existing Wiring For Pendant Light Installation?
Yes, you can often reuse the existing wiring. Pendant lights usually connect to the same electrical box as recessed lights. Ensure the wiring is in good condition and compatible with the new fixture’s requirements before installation.
How Do I Choose The Right Height For Pendant Lights?
Measure from the floor to the bottom of the pendant. Typically, 28-34 inches above countertops is ideal. Adjust based on ceiling height and room size. Proper height ensures good lighting and aesthetics without obstruction.
Conclusion
Replacing recessed lighting with pendant lights can change your room’s look. Pendant lights add style and direct light where needed. The process is simple with basic tools and safety steps. Choose the right size and height for your space. Take your time and follow the instructions carefully.
Enjoy the new atmosphere and improved lighting in your home. Small changes can make a big difference. Give your room a fresh and warm feel with pendant lighting.


