
Are you looking to transform your walls without spending a fortune? Do It Yourself 3D wall panels could be the perfect solution for you.
Imagine adding depth, style, and a modern touch to any room with panels you can install yourself. It’s easier than you think, and the results are stunning. Keep reading to discover how you can upgrade your space quickly, save money, and enjoy a creative project that makes your home truly yours.

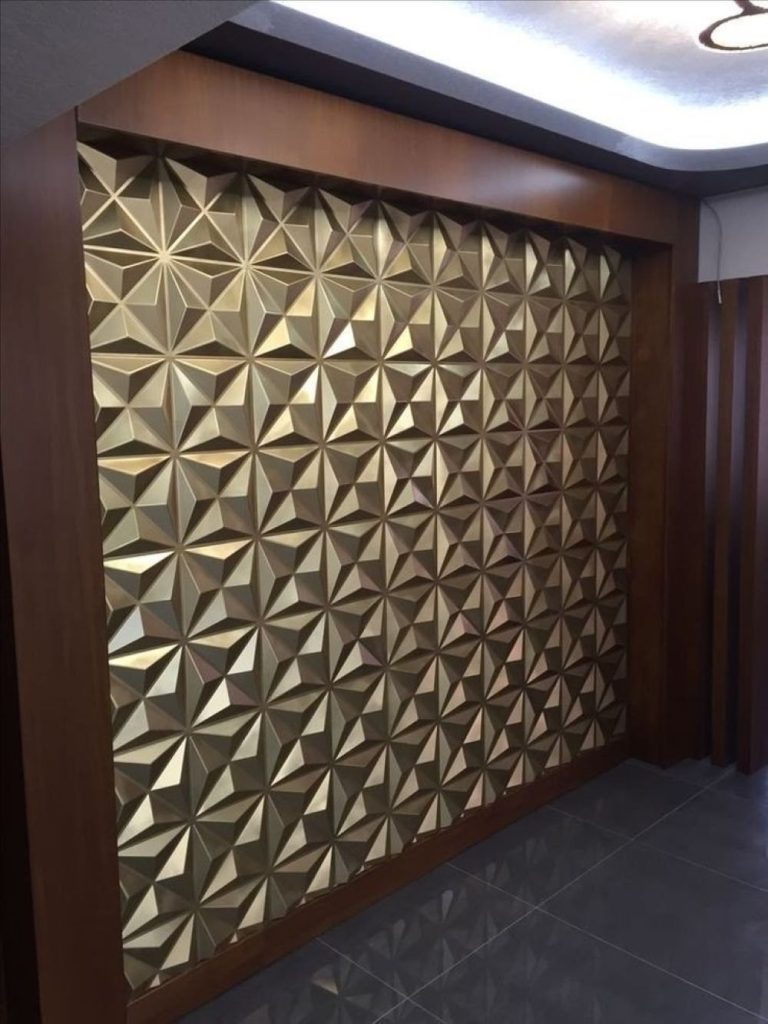
Credit: 3dwallpanels.co.uk
Benefits Of 3d Wall Panels
3D wall panels offer more than just a trendy look. They bring several benefits to any space. From style upgrades to practical advantages, these panels improve rooms in many ways. Understanding these benefits helps you choose the right design for your home or office.
Enhancing Interior Aesthetics
3D wall panels add texture and depth to plain walls. They create eye-catching patterns that attract attention. These panels fit various styles, from modern to classic. They turn dull spaces into vibrant, artistic areas. You can paint or finish them to match any color scheme. This makes rooms feel more lively and inviting.
Improving Room Acoustics
These panels help reduce echo and noise inside rooms. Their textured surfaces break sound waves, improving sound quality. This makes rooms quieter and more comfortable. Ideal for living rooms, offices, and home theaters. Better acoustics mean less distraction and more focus.
Easy Maintenance And Durability
3D wall panels are simple to clean and maintain. Most panels resist stains and moisture. A quick wipe keeps them looking fresh and new. They are made from strong materials that last long. This durability saves money on frequent repairs or replacements. Panels stay attractive over many years.
Choosing The Right Materials
Choosing the right materials for your DIY 3D wall panels is crucial for achieving the best look and durability. With a variety of materials available, making an informed choice can significantly impact the final result. Whether you’re aiming for a modern aesthetic or an eco-friendly solution, understanding your options is key.
Popular Material Options
Many DIY enthusiasts opt for materials like PVC, wood, or gypsum for their 3D wall panels. PVC is lightweight, easy to install, and comes in various designs, making it a top pick for beginners. Wood offers a natural, warm look that can be customized through staining or painting, though it may require more maintenance. Gypsum panels are another choice, known for their soundproofing qualities and sleek finish.
Eco-friendly Alternatives
For those conscious of their environmental footprint, there are sustainable materials worth considering. Bamboo panels are a fantastic eco-friendly option, known for their rapid regrowth and durability. Reclaimed wood is another choice, adding character and a story to your walls, while reducing waste. Cork panels provide a unique texture and are both renewable and biodegradable.
Cost Vs. Quality Considerations
Balancing cost and quality is often a challenge, but it’s essential for a successful DIY project. While cheaper materials might seem attractive, they may not offer the longevity or visual appeal you desire. Investing in higher-quality materials can pay off in the long run with enhanced durability and aesthetics. Consider your budget and how much you value the end result when making your decision.
Have you ever chosen a material based solely on price, only to find it didn’t meet your expectations? It’s a common pitfall, but with a bit of planning and research, you can avoid it. Choose wisely, and your DIY 3D wall panels will not only beautify your space but also stand the test of time.
Tools And Supplies Needed
Installing 3D wall panels yourself can transform any space quickly. Having the right tools and supplies makes the process smooth and efficient. The list below covers everything needed to complete your project with confidence.
Basic Tools For Installation
- Measuring tape – for accurate panel placement
- Level – to ensure panels are straight
- Utility knife – for cutting panels to size
- Adhesive or construction glue – to secure panels on the wall
- Caulking gun – for applying adhesive evenly
- Screwdriver or drill – for extra fastening if required
- Sandpaper – to smooth edges after cutting
Safety Equipment Essentials
- Protective gloves – to avoid cuts and scrapes
- Safety goggles – to protect eyes from dust and debris
- Dust mask – to prevent inhaling particles
- Knee pads – for comfort during low wall work
Optional Decorative Accessories
- Paint and brushes – to customize panel color
- Caulk or filler – to hide seams between panels
- Decorative trim – for a polished border finish
- Lighting fixtures – to highlight texture and depth

Credit: www.amazon.co.uk
Preparing Your Wall Surface
Preparing your wall surface is the foundation for a successful DIY 3D wall panel project. A smooth, clean, and properly marked wall ensures the panels stick well and look fantastic. Taking the time to prep your wall prevents future issues like peeling or uneven panels.
Cleaning And Repairing Walls
Start by removing any dust, dirt, or grease from the wall using a mild detergent and water. A clean surface helps the adhesive grip better, so don’t skip this step. Check for cracks, holes, or uneven spots and fill them with spackle or putty.
After the filler dries, sand the patched areas until smooth. You want a flat surface to avoid bumps showing through the panels. Have you noticed how even tiny imperfections become obvious once panels are installed?
Measuring And Marking Layout
Measure your wall’s height and width accurately before you begin placing panels. Use a pencil and a level to mark guidelines where each panel’s edge will sit. This step helps you maintain straight lines and avoid awkward gaps.
Consider starting from the center of the wall and working outward for a balanced look. Have you ever ended up with a tiny sliver of panel on one side? Proper marking prevents that frustrating scenario.
Priming For Better Adhesion
Priming your wall with a suitable primer creates a better surface for the panels to stick to. Choose a primer compatible with your wall type—drywall, plaster, or concrete.
Apply the primer evenly and let it dry completely before installing panels. This simple step can make a big difference in the durability of your project. Would you want your hard work to peel off after a few weeks?
Step-by-step Installation Guide
Installing 3D wall panels yourself can transform any space with texture and depth. The process may seem tricky at first, but breaking it down into clear steps makes it manageable. You’ll find that careful preparation and attention to detail deliver professional-looking results without hiring a pro.
Cutting Panels To Size
Measure your wall area precisely before cutting. Use a sharp utility knife or fine-toothed saw to ensure clean edges. Cutting panels on a flat, stable surface helps avoid mistakes and keeps the panel intact.
Remember, it’s better to cut slightly larger than smaller—you can always trim excess later. Have a straight edge or ruler handy to guide your cuts for accuracy. How confident are you with your measuring skills? Double-checking can save you from wasted material.
Applying Adhesive Correctly
Choose an adhesive recommended by the panel manufacturer for best results. Apply it evenly on the back of each panel using a notched trowel or caulking gun, depending on the type.
Don’t overdo the glue; too much can squeeze out and create a mess, while too little won’t hold the panel securely. Press the panel firmly against the wall immediately after applying adhesive to ensure a strong bond. Have you tested the adhesive on a small area? This helps you understand drying times and hold strength.
Aligning And Securing Panels
Start from a corner or a straight edge to keep panels aligned. Use a level to check that each panel sits perfectly straight—misalignment becomes obvious as you progress.
If panels have interlocking edges, make sure they fit snugly together before pressing in place. For extra security, use finishing nails or screws where allowed by the panel type. What challenges might your wall surface present? Uneven walls may need extra preparation to achieve a smooth finish.
Creative Design Ideas
Creative design ideas can transform your DIY 3D wall panels from simple decor to a stunning focal point. By mixing different elements, you can create a unique look that reflects your style and adds depth to any room. Let’s dive into some practical ways to make your wall panels stand out.
Mixing Patterns And Textures
Combining various patterns and textures adds visual interest and makes your wall panels more dynamic. Try pairing smooth geometric shapes with rough, natural textures like wood grain or stone finishes. This contrast catches the eye and gives your walls a tactile appeal that invites touch.
You don’t have to stick to one pattern—mix stripes, waves, and angular designs for an eclectic but balanced look. Think about how the light will play off different surfaces throughout the day. Have you experimented with layering panels of different depths to add a 3D effect?
Incorporating Lighting Effects
Lighting can dramatically enhance the impact of your 3D wall panels. Adding LED strips behind or around the panels creates shadows and highlights that emphasize their shape. Soft, warm lights work well for cozy spaces, while cooler lights can give a modern, sleek vibe.
Consider adjustable lighting so you can change the mood depending on the time of day or occasion. Spotlights angled correctly can make textures pop. What kind of lighting setup would best showcase your panel design?
Painting And Finishing Touches
Painting your 3D wall panels offers endless customization options. Use bold colors on raised sections to make them stand out or apply a metallic finish for a sophisticated touch. You can also try ombre effects or subtle gradients to add movement across the surface.
Don’t forget about protective finishes—matte, gloss, or satin can all change the feel and durability of your panels. Adding small accents like stenciled patterns or decals can personalize your design even more. How could a fresh coat of paint transform your current wall setup?
Common Challenges And Solutions
Installing DIY 3D wall panels can be rewarding yet tricky. Challenges often arise that affect the final look and durability. Knowing common problems and their solutions helps create a smooth installation process. This section discusses three key challenges and how to handle them effectively.
Dealing With Uneven Walls
Uneven walls cause gaps or misaligned panels. They make installation harder and reduce the panels’ visual appeal. Start by measuring the wall surface carefully. Use a level tool to find the high and low spots.
Fill small dents or holes with a lightweight filler. For bigger uneven areas, apply a thin plywood sheet as a base. This creates a flat surface to attach the panels securely. Sand the base layer smooth before installation.
Fixing Installation Mistakes
Mistakes like misaligned panels or wrong cuts can happen. Avoid rushing the process. Mark panel positions with a pencil before gluing or nailing. If a panel is misplaced, gently remove it before the adhesive sets.
Use a fine saw to trim panels that don’t fit well. Replace damaged panels promptly to keep the wall uniform. Keep extra panels handy for quick swaps. Correct errors early to save time and effort later.
Maintaining Panel Integrity Over Time
3D wall panels need care to stay fresh and strong. Dust panels regularly with a soft cloth or brush. Avoid harsh cleaning chemicals that can damage the material.
Control room humidity to prevent warping or mold growth. Fix any cracks or chips with matching filler or paint. Check panels yearly for loose spots and reattach if needed. Proper maintenance extends the life of your wall design.
Budget-friendly Tips
Creating 3D wall panels yourself can be a fantastic way to add style to your space without breaking the bank. Budget-friendly tips help you focus on smart choices that save money while still delivering impressive results. Let’s look at how you can keep costs low and quality high.
Sourcing Affordable Materials
Finding the right materials at a good price is key. Check out local hardware stores for clearance sales or leftover supplies. Sometimes, online marketplaces offer bulk discounts on foam, wood, or PVC sheets used in 3D panels.
Don’t overlook recycled or repurposed materials. Old pallets, leftover drywall, or even cardboard can be transformed into creative wall panels with some paint and creativity. Have you explored community swap groups or freecycle platforms? You might score materials for free or very cheap.
Diy Vs. Professional Help
Doing it yourself saves labor costs but requires time and patience. If you have basic tools and a willingness to learn, you can achieve professional-looking results without the price tag. However, consider the complexity of your design; some detailed patterns may benefit from expert help.
Think about the value of your time. Would hiring a pro for a few hours to handle tricky parts save you frustration and money in the long run? Sometimes, a hybrid approach—DIY for simple sections and professionals for finishing touches—works best.
Maximizing Impact On A Small Budget
Focus on one feature wall instead of covering an entire room to stretch your budget. Using paint creatively on textured panels can enhance depth without extra material cost. You can also mix different panel styles or sizes to create an eye-catching arrangement.
Lighting plays a big role in how your panels look. Experiment with shadows using affordable LED strips or spotlights to highlight the 3D effect. What’s one small area in your home that could benefit most from a visual upgrade?

Credit: archipro.com.au
Frequently Asked Questions
What Materials Are Best For Diy 3d Wall Panels?
Popular materials include PVC, MDF, gypsum, and wood. These are affordable, easy to work with, and durable. Choose based on your room’s style and budget for best results.
How Do I Install 3d Wall Panels Myself?
Clean the wall surface first. Use construction adhesive or nails to fix panels. Align panels carefully and seal edges with caulk for a seamless look.
Can I Paint Diy 3d Wall Panels?
Yes, most panels can be painted. Use primer first for better adhesion. Choose paint suitable for the panel material and desired finish.
How Much Does It Cost To Make 3d Wall Panels?
Costs vary by material and size. DIY projects typically range from $2 to $10 per square foot. Budget for tools, paint, and adhesives as well.
Conclusion
DIY 3D wall panels bring style and texture to any room. You can create a fresh look without spending much money. The process is simple and fun for beginners. Just choose the right materials and design for your space. These panels add depth and character to plain walls.
Enjoy personalizing your home with your own hands. Small changes can make big differences in your decor. Try this project to refresh your living space today.


