
Looking to give your desk lamp a fresh, stylish look? Adding a shade is a simple way to transform your workspace and create the perfect lighting for reading, working, or relaxing.
You might think it’s tricky, but with the right steps, you can do it yourself quickly and easily. Keep reading, and you’ll discover how to choose the right shade and install it without any hassle—making your desk lamp both functional and beautiful.
Ready to brighten up your space? Let’s get started!

Credit: www.ebay.ca
Choosing The Right Shade Material
Choosing the right shade material affects both the look and function of your desk lamp. The material controls how light spreads and how the lamp complements your room. Picking a shade that fits your style and lighting needs makes your workspace more inviting and practical.
Fabric Options
Fabric shades offer a soft, warm glow. They come in cotton, linen, silk, and blends. Cotton is easy to clean and durable. Linen adds texture and lets light shine gently. Silk creates a smooth, elegant look but can be delicate. Fabric shades fit well in cozy or traditional rooms.
Paper Shades
Paper shades are lightweight and budget-friendly. They provide a soft, diffused light. Some papers have patterns or textures for extra style. Paper can be fragile, so handle with care. These shades suit casual and minimalist spaces nicely.
Metal And Plastic Choices
Metal shades offer a modern, sleek look. They direct light downwards or upwards, perfect for task lighting. Metal is strong and easy to clean. Plastic shades come in many colors and shapes. They are lightweight and often less expensive. Both materials are good for bright, focused light.

Credit: imogenpopelondon.com
Measuring Your Lamp
Measuring your desk lamp is the first step to choosing the right shade. Accurate measurements ensure the shade fits well and looks balanced. This process helps avoid buying a shade that is too big or too small. Take your time to measure carefully for the best results.
Determining Shade Size
Start by measuring the width of your lamp’s base or the area where the shade will sit. Use a tape measure to get the diameter across the widest point. Next, measure the height from the base to the top of the lamp holder. Consider the style of the lamp; some need taller or wider shades.
Write down these dimensions. Compare them to shade sizes available online or in stores. A good rule is the shade should be about two-thirds the height of the lamp base. The width of the shade should be slightly wider than the base for balance.
Checking Lamp Fitting Types
Identify the type of fitting your lamp uses. The fitting holds the shade in place and varies by lamp. Common types include spider, clip-on, and uno fittings.
- Spider fitting:Sits on top of the lamp harp and secures with a finial.
- Clip-on fitting:Clips directly onto the light bulb.
- Uno fitting:Screws onto the lamp socket under the bulb.
Match the shade’s fitting type to your lamp’s fitting. This ensures the shade will attach securely and safely. Check the lamp socket size and shape to avoid compatibility issues.
Tools And Supplies Needed
Basic tools like a screwdriver and pliers make the process easier. Gather a suitable lampshade, screws, and mounting brackets before starting. These supplies ensure a safe and secure attachment to your desk lamp.
To successfully add a shade to your desk lamp, gathering the right tools and supplies is crucial. Having everything ready before you start will make the process smoother and more enjoyable. Let’s dive into the essentials you’ll need to bring your creative vision to life.Basic Craft Tools
Begin with the basics. Scissors are your go-to for cutting fabric or paper for the shade. A ruler or measuring tape ensures precision in your cuts and measurements. If you don’t have these on hand, borrow from a friend or check a local craft store. A utility knife can be handy for more detailed work. It’s excellent for cutting stiffer materials or making intricate designs. Keep a cutting mat nearby to protect your surfaces and make clean cuts.Adhesives And Fasteners
Choosing the right adhesive is key. Hot glue guns are popular for their quick drying time and strong hold. They work well on fabric, paper, and other lightweight materials. For a more flexible adhesive, consider using craft glue or spray adhesive. These options allow for repositioning before they set. Velcro strips or snaps can be useful if you want a removable shade for easy changes or cleaning. As you gather your tools and supplies, think about how you want your finished lamp to look. Do you envision a bold statement piece or something more subtle? With the right materials, you can make your vision a reality.Step-by-step Shade Assembly
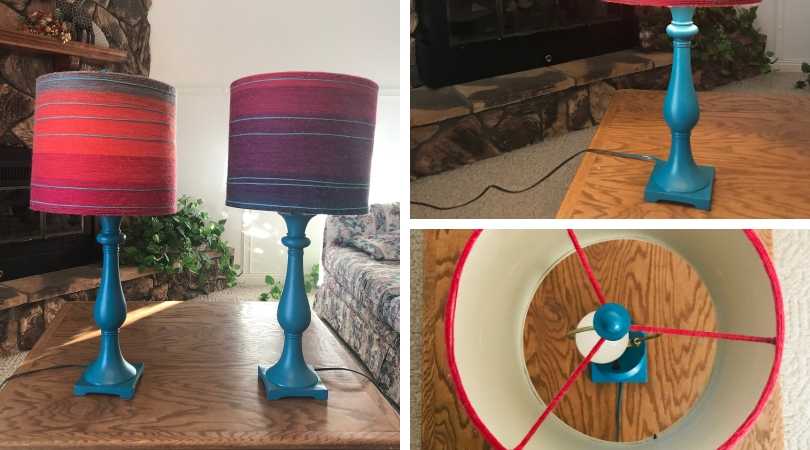
Adding a shade to a desk lamp transforms its look and softens the light. The process is simple and rewarding. Follow these steps to assemble a custom shade that fits perfectly and enhances your lamp’s style.
Cutting The Shade Material
Choose fabric or paper for the shade. Measure the lamp’s frame carefully. Cut the material slightly larger than the frame size. This extra space helps with folding and attaching. Use sharp scissors or a craft knife for clean edges. Keep the cuts straight for a neat finish.
Attaching The Frame
Place the cut material around the lamp frame. Use fabric glue or double-sided tape to secure edges. Smooth out wrinkles and bubbles as you go. Press the material firmly to the frame for a strong hold. Let the glue dry completely before moving on.
Securing The Shade To The Lamp
Align the shade frame with the lamp’s bulb holder or harp. Most desk lamps have a clip or screw to hold the shade. Fit the shade into place carefully. Tighten any screws or clips to keep the shade stable. Check the shade sits evenly and does not wobble.
Customizing Your Shade
Customizing your desk lamp shade transforms it into a unique piece. It lets you add personality and style to your workspace. Simple changes can make a big difference in how your lamp looks and feels. Below are easy ways to personalize your shade with paint and decorations.
Painting And Decorating
Start with a clean, dry lampshade. Use acrylic paint for good coverage and color variety. Apply thin coats to avoid drips and uneven spots. Let each layer dry fully before adding another. Patterns like stripes, dots, or geometric shapes work well. Use painter’s tape to create clean lines. For a soft look, try sponging paint onto the fabric. Seal the paint with a clear spray to protect your design.
Adding Trims And Embellishments
Trim your shade with ribbons, lace, or fabric tape for a polished look. Hot glue or fabric glue works best for sticking embellishments. Add beads or small charms for extra flair. Attach fringe or pom-poms along the bottom edge for a fun touch. Keep decorations light to avoid weighing down the shade. Match colors and styles to your room’s decor for harmony.
Safety Tips For Diy Lamp Shades
Adding a shade to your desk lamp can transform its look and your workspace ambiance. However, safety should never take a backseat during this creative process. Paying attention to specific safety tips ensures your DIY project not only looks great but also functions safely for years to come.
Heat Resistance Considerations
Choosing the right materials for your lamp shade is crucial. Some fabrics and papers can easily catch fire or melt when exposed to the heat from the bulb.
Opt for materials labeled as heat resistant or flame retardant. This small step can prevent serious hazards and protect your home from accidents.
Have you ever felt the lamp shade getting unusually warm? That’s a clear sign your material isn’t coping well with the bulb’s heat. Switching to LED bulbs can also reduce heat, making your shade safer.
Electrical Safety
Working with electrical fixtures requires extra care. Always unplug your lamp before starting any modifications to avoid electric shocks.
Check that your shade design doesn’t block the lamp’s ventilation or interfere with the wiring. This can cause overheating or short circuits.
Use insulated tools and avoid touching the wiring directly. If you notice any frayed cords or loose connections, replace them before adding your shade.
Have you tested your lamp after adding the shade? Make sure it operates without flickering or unusual smells—that’s your cue to double-check the setup.

Credit: www.amazon.com
Frequently Asked Questions
How Do I Choose The Right Shade For My Desk Lamp?
Choose a shade that fits your lamp’s size and style. Consider materials like fabric or glass for desired lighting effects. Match colors to your room decor for a cohesive look. Ensure the shade allows enough light for your workspace needs.
Can I Add A Shade To Any Type Of Desk Lamp?
Most desk lamps can have shades added if they have a compatible fitting. Check if your lamp has a harp, clip, or screw fitting. Some modern or minimalist lamps may not support traditional shades. Always verify before purchasing a shade.
What Tools Do I Need To Add A Desk Lamp Shade?
You typically need no special tools to add a desk lamp shade. Most shades attach via clips, screws, or harp fittings. For screw fittings, a screwdriver may be helpful. Always follow the shade manufacturer’s installation instructions carefully.
How Do I Install A Clip-on Shade On A Desk Lamp?
To install a clip-on shade, simply open the clip and attach it to the bulb or lamp frame. Ensure it grips securely without touching the bulb directly. Position the shade evenly to avoid tilting or uneven light distribution.
Conclusion
Adding a shade to a desk lamp is simple and quick. It can change the look of your space. You get softer light that is easier on the eyes. Choose a shade that fits your lamp well. Follow the steps carefully for safety.
Enjoy a cozy and stylish workspace. Try different styles to find what suits you best. A small change makes a big difference. Now, your desk lamp looks neat and works better. Give it a go today!


