
Looking to add style and storage to your space without clutter? A floating wall shelf is the perfect solution.
It’s sleek, modern, and surprisingly easy to build yourself. Imagine having a sturdy shelf that seems to float on your wall, showcasing your favorite books, plants, or décor. In this guide, you’ll discover simple, step-by-step instructions to create a floating wall shelf that fits your style and space.
Ready to transform your room and impress your guests? Let’s get started!
Materials And Tools Needed
Gathering the right materials and tools is the first step to successfully building a floating wall shelf. Having everything ready not only saves time but also makes the process smoother and more enjoyable. Let’s look at what you’ll need to create a sturdy and stylish shelf that fits your space perfectly.
Materials Required
- Wood board:Choose a solid wood piece like pine, oak, or plywood. The size depends on your shelf’s desired length and width. I once picked a reclaimed wood board, which added character and saved money.
- Floating shelf brackets:These metal brackets support the shelf invisibly. Make sure they are rated to hold the weight of your shelf plus whatever you plan to place on it.
- Wood screws:Pick screws that fit your brackets and wall type. Drywall anchors may be necessary if you’re not screwing into studs.
- Wood filler and sandpaper:For smoothing edges and filling any holes or imperfections before painting or staining.
- Paint or stain:Choose a finish that matches your room’s style and protects the wood.
Tools You’ll Need
- Power drill:Essential for pre-drilling holes and driving screws. A drill with adjustable speed helps avoid splitting the wood.
- Level:Ensures your shelf sits perfectly horizontal. This small tool makes a big difference in the final look.
- Stud finder:Helps locate wall studs for a secure mount. Skipping this can risk your shelf falling under weight.
- Measuring tape and pencil:For marking exact spots on the wall and wood. Precision here prevents uneven shelves.
- Sandpaper or electric sander:Smooths the wood surface to prepare it for finishing.
- Screwdriver:Handy for fine adjustments and tightening screws where the drill can’t reach.
Have you ever started a project only to realize you’re missing a crucial tool? I learned that the hard way. Now, I always double-check my toolkit before beginning. What’s the one tool you think you can’t live without during a DIY project?
Choosing The Right Shelf Design
Choosing the right shelf design is key to making your floating wall shelf both functional and stylish. The design affects how much you can store, how the shelf fits in your space, and the overall vibe of your room. Let’s break down what you need to think about before picking your shelf.
Selecting Shelf Size
The size of your shelf depends on what you plan to put on it. Are you displaying small plants, books, or larger decorative items? Make sure the shelf is deep enough to hold these items securely without looking crowded.
Think about the wall space too. A long, narrow shelf might work well above a desk, while a shorter, wider shelf could suit a cozy reading nook. Don’t forget to measure your wall carefully so the shelf fits perfectly.
Picking Shelf Style
Floating shelves come in many styles, from sleek and modern to rustic and chunky. Your choice should match the mood you want to create. For instance, a thin metal shelf can add a minimalist touch, while a thick wooden shelf brings warmth and texture.
Consider how the shelf mounts to the wall. Invisible brackets offer a clean look but require precise installation. Visible brackets can add a decorative element and are often easier to install if you’re new to DIY.
Matching Shelf To Room Decor
Your shelf should blend seamlessly with your room’s existing decor. Look at the colors, materials, and shapes already in the space. Does your room have a lot of natural wood tones, or is it more about metal and glass?
Try to complement these elements rather than clash with them. If your room is mostly neutral, a bold-colored shelf can act as an accent piece. If you prefer harmony, choose a shelf that mirrors the room’s palette and style.
Preparing The Workspace
Clear the area and gather all tools before starting. Ensure enough light and space for easy movement. Protect surfaces to avoid damage during the build.
Preparing the workspace is an essential step in any DIY project, especially when building something as stylish and functional as a floating wall shelf. It sets the stage for a smooth and enjoyable crafting experience. A well-prepared workspace not only saves you time but also minimizes the risk of mistakes and accidents. Let’s dive into how you can get your area ready for this exciting endeavor.Clearing The Area
Begin by selecting the right spot for your project. You’ll need enough room to move around comfortably. Remove any clutter or unnecessary items from the area. This will prevent any accidental damage to your belongings and give you a clear view of your project. Wipe down surfaces to ensure a clean environment. Dust and debris can interfere with your materials and tools. Think of this as laying a clean canvas before you start painting.Gathering Supplies
Having all your supplies within reach can make a world of difference. Gather your tools and materials before you start. This may include a drill, level, screws, brackets, and the wood for your shelf. Consider organizing your supplies in a toolbox or on a workbench. This keeps everything in order and prevents the frustration of searching for a missing screwdriver halfway through the job. What items do you think are essential that you might have overlooked?Safety Precautions
Safety should be your priority, always. Ensure you have safety goggles and gloves ready. These protect you from any splinters or flying debris. Check your tools before you begin. Are they in good working condition? An unexpected malfunction can be dangerous and lead to errors in your project. If you ever doubt the safety of your tools, it’s better to pause and address it first. Your safety is worth the extra time. Taking these preparatory steps seriously will make the process of building a floating wall shelf not just a project, but a rewarding experience.Cutting And Assembling The Shelf
Cutting and assembling your floating wall shelf is where your project starts to take shape. Precision matters here—not just for aesthetics but also for safety and durability. You’ll need to carefully measure, cut, and finish each piece to ensure your shelf looks professional and holds up well over time.
Measuring And Marking Wood
Begin by measuring the wood carefully according to your shelf design. Use a tape measure and mark each piece with a pencil clearly, double-checking your numbers before cutting. Marking the wood accurately prevents costly mistakes and wasted material.
Think about the thickness and width of your wood. Are you accounting for these in your measurements? It’s easy to overlook small dimensions that affect how pieces fit together later.
Cutting Pieces Accurately
Use a saw appropriate for your wood type—circular saws work well for straight cuts, while jigsaws handle curves better. Keep your cuts slow and steady to avoid splintering or uneven edges.
Have you tried clamping your wood before cutting? This simple step keeps pieces stable and improves accuracy. If possible, cut slightly outside your marked lines and sand down to exact size for a cleaner finish.
Sanding And Finishing
Sanding smooths out rough edges and prepares your shelf for finishing touches like paint or stain. Start with medium-grit sandpaper and finish with fine grit for a polished surface.
Don’t rush this step—your hands will thank you when the shelf feels smooth and looks sharp. Applying a finish not only enhances appearance but also protects the wood from moisture and wear. What finish fits your room’s style best—matte, glossy, or natural?
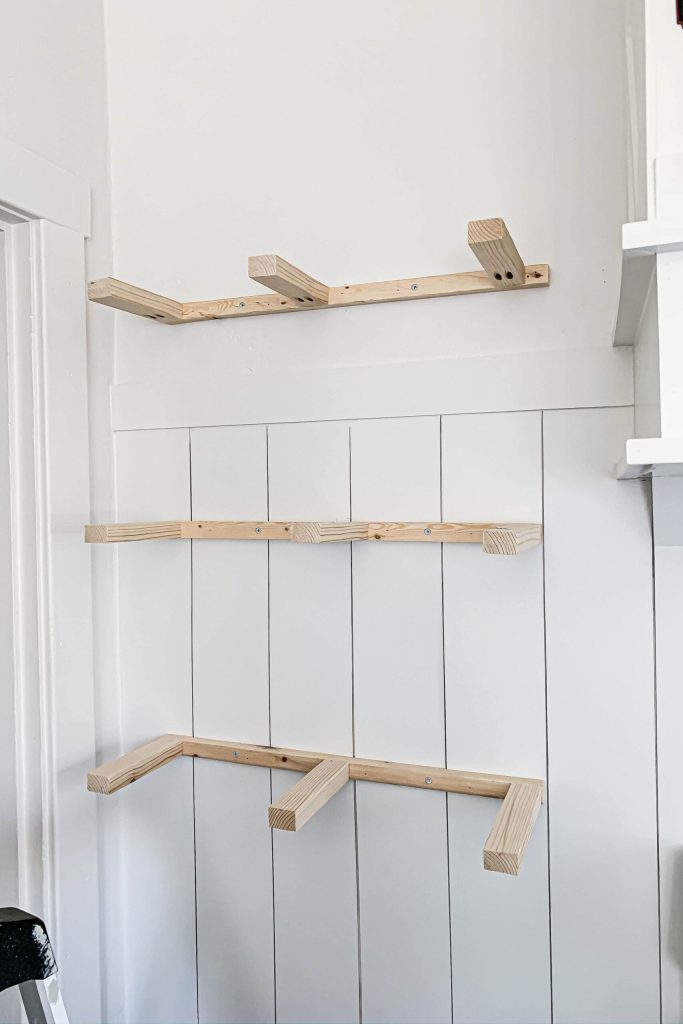
Installing The Mounting Brackets
Installing the mounting brackets is a key part of building a floating wall shelf. These brackets hold the shelf firmly in place. Proper installation prevents the shelf from falling or tilting.
This section covers how to find the right wall spots, attach the brackets safely, and check their level. Follow these simple steps to make your shelf strong and steady.
Locating Wall Studs
Wall studs provide the strongest support for your floating shelf. Use a stud finder tool to locate them inside the wall. Move the finder slowly until it signals a stud.
Mark the stud positions with a pencil. Avoid placing brackets only on drywall. Drywall alone cannot hold heavy shelves well.
Attaching Brackets Securely
Use screws that fit your bracket holes perfectly. Drill pilot holes into the stud marks to guide the screws. This prevents wood from splitting.
Fasten the brackets tightly to the wall. Make sure there is no wiggle or looseness. Tight brackets keep the shelf safe and stable.
Ensuring Level Placement
Place a level on top of each bracket after installation. Adjust the bracket position until the bubble is centered. A level shelf looks neat and prevents items from sliding off.
Check all brackets before mounting the shelf board. Small adjustments now save trouble later.

Credit: www.projectallendesigns.com
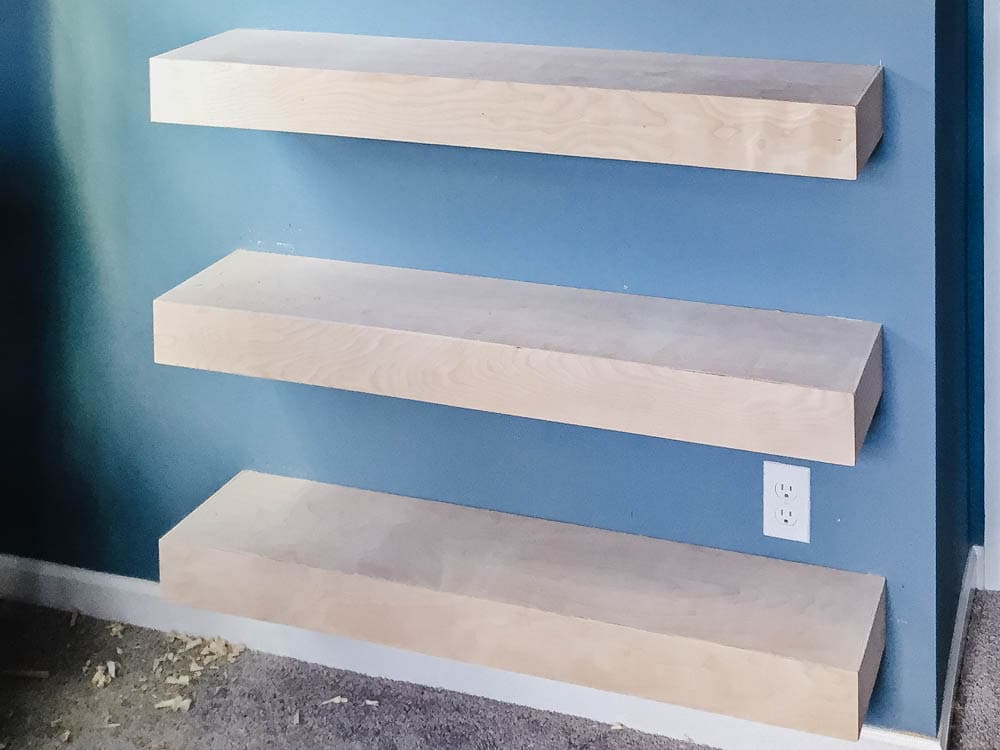
Mounting The Shelf On The Wall
Mounting your floating wall shelf correctly is key to making sure it holds firm and looks great. This stage transforms your efforts from a pile of materials into a stylish, functional feature on your wall. Taking the time to align, secure, and adjust the shelf will save you headaches later and give you a clean, professional finish.
Aligning Shelf With Brackets
Start by positioning the shelf onto the wall brackets carefully. Make sure the shelf sits flush against the wall without any gaps. Use a level tool to confirm it’s perfectly horizontal—no tilt allowed.
Check that the edges of the shelf align evenly with the brackets underneath. If you notice any misalignment, adjust the shelf by sliding it slightly until everything fits snugly. This step ensures your shelf looks balanced and stable.
Securing Shelf In Place
Once aligned, it’s time to secure the shelf firmly. Depending on your bracket design, use screws or locking mechanisms to attach the shelf to the brackets. Tighten them just enough to hold the shelf steady without damaging the wood.
Don’t rush here. Double-check that each screw is fully engaged and that the shelf doesn’t wobble when you gently press it. This attention to detail prevents future sagging or accidents.
Final Adjustments
After securing, step back and inspect your work from different angles. Is the shelf level? Does it sit flush against the wall? If something looks off, loosen the screws slightly and tweak the position.
Try placing a few light items on the shelf to test its stability. If it holds well, you’re all set. If not, consider reinforcing the brackets or checking your wall anchors. How solid does your shelf feel right now?
Styling And Decorating Tips
Styling and decorating your floating wall shelf turns it into a beautiful and useful feature. It reflects your personality and enhances the room’s look. Focus on simple ideas that create balance and charm.
Choosing Decorative Items
Select items that match your room’s style and color scheme. Mix different shapes and sizes to keep the display interesting. Use small plants, framed photos, or books to add character. Avoid overcrowding the shelf to keep it neat and tidy.
Balancing Function And Aesthetics
Combine beauty with practical use. Store everyday items like keys or small baskets for storage. Let decorative pieces share space with useful objects. Keep heavier items close to the wall for safety. This balance keeps the shelf attractive and functional.
Maintaining The Shelf
Dust the shelf often to keep it looking fresh. Check for loose screws or brackets regularly. Wipe surfaces with a soft cloth to avoid scratches. Replace or rearrange items seasonally to refresh the look. Proper care extends the shelf’s life and appeal.
Credit: www.christeneholderhome.com

Credit: www.create-enjoy.com
Frequently Asked Questions
What Tools Do I Need To Build A Floating Wall Shelf?
To build a floating wall shelf, you’ll need a drill, level, stud finder, screws, anchors, measuring tape, and a saw. These tools help ensure your shelf is secure and level. Having the right tools makes the project easier and safer.
How Do I Find Studs For Mounting The Shelf?
Use a stud finder to locate studs behind your wall. Mark the stud positions with a pencil. Mounting the shelf on studs ensures it holds weight safely and prevents damage to drywall.
What Materials Are Best For Floating Wall Shelves?
Solid wood, plywood, or MDF are ideal materials for floating shelves. Choose materials that can support your intended weight. A good finish also enhances shelf durability and appearance.
How Much Weight Can A Floating Wall Shelf Hold?
Weight capacity depends on the shelf material and mounting hardware. Typically, a well-mounted floating shelf can hold 20-50 pounds. Always check the hardware specifications and avoid overloading.
Conclusion
Building a floating wall shelf adds style and storage to any room. The steps are simple and clear. You only need basic tools and materials. Take your time to measure and level carefully. Secure the shelf well to hold weight safely.
Enjoy your new shelf for books, plants, or decor. Try making more shelves to personalize your space. A floating shelf is both useful and attractive. Give it a try and see how it changes your room.


