
Are you worried about your attic getting too hot or damp? Proper attic ventilation is the key to keeping your home comfortable and protecting your roof from damage.
Installing attic ventilation might sound tricky, but with the right steps, you can do it yourself and save money. In this guide, you’ll discover simple, clear instructions to help you improve airflow in your attic. Keep reading to learn how to make your home healthier and more energy-efficient with effective attic ventilation.
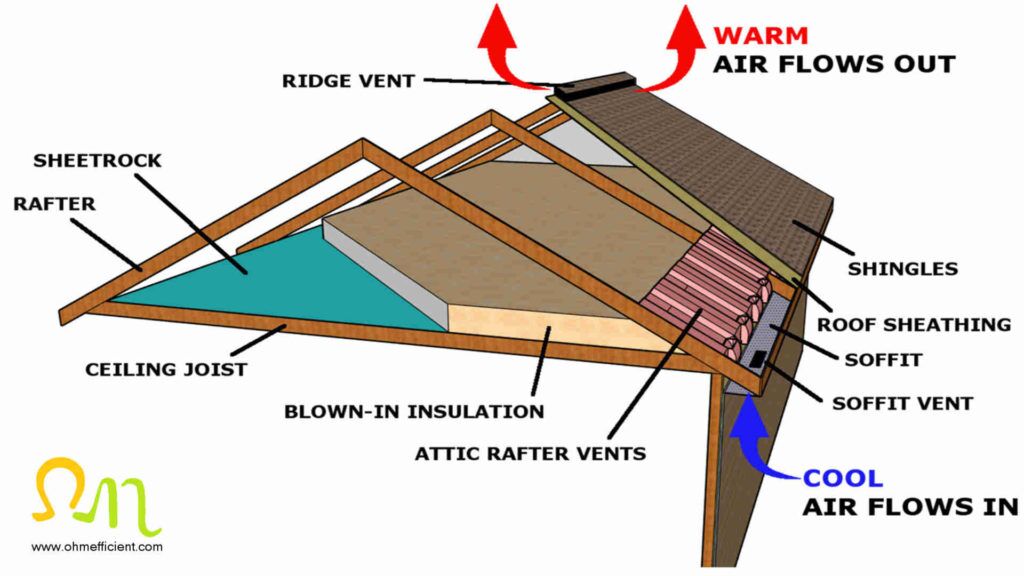
Credit: ohmefficient.com
Benefits Of Attic Ventilation
Proper attic ventilation can transform your home environment. It controls temperature and moisture levels, directly impacting your comfort and the longevity of your property. Understanding these benefits can help you decide why installing attic ventilation is a smart choice.
Preventing Moisture Build-up
Moisture in the attic creates a breeding ground for mold and mildew. These fungi can damage wood structures and insulation, leading to costly repairs.
Good ventilation allows humid air to escape and fresh air to enter, keeping the attic dry. Have you noticed a musty smell or water stains in your attic? These signs tell you that ventilation might be lacking.
Reducing Energy Costs
Attics that trap heat force your air conditioner to work harder. This increases your electricity bills during hot months.
Ventilation helps maintain a cooler attic temperature, reducing the load on your cooling system. Imagine lowering your energy bills just by improving airflow above your ceiling—it’s possible.
Extending Roof Life
Heat and moisture can wear down roofing materials faster than normal. Shingles may crack or warp, causing leaks and damage.
By keeping your attic well-ventilated, you protect your roof from premature aging. This simple step can save you money on roof repairs or replacements over time.
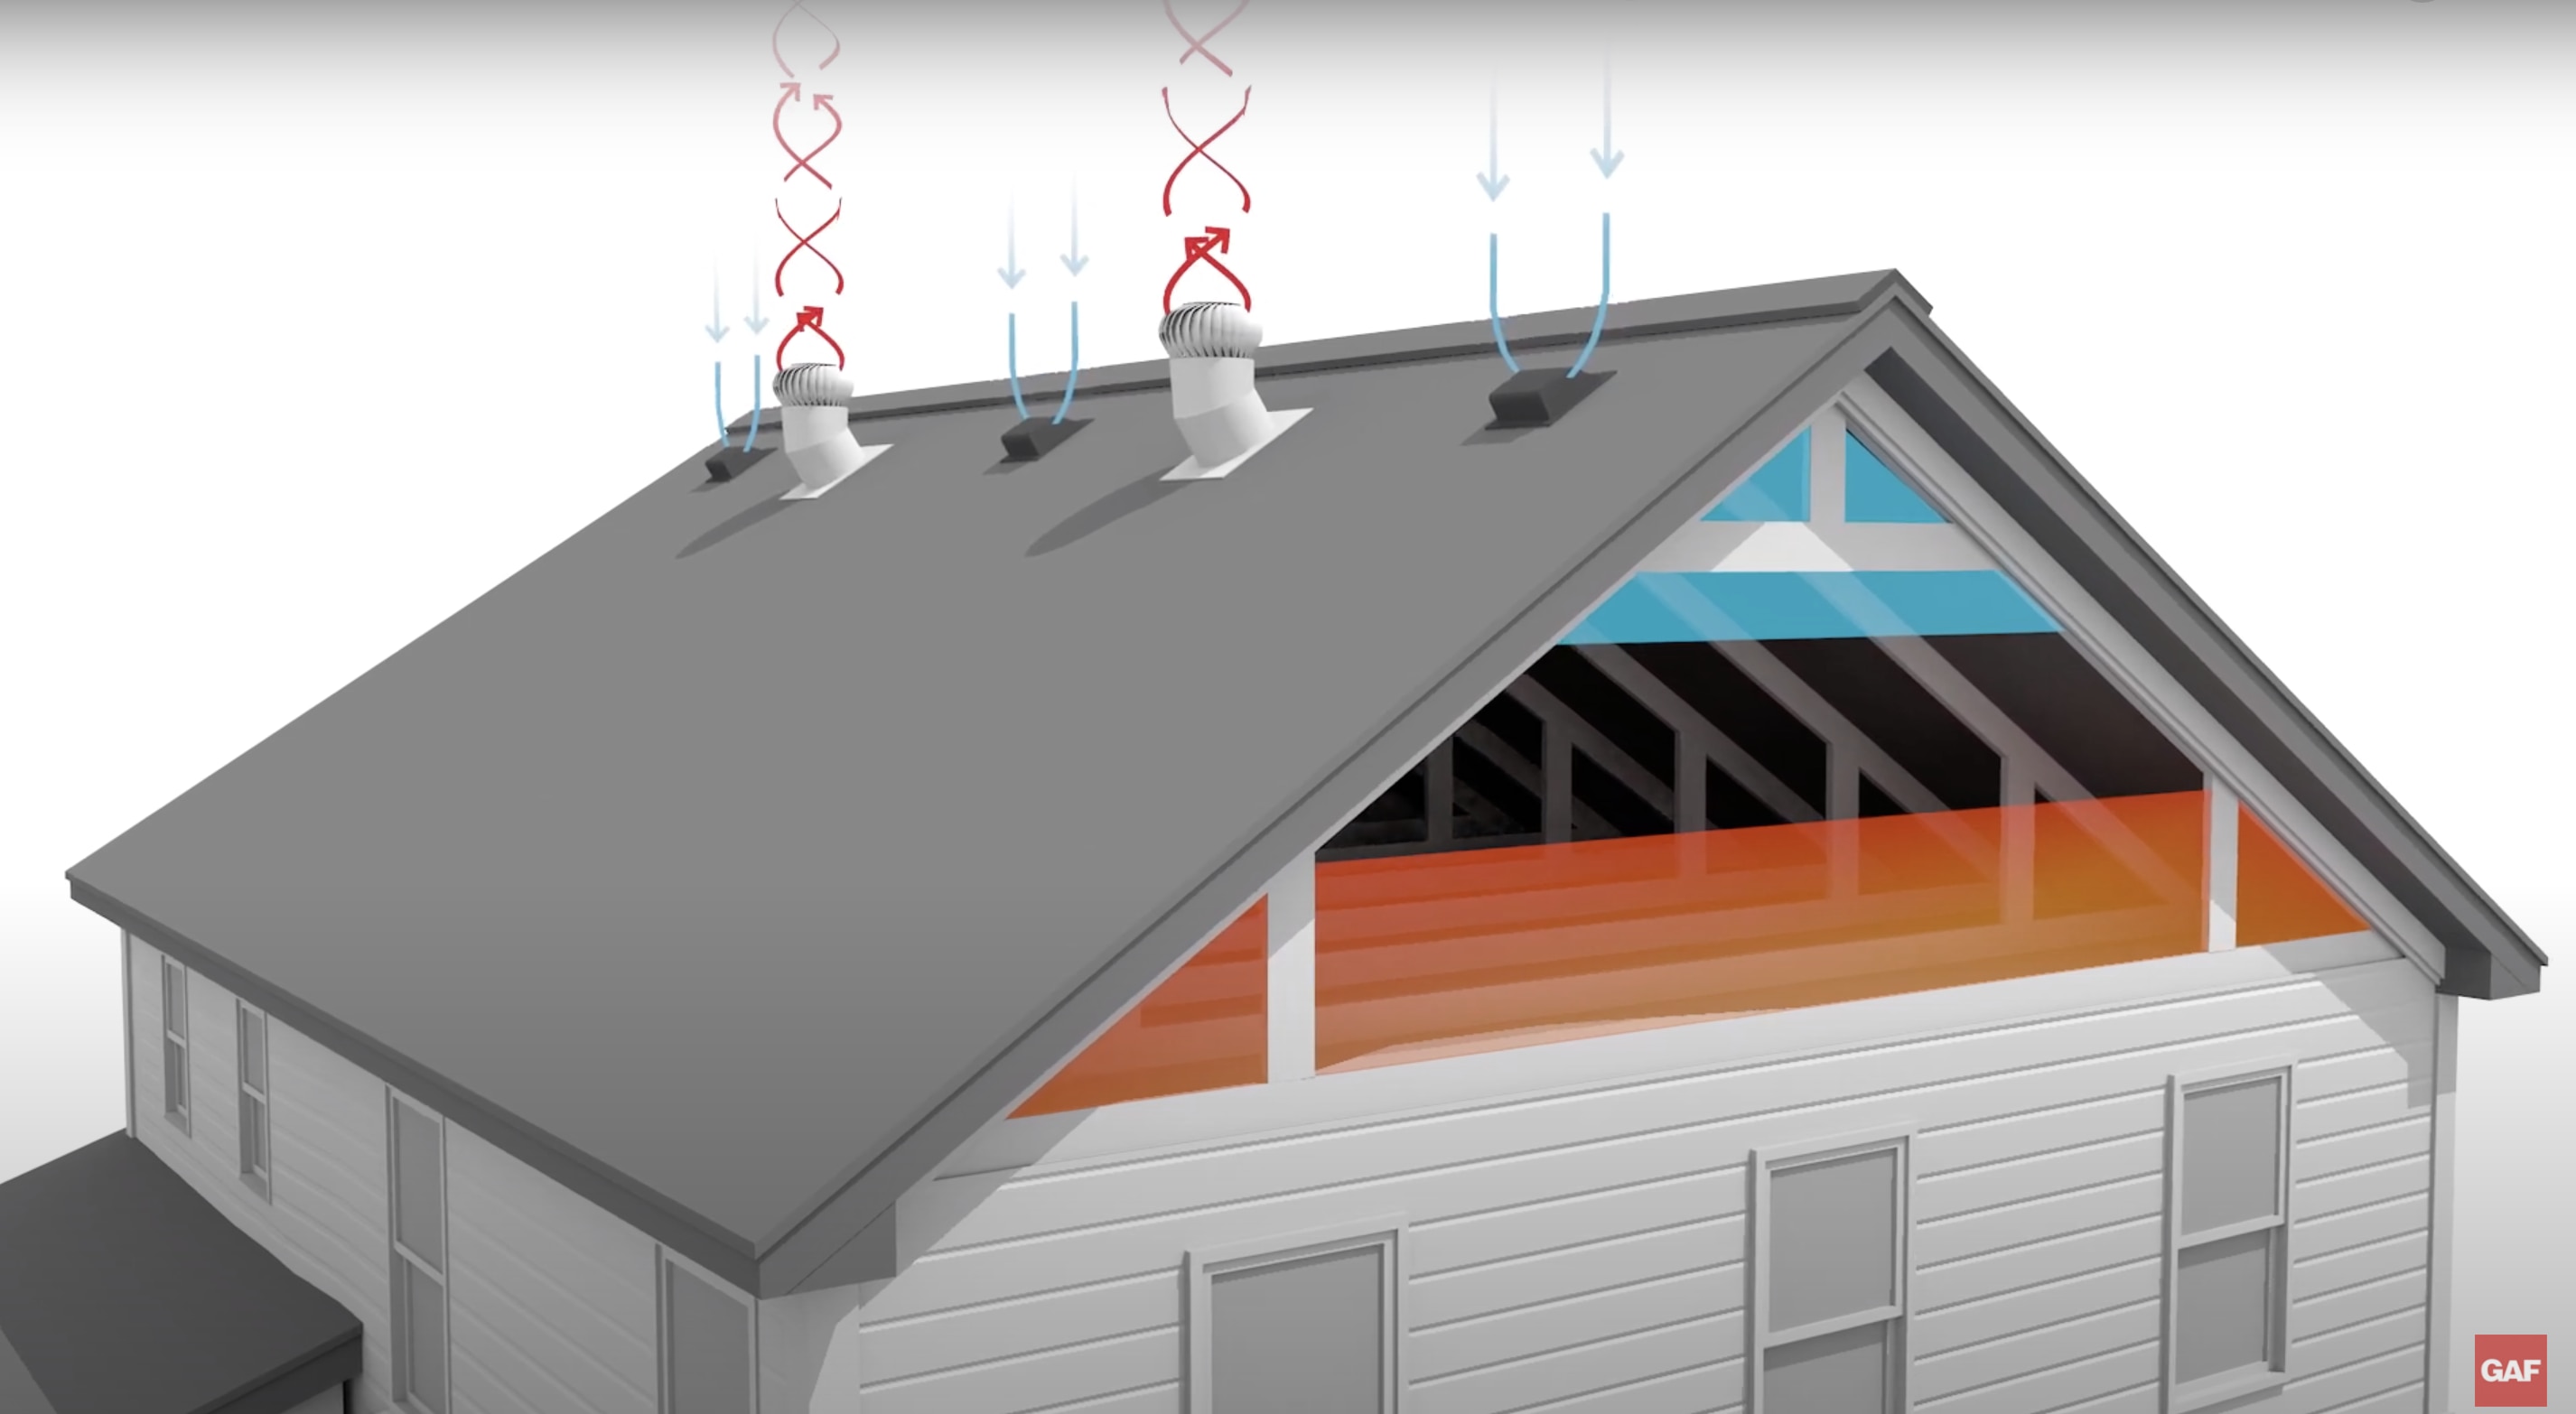
Credit: www.gaf.com
Types Of Attic Vents
Choosing the right type of attic vent is important for proper airflow. Different vents work in various ways to remove heat and moisture. Each type fits different attic designs and ventilation needs. Understanding these options helps you pick what suits your home best.
Soffit Vents
Soffit vents are installed under the eaves of the roof. They allow fresh air to enter the attic from the outside. These vents work well with ridge vents to create a strong airflow path. Soffit vents help keep the attic cool and reduce moisture buildup.
Ridge Vents
Ridge vents run along the peak of the roof. They let hot air escape from the attic naturally. Ridge vents work best combined with soffit vents for balanced ventilation. These vents are almost invisible and provide continuous airflow.
Gable Vents
Gable vents are placed on the triangular walls at each end of the attic. They allow air to flow in and out horizontally. Gable vents are easy to install and add a decorative touch. Proper placement ensures good ventilation without letting rain inside.
Turbine Vents
Turbine vents spin with the wind to pull hot air out. They are mounted on the roof and work without electricity. These vents increase air movement on windy days. Turbine vents help lower attic temperatures and reduce moisture levels.
Tools And Materials Needed
Before you dive into the installation of attic ventilation, gathering the right tools and materials is crucial. Having everything you need at hand streamlines the process and prevents unnecessary interruptions. This section will guide you through the essential components and tools you’ll need for a successful project.
Ventilation Components
- Roof Vents:These allow hot air to escape your attic, maintaining a balanced temperature.
- Soffit Vents:Essential for letting cooler air in, these work in tandem with roof vents.
- Ventilation Baffles:They ensure that the airflow is unobstructed, maintaining the efficiency of your ventilation system.
Choosing high-quality components can make a significant difference. Poor quality vents can lead to frequent replacements and higher costs in the long run.
Cutting And Measuring Tools
- Measuring Tape:Accuracy is key. Ensuring precise measurements prevents mistakes.
- Utility Knife:Useful for cutting insulation or any flexible materials.
- Reciprocating Saw:Ideal for cutting through tougher materials like wood and ensuring clean cuts for vent installation.
Accurate cuts and measurements are like the backbone of your project. They save you from future headaches and ensure a snug fit for all components.
Safety Gear
- Safety Glasses:Protect your eyes from dust and debris, which can be prevalent in attic spaces.
- Gloves:Prevent cuts and abrasions while handling tools and materials.
- Dust Mask:Attics can be dusty places; a mask ensures you breathe clean air.
Safety should never be an afterthought. Equip yourself properly to prevent accidents and make your installation process smoother.
Are you ready to take on this project with confidence? Proper preparation is your first step to success. What other tools do you think might be essential for this task? Share your thoughts in the comments below!
Preparing The Attic
Preparing your attic properly is crucial before installing any ventilation system. It sets the foundation for effective airflow and helps avoid costly mistakes later. Taking the time to understand your attic’s current state will save you effort and ensure better results.
Inspecting Existing Ventilation
Start by checking what ventilation is already in place. Look for soffit vents, ridge vents, gable vents, or any other openings designed for airflow.
Are these vents clear and functioning? Sometimes vents are blocked or too small to properly ventilate your attic. Identifying gaps or damaged areas helps you decide where to add or improve ventilation.
Clearing Obstructions
Next, remove anything blocking airflow within the attic. Insulation pushed up against vents or debris like leaves and dust can reduce ventilation efficiency.
Make sure soffit vents are not covered by insulation, and clear any dirt or cobwebs from vent openings. This step is often overlooked but makes a big difference in how well your attic breathes.
Measuring Vent Placement
Before installing new vents, measure carefully where they will go. Proper placement balances intake and exhaust, which is key to airflow.
Use a tape measure to mark spots for soffit vents and ridge vents, ensuring they are spaced evenly. Have you considered how the size of each vent affects airflow volume? Accurate measurements prevent overcrowding or gaps that reduce ventilation effectiveness.
Installing Soffit Vents
Installing soffit vents is a key part of attic ventilation. They let fresh air enter the attic space. This helps keep the attic cool and prevents moisture buildup. Properly placed soffit vents work with ridge vents or other exhaust vents to create a steady airflow. This airflow protects your roof and improves energy efficiency.
Marking Vent Locations
Start by inspecting the soffit area under your roof overhang. Look for spots clear of obstructions like wiring or pipes. Measure evenly along the soffit to space vents for good airflow. Use a pencil to mark where each vent will go. Keep marks consistent on both sides of the attic.
Cutting Openings
Use a drill or saw to cut along the marked lines. Cut carefully to avoid damaging the surrounding soffit material. Make sure holes match the size of your vents. Remove any rough edges with sandpaper or a file. Clean away dust and debris before installing the vents.
Securing Vents
Place each vent into its opening. Align vents so they sit flush against the soffit. Use screws or nails to fasten vents firmly in place. Check vents for a tight fit and no gaps. Seal edges with caulk if needed to keep out pests and water.
Credit: www.roofingcontractor.com
Installing Ridge Vents
Installing ridge vents is one of the most effective ways to improve attic ventilation. These vents run along the peak of your roof, allowing hot air to escape naturally. Proper installation ensures your attic stays cooler, reduces moisture buildup, and prolongs the life of your roof.
Removing Roof Shingles
Start by carefully lifting and removing the shingles along the ridge line of your roof. Use a flat pry bar to gently lift the shingles without damaging the surrounding area. Removing about 3 feet of shingles on either side of the ridge is usually enough for installing the vent.
Be sure to wear gloves and safety glasses. This part can be tricky because shingles are nailed down firmly. Take your time to avoid breaking them, especially if you plan to reuse some shingles later.
Cutting Ridge Slot
Next, you need to cut a slot along the ridge where the vent will sit. The slot should be about 1 to 2 inches wide and run the entire length of the ridge. Use a circular saw with a fine-toothed blade set to the depth of the roof decking to make this cut.
Mark the cutting line clearly before you begin. If you’re unsure about the exact width or length, check the vent manufacturer’s instructions. Proper slot size is critical for airflow and roof integrity.
Attaching Ridge Vent
Once the slot is cut, lay the ridge vent over the opening and align it carefully. Secure it with roofing nails, placing nails through the vent’s flange into the roof decking. Make sure the vent is straight and firmly attached.
After nailing, replace the shingles on either side of the vent, cutting them if needed to fit snugly. This step prevents water leaks and keeps your roof looking neat. Have you noticed how well a properly installed ridge vent blends in with the roofline?
Ensuring Proper Airflow
Proper airflow in your attic is crucial for maintaining home health. It prevents moisture buildup and regulates temperature. This ensures your home stays energy efficient and mold-free. Here’s how to achieve optimal airflow in your attic.
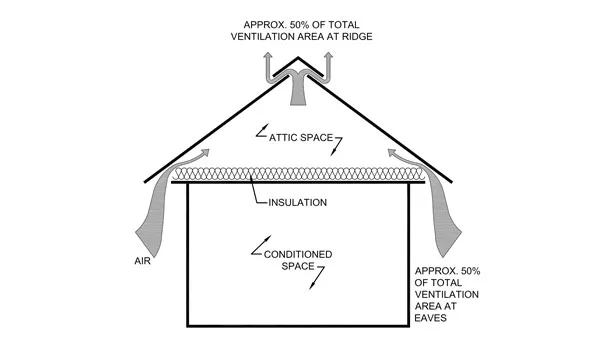
Balancing Intake And Exhaust
Balance intake and exhaust for effective attic ventilation. Intake vents pull in fresh air, while exhaust vents push out stale air. This cycle keeps air moving, preventing moisture buildup. Install intake vents at the attic’s lower parts. Exhaust vents should be at the higher parts. This setup creates a natural airflow path. Use roof ridge vents or gable vents for exhaust. For intake, consider soffit vents. These placement strategies ensure balanced airflow.
Checking For Blockages
Blockages can disrupt airflow in your attic. Regularly inspect vents for obstructions. Leaves, debris, or even nests can block air paths. Keep vents clean to maintain airflow. Check for dust or cobwebs inside the attic. These can also reduce air movement. Clean vents with a soft brush or cloth. Ensure nothing blocks the vents from outside. Trim nearby tree branches that could drop debris.
Using Baffles
Baffles aid in directing airflow properly. They help air move from intake to exhaust vents. Install baffles along the attic’s eaves. This prevents insulation from blocking soffit vents. Baffles ensure a clear path for air. Choose baffles made of durable materials. They withstand attic conditions better. Check them periodically for damage or displacement. Replace any damaged baffles promptly. This keeps airflow consistent and effective.
Maintenance Tips
Maintaining attic ventilation ensures your home stays comfortable and energy-efficient. Proper upkeep prevents moisture buildup and extends vent lifespan. Follow these simple maintenance tips to keep your attic vents working well.
Regular Inspections
Check vents at least twice a year. Look for signs of blockages, damage, or wear. Inspect after storms or heavy wind for debris or loose parts. Use a flashlight to see inside vents clearly. Early detection stops small issues from growing.
Cleaning Vents
Remove dirt, dust, and leaves from vent openings. Use a soft brush or vacuum to clean without damage. Keep vent screens clear to allow airflow. Avoid harsh chemicals that can harm vent materials. Clean vents more often if your home is near trees or dust sources.
Repairing Damages
Fix cracks or holes in vents immediately. Replace broken screens to keep pests out. Tighten loose screws and fasteners. Use weather-resistant sealant on gaps around vents. Prompt repairs protect your attic from moisture and pests.
Frequently Asked Questions
What Are The Benefits Of Attic Ventilation?
Attic ventilation reduces heat buildup, preventing roof damage and lowering cooling costs. It also controls moisture, avoiding mold growth and wood rot, thereby extending your roof’s lifespan.
How Do I Choose The Right Attic Vents?
Select vents based on attic size and roof type. Common options include ridge vents, soffit vents, and gable vents. Proper airflow balance is crucial for effective ventilation.
Can I Install Attic Ventilation Myself?
Yes, with basic tools and safety precautions, DIY installation is possible. Follow manufacturer instructions carefully and ensure proper vent placement for optimal airflow.
How Much Does Attic Ventilation Installation Cost?
Costs vary by vent type and labor. On average, expect $300 to $1,000 for professional installation. DIY methods can lower expenses but require skill.
Conclusion
Proper attic ventilation keeps your home cool and dry. It helps prevent mold and wood damage. Installing vents lets air flow freely through the attic space. Choose the right vent type for your roof design. Seal gaps well to avoid leaks and drafts.
Regular checks ensure the system works effectively over time. A well-ventilated attic improves energy efficiency and comfort. Start your project today for a healthier home environment.


