
Are you ready to add a unique, stylish touch to your workspace? Making your own concrete spiral desk lamp is easier than you might think—and it’s a project that will leave you proud every time you switch it on.
Imagine a lamp that not only lights up your desk but also sparks conversations with its modern, artistic design. In this guide, you’ll discover simple steps to create a stunning piece that combines durability and elegance. Keep reading, and by the end, you’ll have everything you need to craft a lamp that’s truly one of a kind—just like your space.
Materials Needed
Creating a concrete spiral desk lamp requires careful selection of materials. Each item plays a key role in the project’s success. Using the right concrete mix ensures strength and smoothness. Choosing suitable lamp parts guarantees proper function and style. The correct tools make shaping and assembling easier.
Concrete Mix Types
- Standard Portland Cement Mix: Strong and easy to work with.
- High-Strength Concrete Mix: Ideal for durable, long-lasting lamps.
- Lightweight Concrete Mix: Easier to handle, reduces overall weight.
- Quick-Setting Concrete Mix: Speeds up the curing process.
- Pre-Mixed Concrete Powder: Convenient and consistent quality.
Lamp Components
- LED Bulb: Energy-efficient and long-lasting light source.
- Lamp Socket: Holds the bulb securely in place.
- Electrical Cord with Plug: Provides power to the lamp.
- Switch: Allows easy on/off control.
- Metal or Plastic Spiral Mold: Shapes the concrete into a spiral.
- Base Plate: Supports the lamp’s structure.
Tools Required
- Mixing Bucket: For blending concrete ingredients.
- Trowel or Spatula: Helps smooth and shape the concrete.
- Measuring Cups: Ensures precise mix ratios.
- Drill with Bits: Creates holes for wiring.
- Sandpaper: Smooths rough edges after curing.
- Protective Gloves and Mask: Ensures safety while working.
Design Planning
Design planning sets the foundation for creating a concrete spiral desk lamp. It shapes the look and function of the lamp. Careful planning saves time and materials. It also ensures the final product matches your vision perfectly.
Sketching The Spiral Shape
Start by drawing the spiral on paper. Use smooth, flowing lines to capture the spiral’s curve. Sketch different versions to explore shapes and sizes. Keep the lines simple for easy reference during building. A clear sketch helps guide the concrete pouring process.
Measuring Dimensions
Measure the height, width, and depth of the lamp. Include space for the light bulb and wiring. Check the desk area where the lamp will sit. Use a ruler or tape measure for accuracy. Precise dimensions prevent fitting problems later.
Selecting Lamp Style
Choose a lamp style that fits your space and taste. Options include modern, industrial, or minimalist designs. Consider the lamp’s base, shade, and bulb type. Pick a style that complements the spiral shape. This choice affects both function and aesthetics.
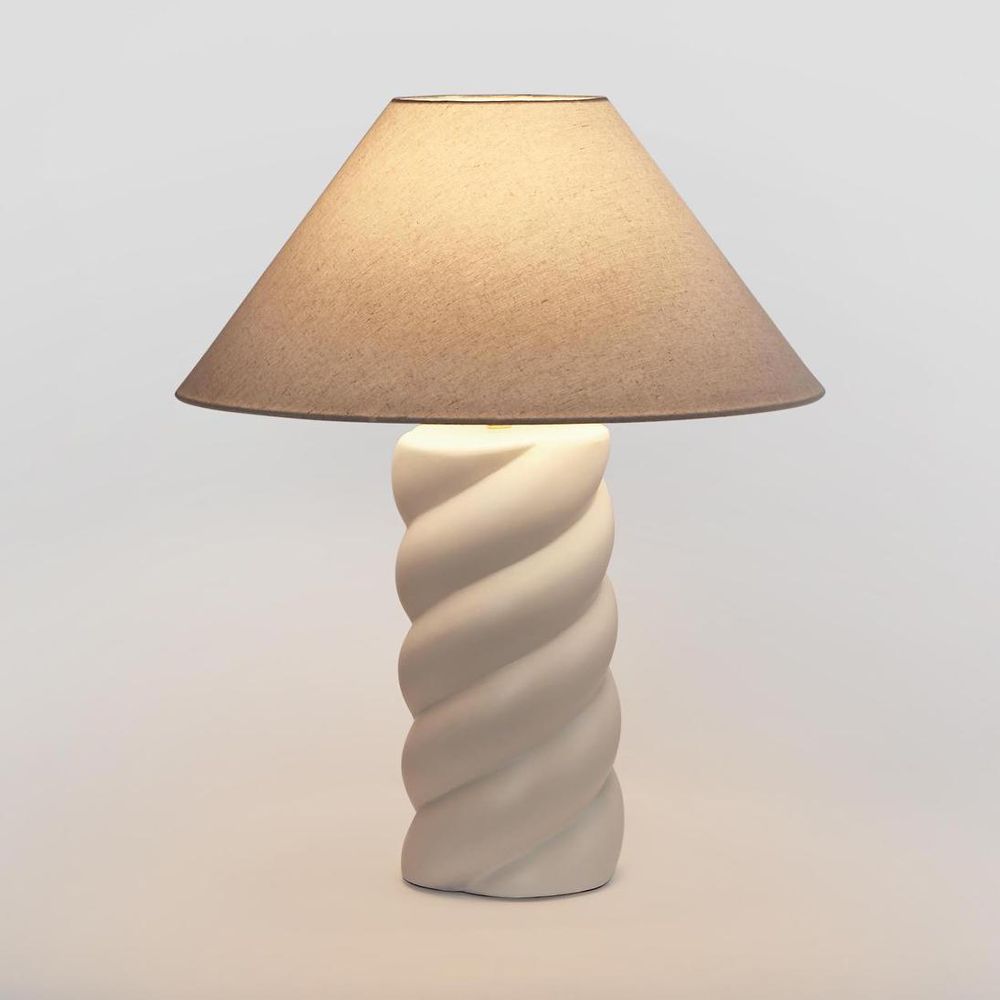
Creating The Mold
Begin by shaping a spiral form using flexible materials like wire or cardboard. Secure the mold firmly to keep its shape during the concrete pour. Ensure smooth edges for a clean lamp design.
Creating a concrete spiral desk lamp begins with crafting a perfect mold. The mold gives the lamp its unique spiral shape. It’s essential to choose the right materials and build a sturdy structure. This ensures the lamp’s durability and design precision.Choosing Mold Materials
Select materials that are both flexible and strong. Silicone is a great option for detailed shapes. It allows easy release of the concrete after it sets. For the base, plywood or MDF board works well. These materials provide a firm foundation for the mold.Building The Spiral Mold
Design the spiral shape using a template. Cut the chosen material according to the template. Assemble the pieces carefully to form the spiral. Use clamps to hold everything in place. Ensure the mold is tight to prevent leaks.Preparing The Mold For Pouring
Apply a mold release agent inside. This helps remove the concrete easily once it dries. Check the mold for any gaps or weak spots. Seal any imperfections with tape or additional material. The mold must be watertight before pouring the concrete.Mixing Concrete
Mixing concrete for your spiral desk lamp is a crucial step that impacts both the look and durability of the final product. Getting the mixture right ensures the lamp holds its shape and lasts long without cracking. Let’s break down how to mix concrete properly, so you get a smooth, strong base for your creative design.
Mixing Ratios
Concrete is a simple blend of cement, sand, and water, but the ratio you use determines the strength and texture. A common mix ratio is 1 part cement to 2 parts sand, with enough water to make it workable but not too runny.
Too much water weakens the concrete, causing cracks later. Too little makes it hard to pour and shape. You might need to adjust slightly based on your environment or the specific cement brand.
Adding Pigments Or Additives
If you want your desk lamp to have color, adding concrete pigments is the way to go. These come in powders and can be mixed directly into the dry ingredients before adding water.
Additives like plasticizers can improve workability without adding water, which keeps the concrete strong. Have you tried adding fiberglass strands? They help reduce cracking and increase durability—great for a lamp you want to last.
Achieving The Right Consistency
The consistency should be like thick pancake batter—fluid enough to pour or mold but firm enough to hold shape. If it’s too runny, the concrete won’t set properly and can cause air bubbles.
Mix in water gradually, stirring thoroughly as you go. Test by scooping some on a trowel—does it hold its form without dripping? If yes, you’re ready to pour.
Pouring The Concrete
Pouring the concrete is a crucial part of making your spiral desk lamp. This step shapes the lamp’s body and gives it strength. Proper pouring ensures your lamp looks smooth and lasts long. Take your time and follow these simple steps to get the best result.
Filling The Mold
Start by slowly pouring the concrete into the spiral mold. Pour in small amounts to avoid overflow. Use a stick or a small trowel to push the concrete into all corners. This helps fill every part of the spiral shape evenly.
Removing Air Bubbles
Air bubbles can cause weak spots in your lamp. Tap the sides of the mold gently with a rubber mallet or your hand. This action helps bubbles rise to the surface and pop. For better results, use a small stick to poke inside the concrete and release trapped air.
Leveling The Surface
After filling, check the concrete’s surface. Use a flat tool to smooth and level it. This step gives your lamp a clean, even finish. Make sure the surface is flat before the concrete starts to set.
Credit: www.coxandcox.co.uk
Curing Process
The curing process is vital for a concrete spiral desk lamp. It strengthens the concrete and ensures durability. Proper curing helps the lamp resist cracks and breakage. This step requires patience and the right conditions. Poor curing leads to weak, fragile concrete.
Optimal Curing Conditions
Keep the concrete moist and at a steady temperature. Ideal temperatures range between 50°F and 75°F (10°C to 24°C). Avoid direct sunlight and strong winds. Cover the lamp with plastic sheets or damp cloths. This keeps moisture from evaporating too fast.
Curing Timeframe
Concrete needs time to reach full strength. A minimum of 7 days is essential for curing. For best results, cure the lamp for 14 to 28 days. Longer curing improves strength and durability. Check moisture regularly and keep the surface damp during this period.
Avoiding Cracks
- Do not let the concrete dry out quickly.
- Keep curing conditions stable without sudden temperature changes.
- Avoid moving or disturbing the lamp during curing.
- Use a mix with proper water-to-cement ratio to reduce shrinkage.
- Seal the surface lightly to slow moisture loss.
Demolding And Finishing
After your concrete spiral desk lamp has set and cured, the process of demolding and finishing begins. This stage is crucial because it reveals the final shape and texture of your lamp. Handling this part with care ensures your lamp looks professional and ready to shine in any space.
Removing The Mold
Start by gently loosening the mold edges. If you used a flexible silicone mold, carefully peel it away without rushing. For rigid molds, tap lightly or use a thin tool to separate the concrete from the mold.
Patience is key here to avoid cracking or chipping the concrete. If your mold sticks, try placing it in a warm area for a few minutes to help loosen the bond. Have you noticed how a slow, steady approach often prevents damage?
Sanding And Polishing
Once demolded, your lamp may have rough spots or uneven surfaces. Use sandpaper starting with a coarse grit (around 80) and gradually move to finer grits (up to 220 or higher) to smooth the surface.
Focus on the curves and edges of the spiral design, as these areas tend to collect imperfections. Polishing brings out the natural texture of the concrete and can make your lamp feel smooth to the touch. Imagine how satisfying it is to run your hand along a perfectly polished spiral!
Sealing The Surface
To protect your lamp and enhance its appearance, apply a concrete sealer. Choose a matte or glossy finish depending on your style preference. Use a brush or a spray to apply an even coat, ensuring every nook of the spiral is covered.
Sealing prevents stains, dust buildup, and water damage, extending the life of your lamp. Have you considered how a simple sealer can transform the durability of your creation?

Credit: www.youtube.com
Installing Electrical Parts
Installing the electrical parts of your concrete spiral desk lamp is where it all comes together. This step transforms your sturdy concrete base into a functional light source. Paying attention to detail here ensures safety and longevity, so take your time and double-check each connection.
Wiring The Lamp
Start by preparing the wires—strip about half an inch of insulation from each end. Connect the live (usually brown or black) and neutral (blue or white) wires from the power cord to the corresponding terminals on the lamp socket. Use a screwdriver to secure them tightly, preventing any loose connections that could cause flickering or shorts.
Make sure to twist the wires neatly before attaching them; this keeps the connection stable. Don’t forget to connect the ground wire if your setup includes one—it’s essential for safety. If you feel unsure about the wiring colors, a simple voltage tester can help confirm which wire does what.
Attaching The Bulb And Socket
Once the wiring is set, screw the socket into the lamp’s mounting plate firmly. This keeps the socket steady and aligned with the spiral design. Next, screw in your chosen bulb; LEDs work great here because they stay cool and last longer in concrete fixtures.
Handle the bulb carefully—fingerprints can shorten its life or affect brightness. If your lamp design includes a shade or diffuser, fit that now to protect the bulb and soften the light. Does your design allow easy bulb changes? Planning for this saves frustration later.
Testing The Lamp
Before sealing everything up, plug in your lamp and switch it on to test the electrical connections. Watch for a steady light without flickering or buzzing sounds, which can indicate wiring issues. If the lamp doesn’t turn on, double-check all connections and ensure the bulb is functional.
Safety is key here—if you smell burning or see sparks, unplug immediately and review your wiring. Testing at this stage can prevent headaches later and ensures your concrete spiral desk lamp is ready to shine bright and safe on your desk.
Safety Tips
Working on a concrete spiral desk lamp combines creativity with practical skills. But safety should always be your top priority. Ignoring safety tips can turn a fun project into a hazardous one. Let’s look at essential precautions that protect you during the process.
Handling Concrete Safely
Concrete contains alkaline chemicals that can irritate your skin and eyes. Always wear rubber glovesand safety goggleswhen mixing or pouring concrete. This prevents burns and irritation.
Mix concrete in a well-ventilated space to avoid breathing in dust. If you’ve ever felt a cough or itch after handling dry cement, that’s the dust irritating your lungs. Consider wearing a dust mask for added protection.
Clean spills immediately because concrete hardens fast and can damage surfaces or cause slips. Have water and towels nearby to wipe up quickly.
Electrical Safety Measures
Since your lamp involves wiring, make sure the power is off before starting any electrical work. Have a voltage tester handy to confirm no live current is present.
Use insulated tools and avoid working with wet hands or near water. Water plus electricity is a dangerous combo that you want to avoid at all costs.
Double-check your wiring connections before turning on the lamp. Loose wires can cause shorts or shocks. If you’re unsure about wiring, consult an electrician to ensure everything is safe.
Do you feel confident handling both concrete and electrical parts safely? Taking these precautions seriously can save you from accidents and let you enjoy creating your unique desk lamp worry-free.

Credit: unsplash.com
Maintenance And Care
Keep the lamp clean by wiping it gently with a soft cloth. Avoid harsh chemicals to protect the concrete’s surface. Regular checks prevent damage and ensure long-lasting beauty.
Maintaining your concrete spiral desk lamp ensures it remains a stunning focal point of your workspace. Even the sturdiest materials need a bit of care to stay looking fresh and functional. Let’s explore simple yet effective maintenance tips to extend the life of your lamp.Cleaning The Lamp
Dust and grime can dull the beauty of your lamp over time. Use a soft, dry cloth to gently wipe the concrete surface, removing any dust or dirt. For more stubborn stains, mix a solution of mild soap and water, and carefully dab the spot using a soft sponge. Avoid harsh chemicals, as they can damage the concrete’s finish. If your lamp has a fabric or metal component, ensure you clean these areas with appropriate materials. Regular cleaning keeps your lamp looking as good as new.Repairing Minor Damages
Concrete is robust but not immune to small chips or scratches. If you notice any minor damages, consider using a concrete repair kit available at most hardware stores. Follow the instructions carefully to fill in any chips or cracks. Sanding the area lightly after repair can help maintain a smooth surface. Have you ever repaired something and felt like a professional? It’s rewarding and extends the life of your lamp. With these simple steps, you can keep your concrete spiral desk lamp in excellent condition, reflecting your style and creativity. Is there a maintenance tip you’ve discovered that’s worked wonders for your lamp? Share your thoughts and experiences!Frequently Asked Questions
What Materials Are Needed For A Concrete Spiral Desk Lamp?
You need concrete mix, a spiral mold, LED lamp parts, wires, and basic tools. Quality materials ensure durability and a sleek finish.
How Long Does It Take To Make A Concrete Spiral Lamp?
The process takes about 48 to 72 hours. This includes mixing, casting, curing, and assembling the lamp parts.
Can I Customize The Design Of The Spiral Desk Lamp?
Yes, you can adjust the spiral size, color, and lamp style. Customization allows for a unique, personalized desk lamp.
Is Making A Concrete Lamp Safe For Beginners?
Yes, with proper safety gear and careful handling of materials, beginners can create this lamp safely. Follow instructions closely.
Conclusion
Creating a concrete spiral desk lamp is a fun and creative project. It adds style and light to any room. You can customize the design to fit your taste. The process is simple and rewarding. With patience, you will make a unique lamp that stands out.
Try this DIY project to brighten your workspace or home. Enjoy crafting something practical and beautiful with your own hands. Give it a go and see the results yourself!


