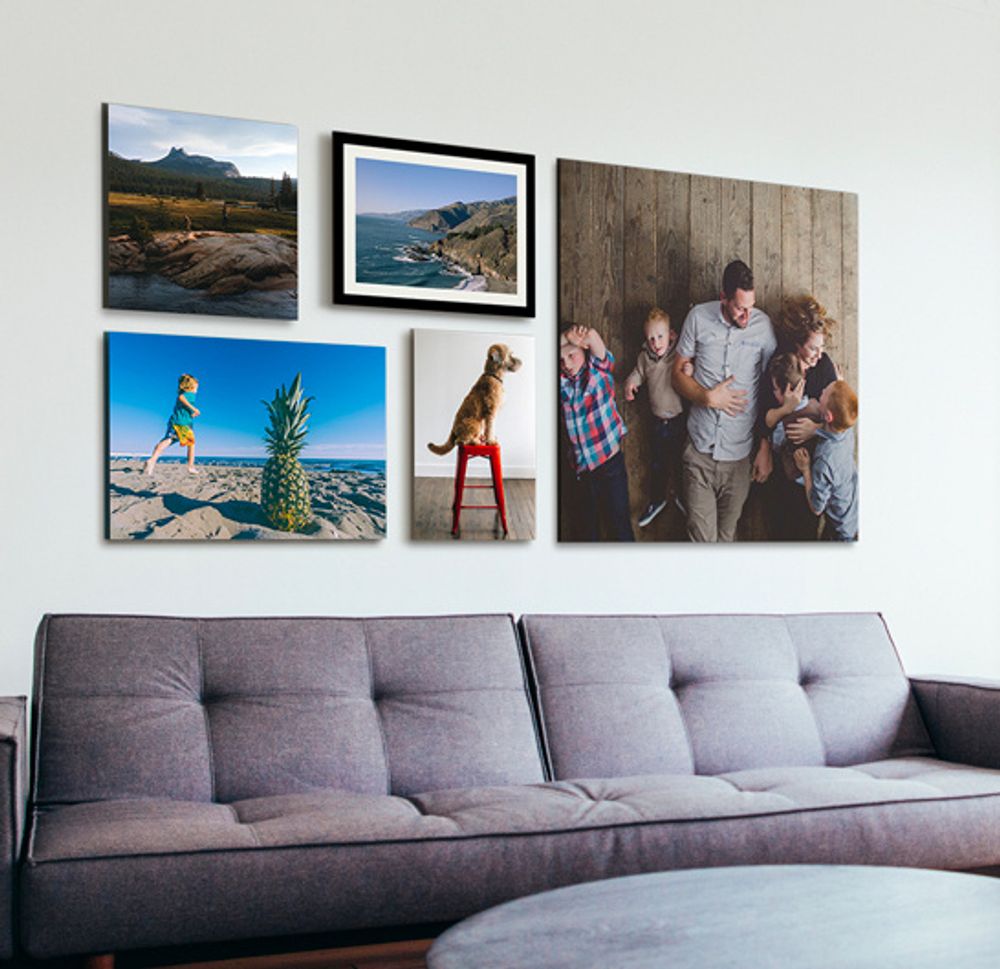
Have you ever wanted to turn your favorite photos into stunning wall art? Printing your photos on canvas is a simple way to bring your memories to life and add a personal touch to any room.
Imagine seeing your best moments displayed in vibrant colors and rich textures every day. In this guide, you’ll discover easy steps to create beautiful canvas prints that showcase your photos like never before. Keep reading, and you’ll learn how to make your pictures stand out and transform your space effortlessly.

Credit: thestackhouse.com
Choosing The Right Photo
Choose a clear, high-quality photo with good lighting and sharp details. Bright images with simple backgrounds work best on canvas. Pick pictures that tell a story or show special moments clearly.
Choosing the right photo is crucial for canvas printing. The right image ensures your canvas stands out and looks beautiful on your wall. You need a photo that tells a story and captures attention. Let’s explore key factors to consider.Selecting High-resolution Images
High-resolution images are essential for clear, sharp prints. Low-resolution photos appear blurry on large canvases. Choose an image with at least 300 DPI for best results. This ensures every detail is vivid and crisp.Considering Subject And Composition
Think about the subject of your photo. Does it convey the message you want? A strong composition adds balance and interest. Use the rule of thirds to position key elements. This makes your canvas more engaging.Using Filters And Edits
Filters can enhance or change a photo’s mood. Apply subtle edits to boost color and contrast. Avoid over-editing, which can distort the image. Small adjustments make your photo print-ready and vibrant.Picking Canvas Materials
Choosing the right canvas materials is key to making your photo print look stunning and last long. The feel, texture, and durability all depend on the canvas fabric, frame, and surface finish you pick. Let’s break down these elements to help you make a confident decision that fits your style and space.
Types Of Canvas Fabrics
There are mainly two types of canvas fabrics used for photo prints: cotton and polyester. Cotton canvas offers a natural texture and rich color depth, giving your photos a classic, artistic vibe. Polyester canvas, on the other hand, tends to be smoother and more resistant to moisture and stretching, making it ideal for vibrant, modern prints.
Ask yourself: do you want a textured, painterly feel or a sleek, sharp look? Cotton has that handcrafted charm, while polyester keeps colors crisp and bright. Some printers even blend both fabrics to balance durability and texture.
Frame Options And Thickness
The frame you choose not only supports your canvas but also influences its overall presentation. Thicker frames, like gallery wraps, give your photo a bold, three-dimensional effect by stretching the canvas around the edges. Slimmer frames offer a minimalist look that fits well in tight spaces or modern decor.
Consider where you’ll hang your print. A living room might benefit from a thick, sturdy frame that stands out, while a hallway might call for something lighter. Also, think about whether you want the edges of your photo to be visible or wrapped around the frame.
Surface Finishes
Surface finish affects how your photo looks under different lighting and how it feels to the touch. Matte finishes reduce glare and reflections, perfect for brightly lit rooms or photos with subtle details. Glossy finishes make colors pop and add a shiny effect, but they can show fingerprints and reflections easily.
There’s also satin or semi-gloss, which balances between matte and glossy, giving a soft sheen without too much shine. Which finish do you think would highlight your photo best? Sometimes testing a small sample can reveal surprising results.
Preparing Your Photo For Print
Preparing your photo for print is a key step in getting great canvas results. This process ensures your image looks sharp and vibrant on the final product. Adjusting the photo’s size, colors, and format helps avoid common printing issues. Taking time here saves effort and improves the quality of your canvas art.
Cropping And Resizing
Cropping removes unwanted parts of your photo. Focus on the main subject and remove distractions. Canvas prints have specific size requirements. Resize your image to match the print dimensions. Keep the aspect ratio to prevent stretching or squashing. Use photo editing software for precise control.
Color Correction Tips
Colors on screen differ from printed colors. Adjust brightness and contrast to enhance details. Increase saturation slightly for richer colors. Avoid overly dark or bright areas that lose detail. Softening shadows helps maintain natural tones. Use a calibrated monitor to see true colors.
File Formats And Resolution
Save your photo in the correct format to keep quality. JPEG is common but can lose detail with compression. TIFF and PNG keep more image data and work well for printing. Set resolution to at least 300 DPI for sharp prints. Low resolution causes blurry or pixelated results. Check file size to ensure it meets printer requirements.
Printing Methods For Canvas
Printing photos on canvas brings your memories to life with texture and depth. Choosing the right printing method affects the final look and quality. Several printing options suit different needs and budgets. Understanding these methods helps you get the best result for your canvas art.
Inkjet Vs. Giclée Printing
Inkjet printing sprays tiny ink droplets onto the canvas. It offers good color and detail. Common home and office printers use this method.
Giclée printing is a type of inkjet printing but with higher quality. It uses archival inks and fine nozzles. This method produces sharper images and richer colors. Giclée prints last longer without fading.
Using Home Printers
Home printers can print on special canvas sheets. These sheets have a coating that holds ink well. Printing at home is quick and cost-effective. But home printers may lack color accuracy and durability.
Use high-quality ink and canvas paper for better results. Adjust printer settings to match the canvas type. Test prints can help avoid mistakes on the final canvas.
Professional Printing Services
Professional services offer superior canvas printing options. They use advanced printers and premium materials. Services include color correction and image enhancement.
Many offer custom sizes and finishes, like matte or glossy. Professionals ensure your photo looks vibrant and lasts long. This option suits important or large prints.
Stretching And Mounting Canvas
Stretching and mounting canvas is a key part of printing your photos on canvas. It gives your photo a professional, polished look. Proper stretching keeps the canvas tight and smooth, avoiding wrinkles or sagging. Mounting the canvas onto a frame ensures it stays secure and ready to hang.
This process requires care and the right tools. It also needs patience to avoid damaging the photo or canvas. The following sections explain the tools needed, how to stretch the canvas, and how to secure it on the frame.
Tools You’ll Need
- Canvas print
- Wooden stretcher bars or frame
- Staple gun with staples
- Canvas pliers
- Measuring tape or ruler
- Scissors
- Hammer (optional for securing staples)
Step-by-step Stretching Process
- Lay the canvas face down on a clean surface.
- Assemble the stretcher bars to create the frame.
- Place the frame on the center of the canvas.
- Fold the canvas edges over the frame sides.
- Use canvas pliers to pull the canvas tight on one side.
- Staple the canvas to the frame’s back, starting at the center.
- Move to the opposite side, pull tight, and staple again.
- Repeat for the other two sides, keeping the canvas taut.
- Work from the center toward the corners, stapling every few inches.
- Fold and tuck corners neatly; staple securely.
Securing The Canvas Frame
- Check that the canvas is tight and wrinkle-free.
- Hammer any staples that are not flush with the frame.
- Add corner braces if the frame feels loose.
- Attach hanging hardware to the back of the frame.
- Store or hang the canvas in a dry place.
Credit: www.canvaspeople.com
Protecting And Finishing Your Artwork
Protecting and finishing your canvas artwork is essential to keep your photos vibrant and lasting. Without the right care, your beautiful prints can fade, get damaged, or lose their visual impact over time. Taking a few extra steps after printing ensures your canvas art stays stunning for years.
Applying Varnish Or Sealants
Adding a varnish or sealant creates a protective layer over your printed canvas. It guards against dust, moisture, and UV light, which can dull colors or cause fading. You can choose between gloss, satin, or matte finishes depending on the look you want.
Use a soft brush or spray to apply the varnish evenly. Make sure you work in a well-ventilated area and allow the canvas to dry completely before handling. Have you tried testing a small corner first? It helps you avoid surprises with the finish.
Framing And Hanging Tips
Framing your canvas adds a polished look and extra protection. Floating frames are popular because they highlight the depth of the canvas without covering the edges. Choose a frame that complements your photo’s colors and style.
When hanging, use sturdy hooks and avoid direct sunlight to preserve color vibrancy. Consider placing your canvas away from humid areas like bathrooms to prevent warping. How could your wall space change the way your art feels in the room?
Maintaining Canvas Art
Regular maintenance keeps your canvas looking fresh. Dust it gently with a soft cloth or a feather duster to avoid scratches. Avoid using water or cleaning chemicals, as they can damage the surface.
Check for signs of wear or damage periodically. If you spot any issues, act quickly to prevent further problems. How often do you think your canvas art needs a little TLC?
Creative Ideas For Display
Displaying your canvas prints creatively can transform any room. It brings life and personality to your space. Choosing unique ways to show off your photos makes your walls more interesting. It also highlights your favorite memories and art styles beautifully.
Gallery Wall Arrangements
Create a gallery wall by grouping several canvas prints together. Use different sizes and shapes for visual interest. Arrange them in a grid or an organic cluster. Leave equal space between each canvas for balance. Use frames or leave canvases unframed for a modern look. This style fills large walls and tells a story with images.
Mixing Canvas With Other Art
Combine canvas prints with paintings, posters, or photographs. Mix textures and materials to add depth to your display. Place canvas prints alongside shelves, plants, or decorative objects. This blend creates a layered, dynamic wall. It also lets you showcase various art forms in one spot.
Personalized Gift Options
Canvas prints make thoughtful, personalized gifts. Print cherished family photos or favorite moments for loved ones. Add text or dates to mark special occasions. Choose sizes that fit different spaces, like desks or walls. Personalized canvases show care and create lasting memories. Perfect for birthdays, anniversaries, or holidays.
Credit: www.canvaspeople.com
Frequently Asked Questions
How Do I Prepare Photos For Canvas Printing?
To prepare photos, use high-resolution images with at least 300 DPI. Edit brightness and contrast for clarity. Crop the photo to fit the canvas size. Save the file in JPEG or PNG format. This ensures sharp and vibrant canvas prints.
What Canvas Size Is Best For Photo Printing?
Choose a canvas size based on your wall space and photo detail. Common sizes are 16×20, 20×30, or 24×36 inches. Larger canvases highlight details but require high-resolution images. Select a size that complements your photo and room decor.
Can I Print Photos On Canvas At Home?
Yes, you can print photos on canvas at home using a specialized printer. Use canvas sheets compatible with your printer. However, professional services often provide better quality and durability. Home printing is ideal for small projects or practice.
How Long Does Canvas Photo Printing Take?
Canvas photo printing usually takes 1 to 3 days with professional services. This includes printing, drying, and stretching the canvas. Home printing time varies based on equipment and drying conditions. Plan ahead for timely delivery or display.
Conclusion
Printing your photos on canvas brings your memories to life. Choose a good photo with clear details. Pick the right size and style to fit your space. Use quality materials for long-lasting results. Remember to check the resolution before printing.
Enjoy the warm, personal touch canvas art adds to your home. Try it yourself and see how it changes your room’s feel. Simple steps, great outcome. Your photos deserve to be seen in a beautiful way.